MANAGEMENT SYSTEM WEBSITE
1. Login
Users can log in to the management system in one of the following ways:
1.1 - Login using Username and Password
On the Login page, users enter their registered Username and Password in the system, then click the "Login" button.
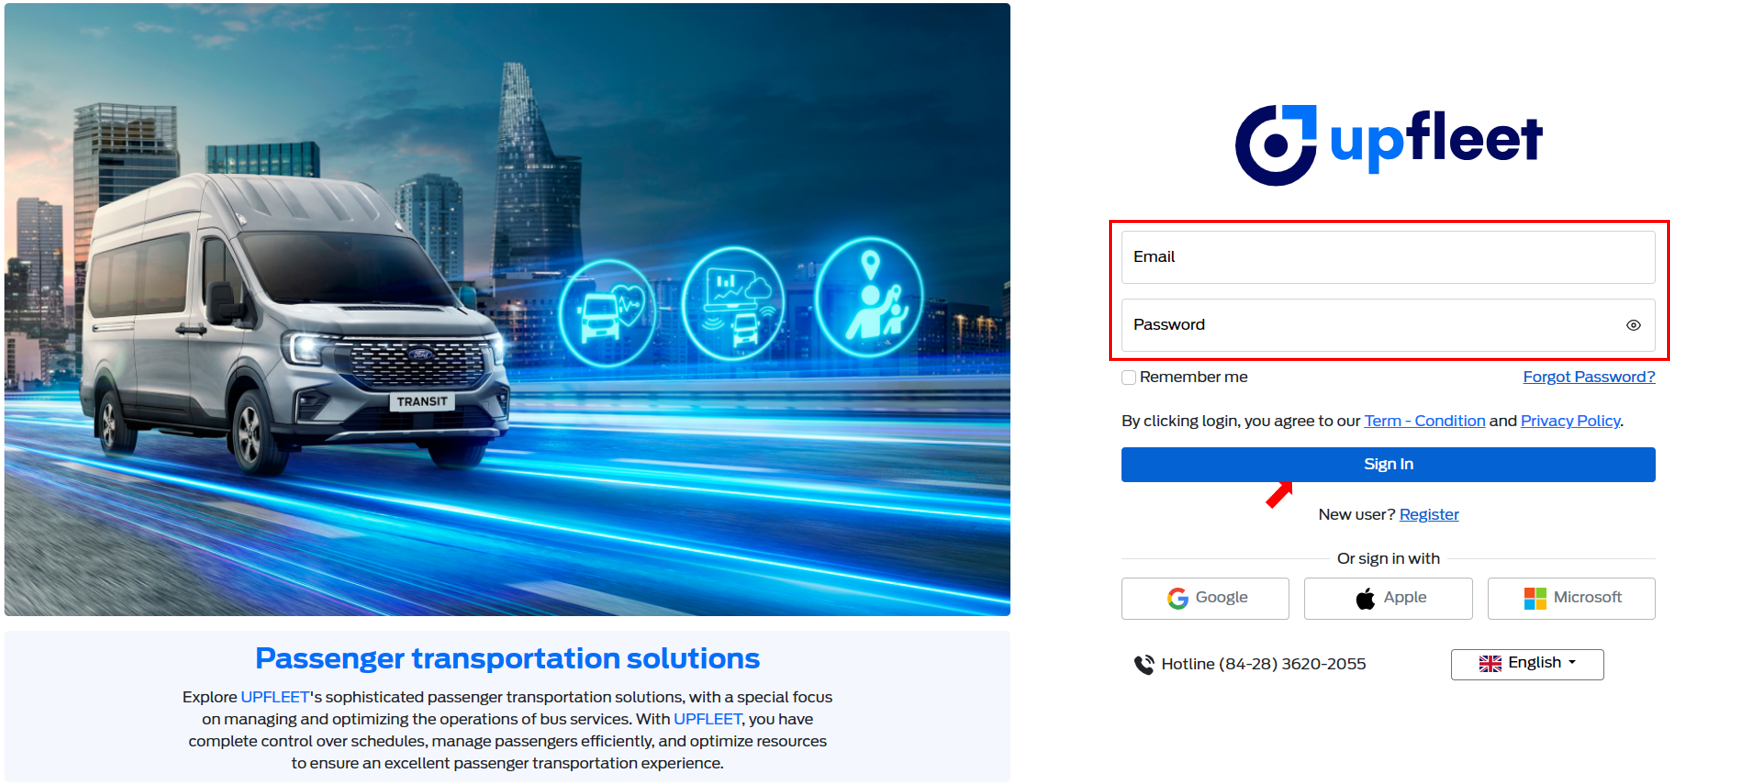
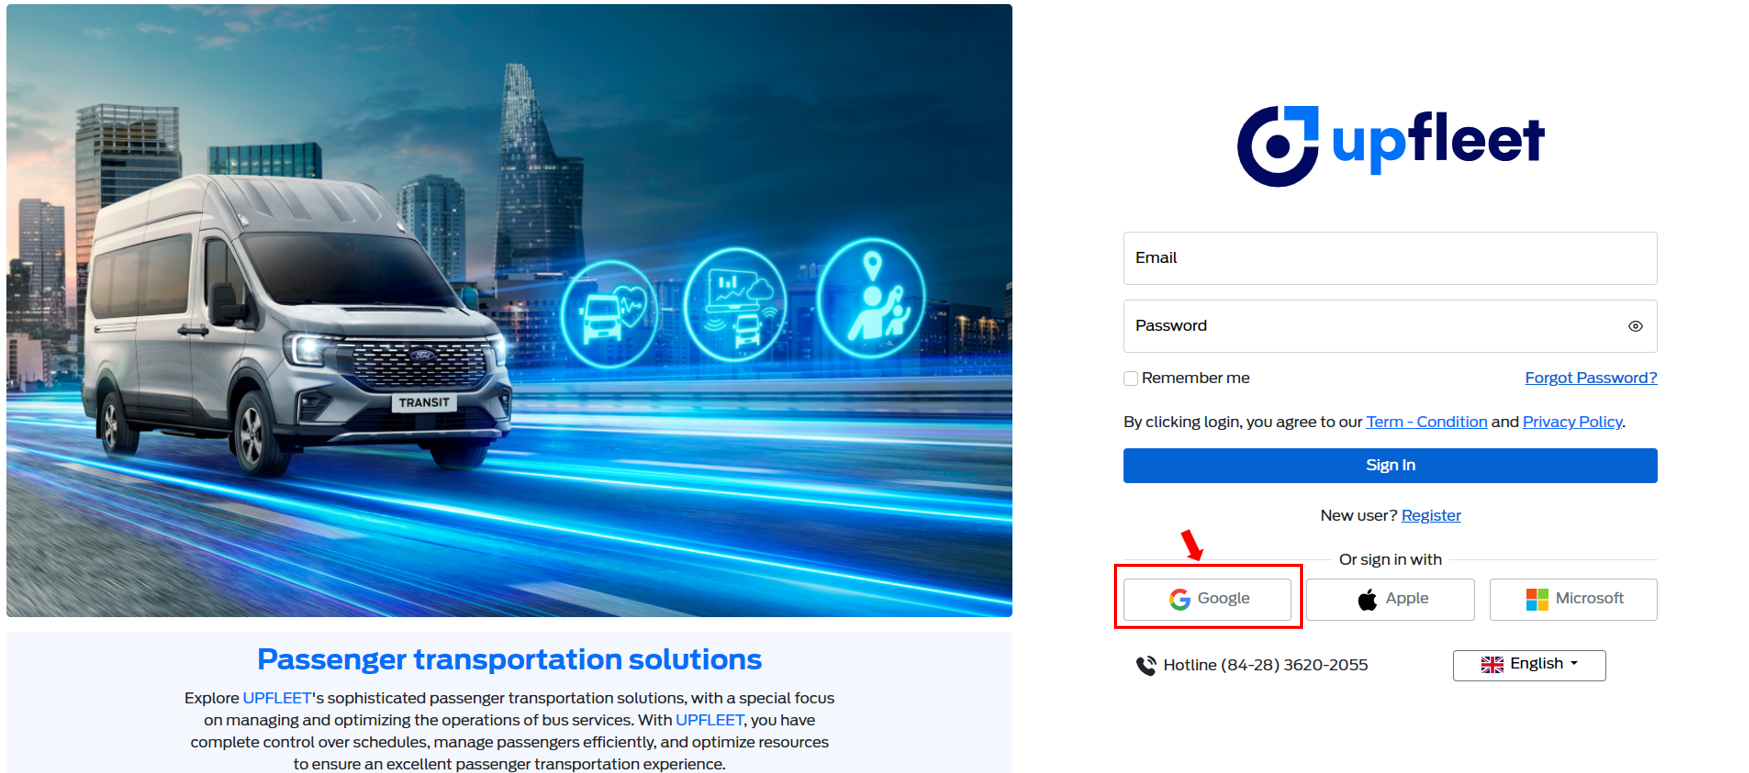
1.2 - Login using Google
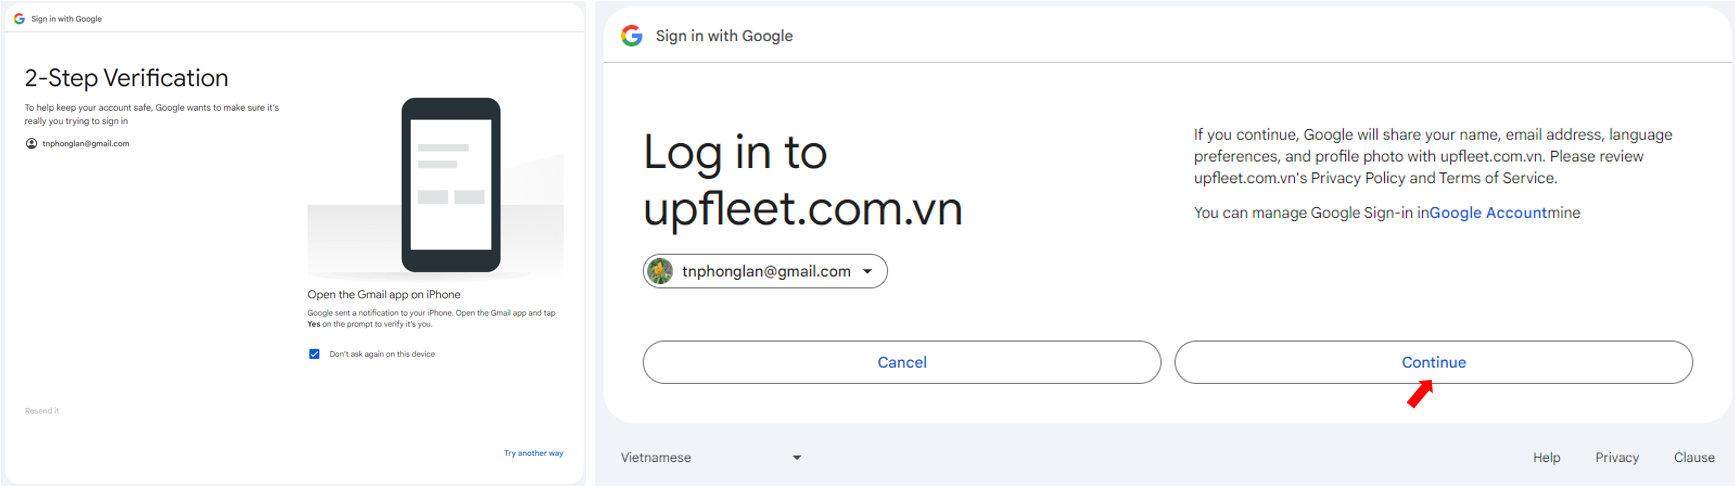
On the Login page, users click on the "Google" button.
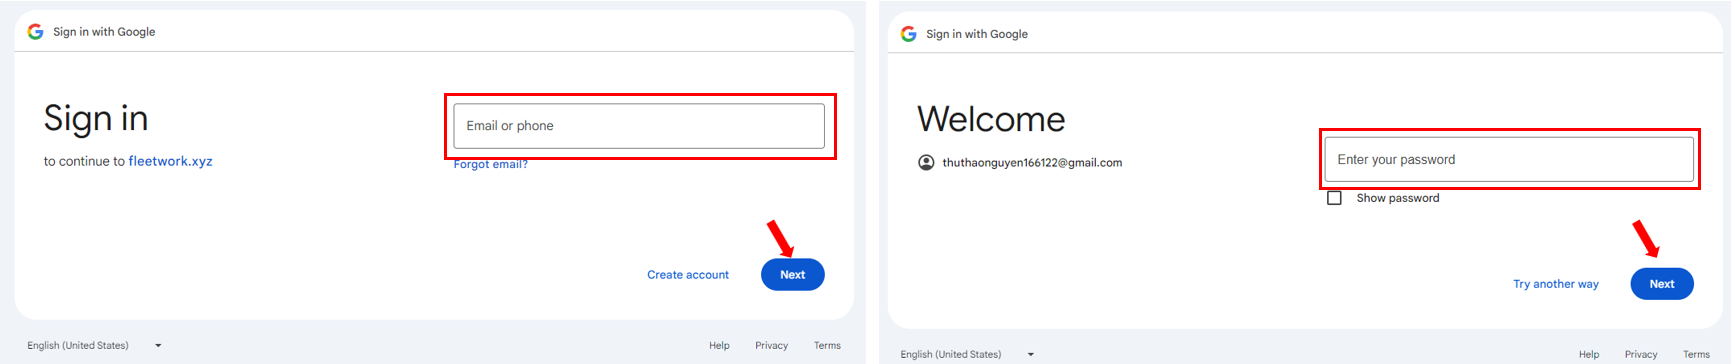
- In case the Email is not registered in the system Enter your Google account Email and Password, then click "Next" button.
Follow the Google login verification instructions and click "Continue" button.
 On the Workspace List page, create a new Workspace to start using the system.
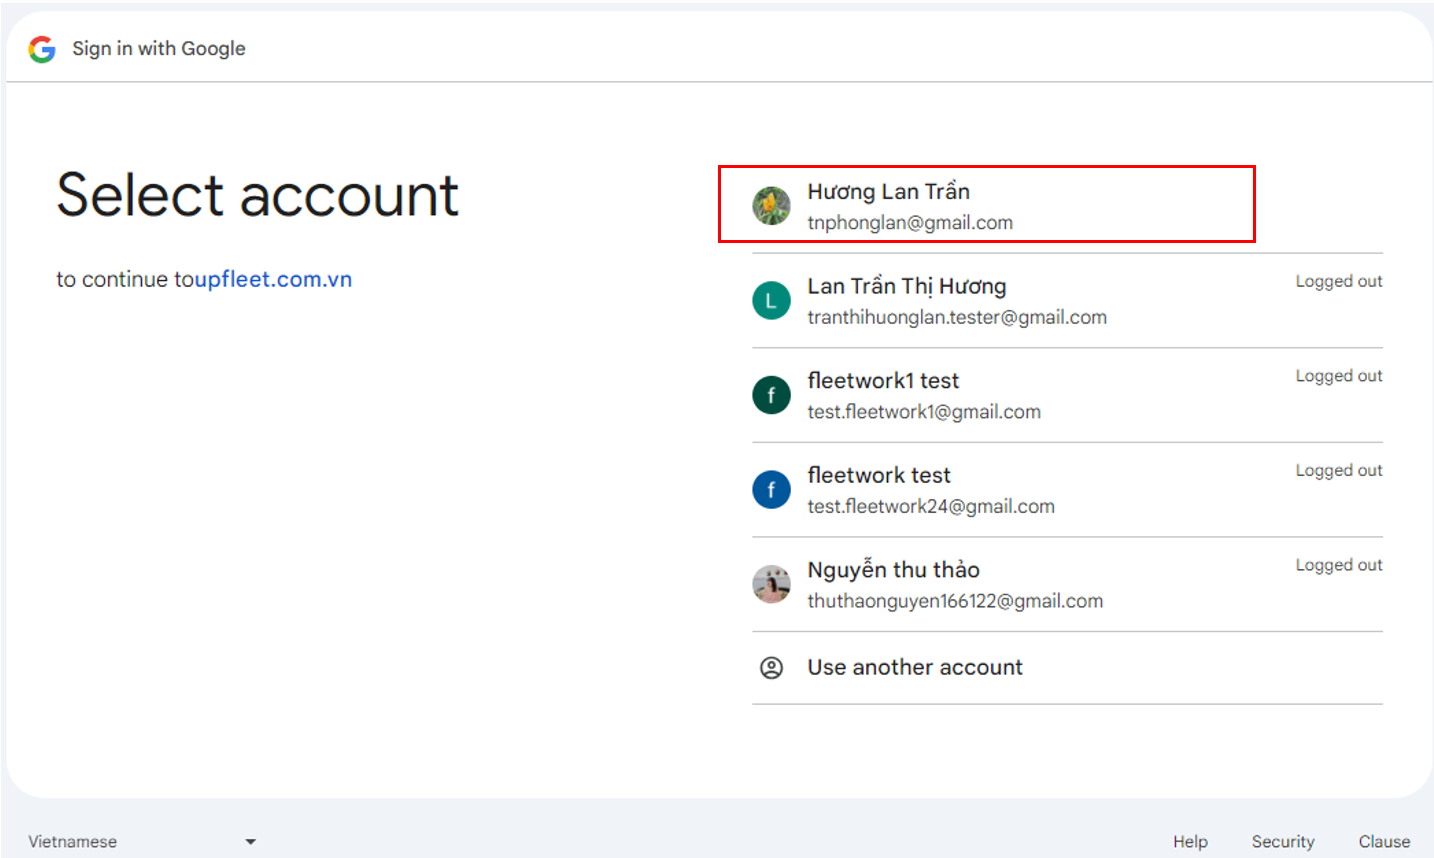
- In case the Email is already registered in the system
Select the Google Email you registered with the system.
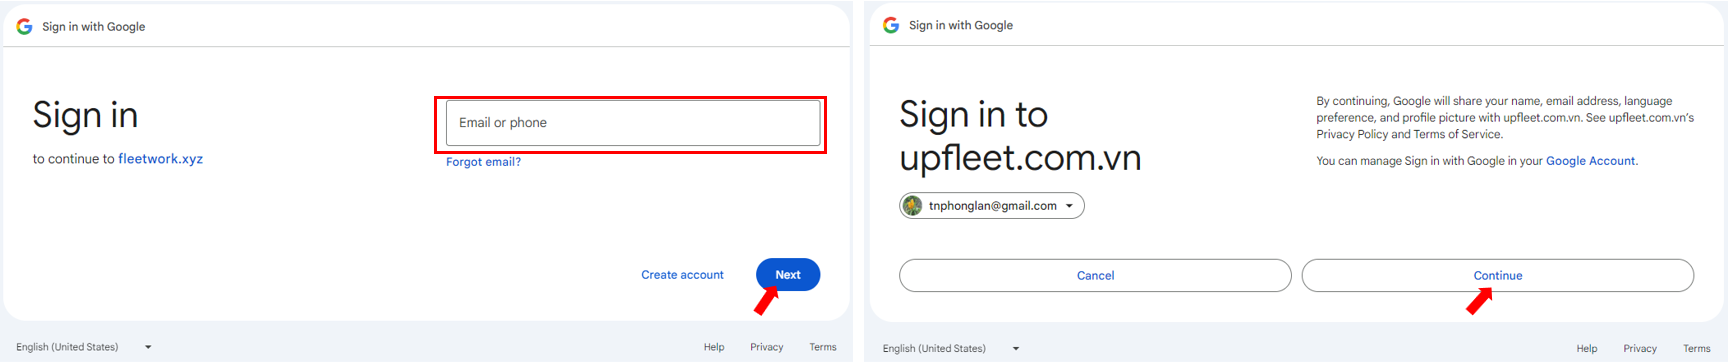
 Enter your Google account password and click "Next". The system will display a message prompting you to click "Continue" to complete the process.
 On the Workspace List page, select the Workspace you want to work in.
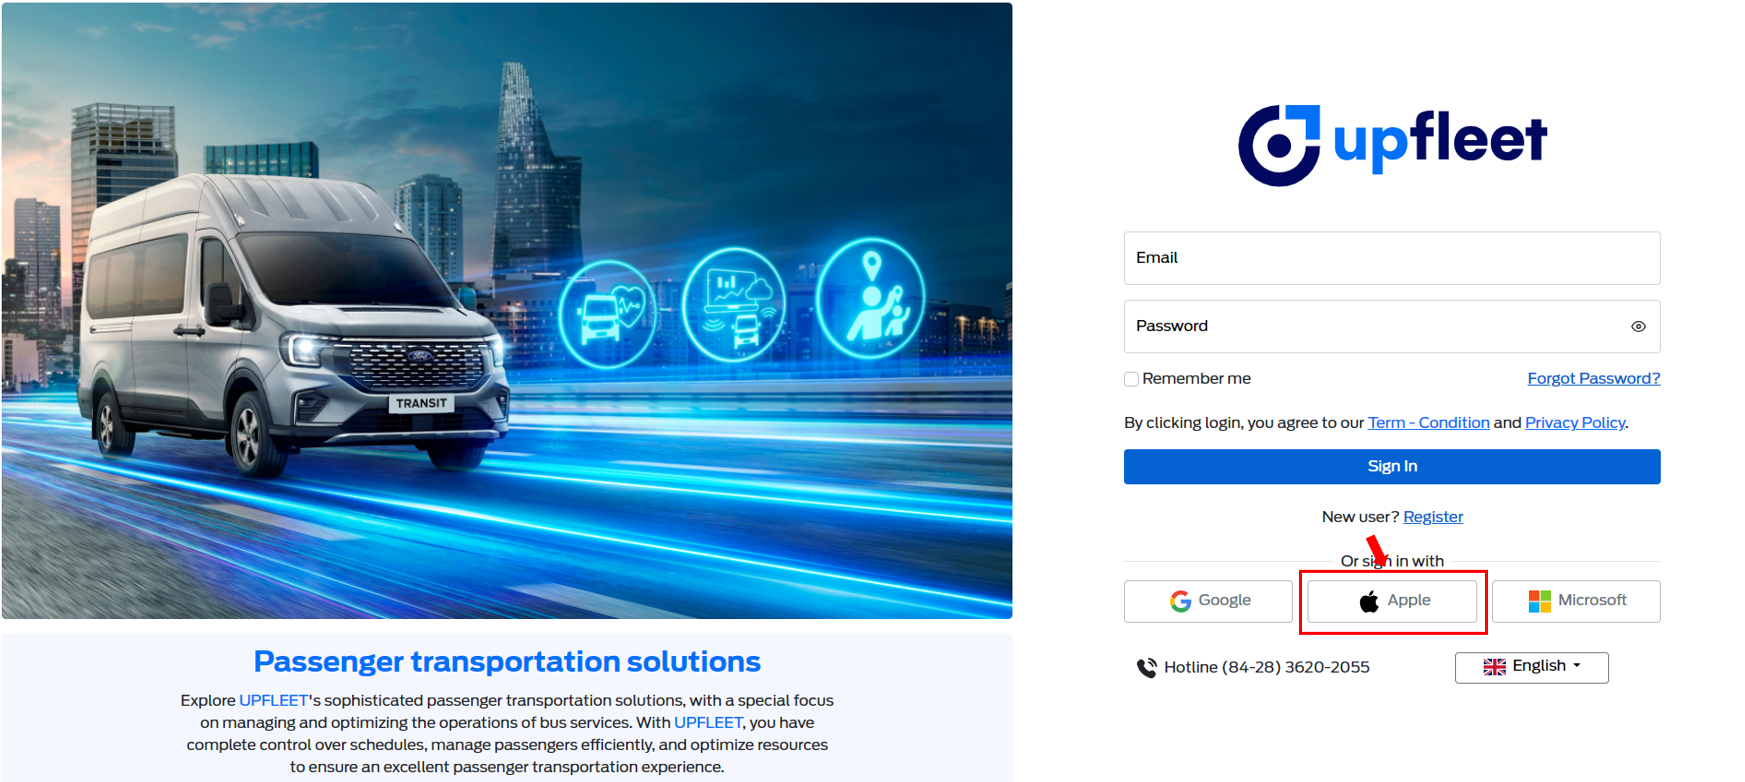
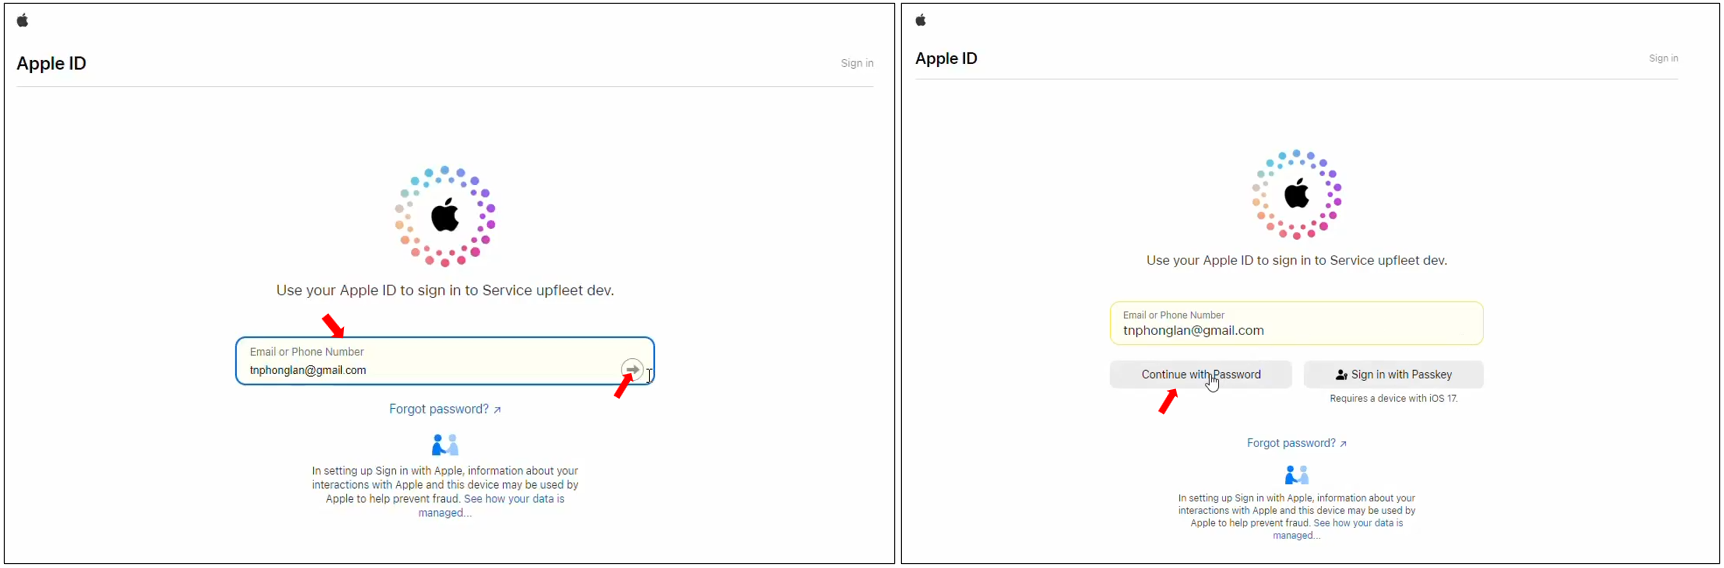
1.3 - Login using Apple
On the Login page, users click on the "Apple" button.
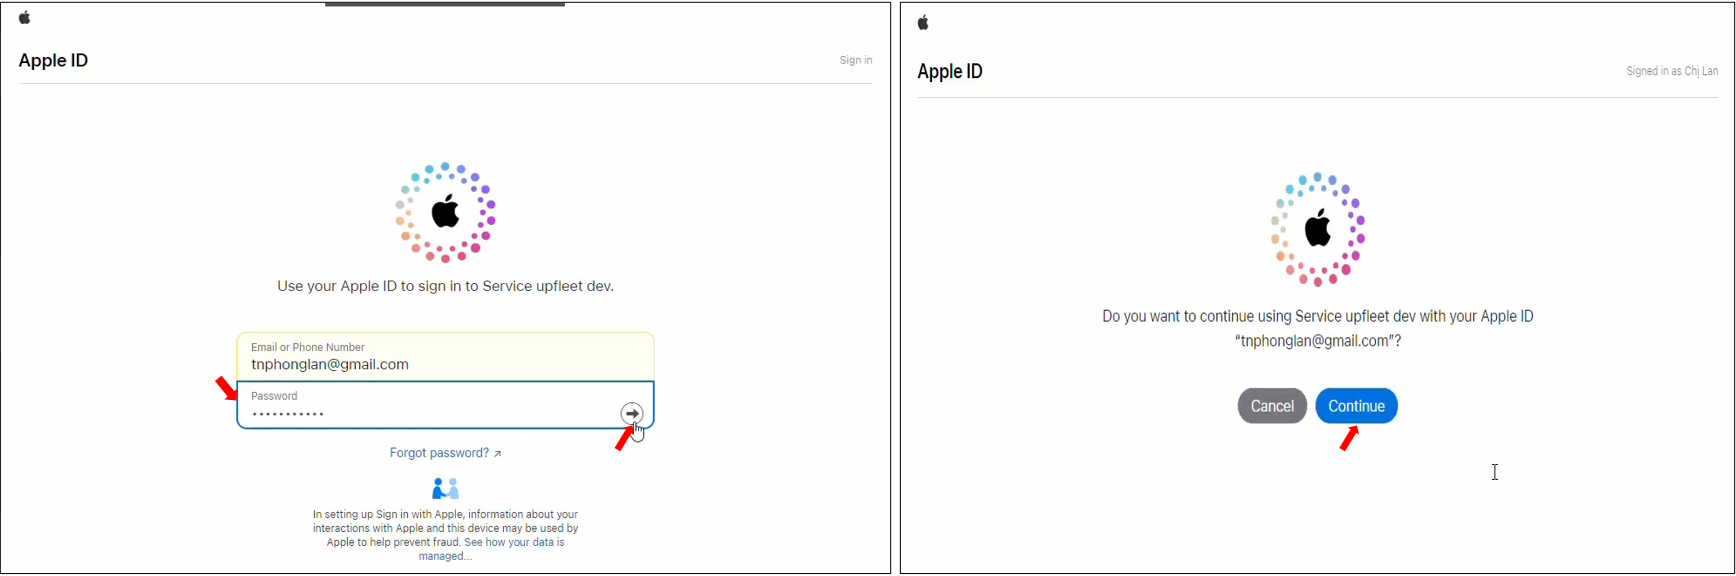
 Enter your Apple account Email and Password, then click "Continue" button.
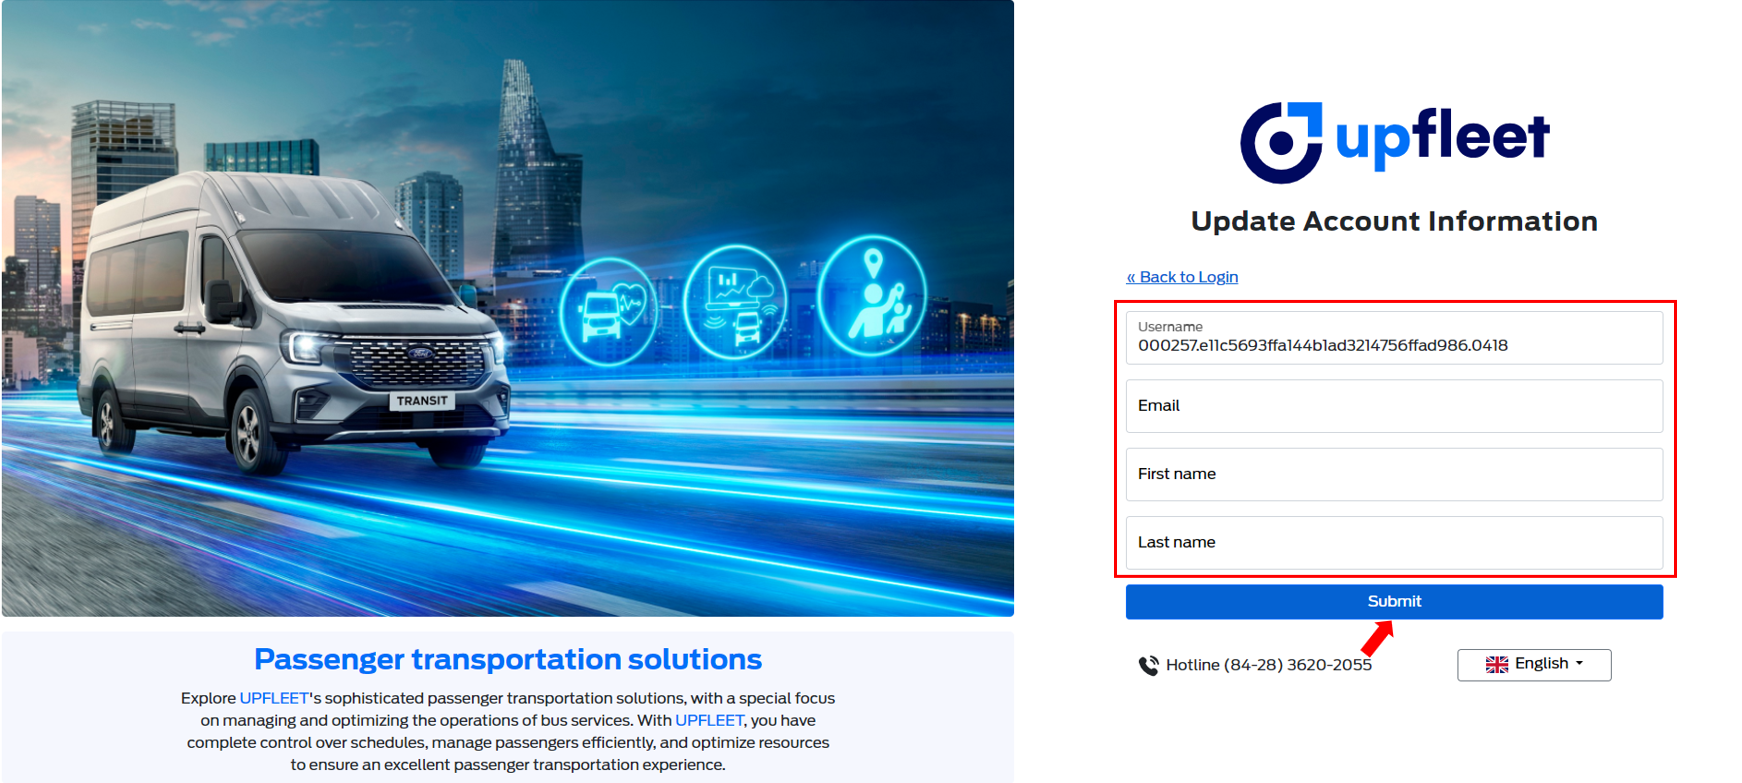
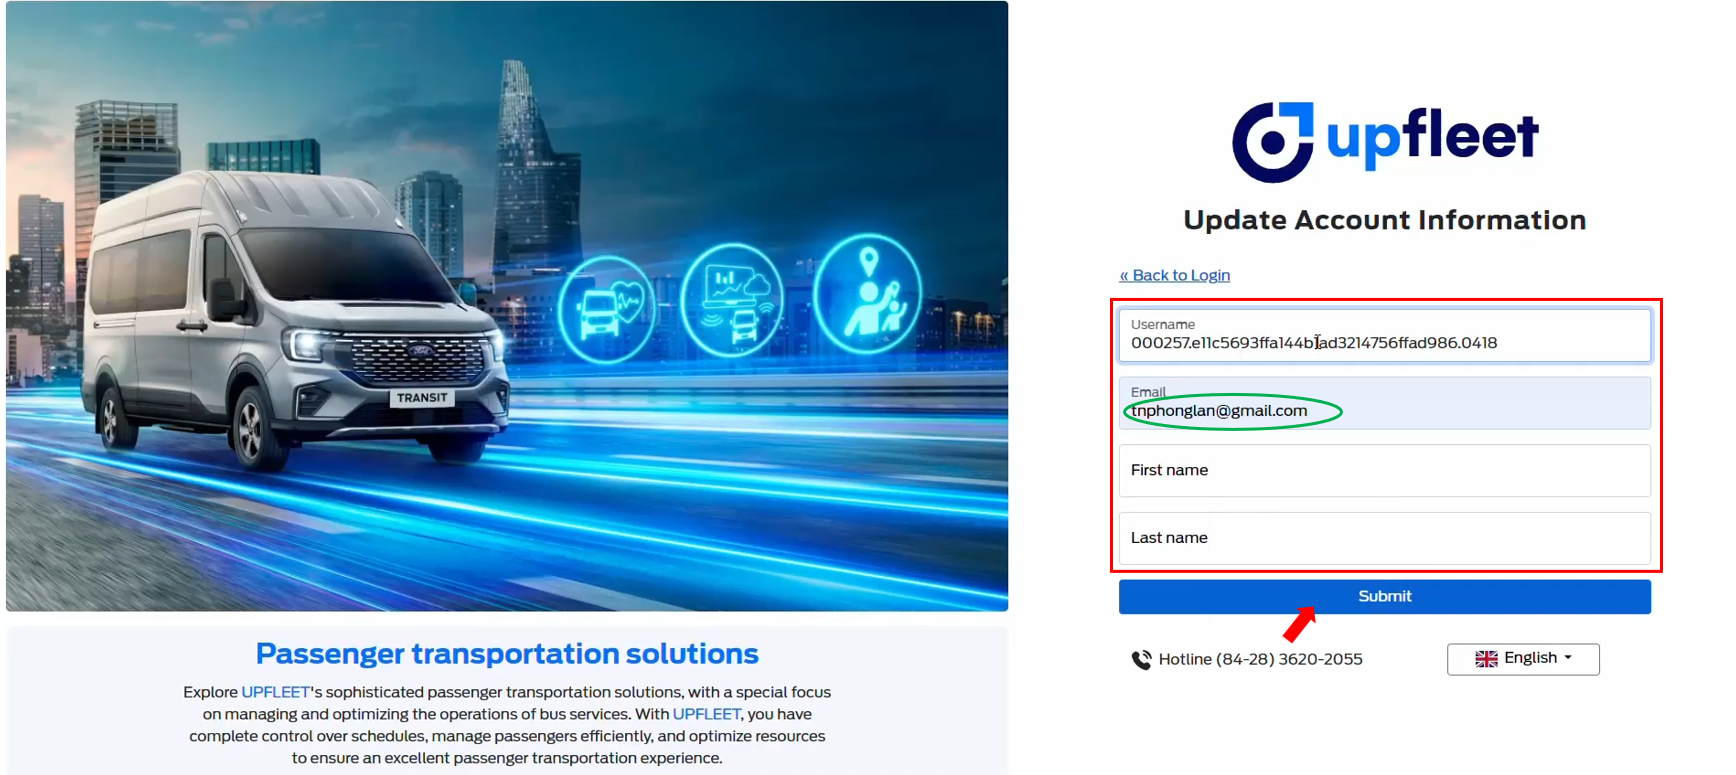
- In case the Email is not registered in the system
On the "Update Account Information" page, enter your account details and click the "Submit" button. Note that for the Email field, you can use your Apple account email or another email address.
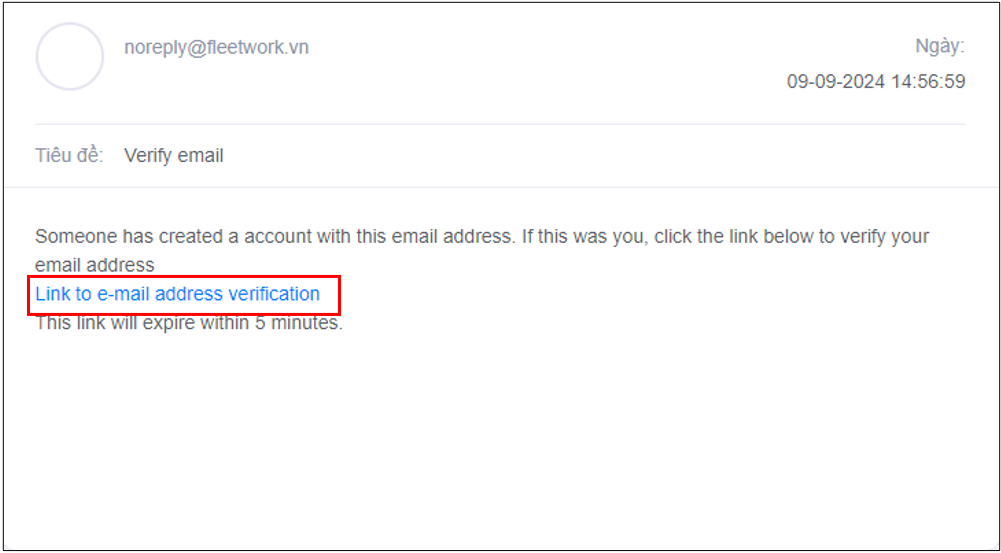
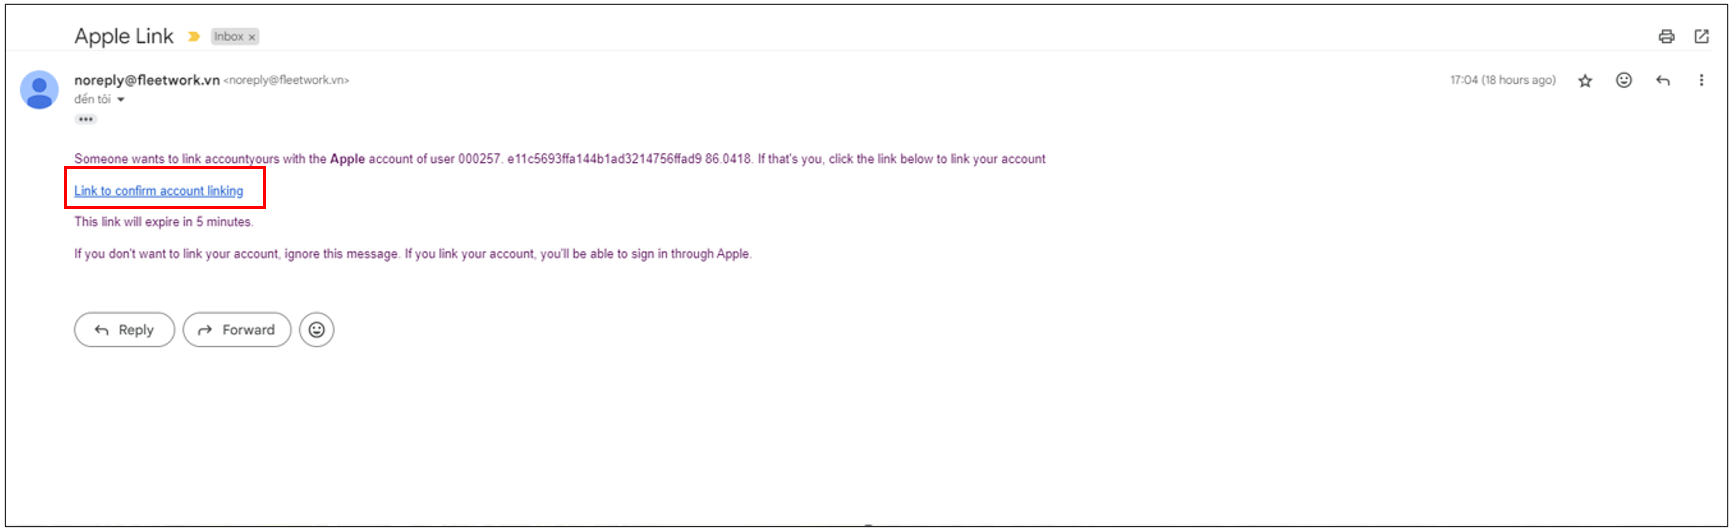
 The system will send a verification email to the address you just entered. Click the link in the email to verify and complete the process.
 On the Workspace List page, create a new Workspace to start using the system.
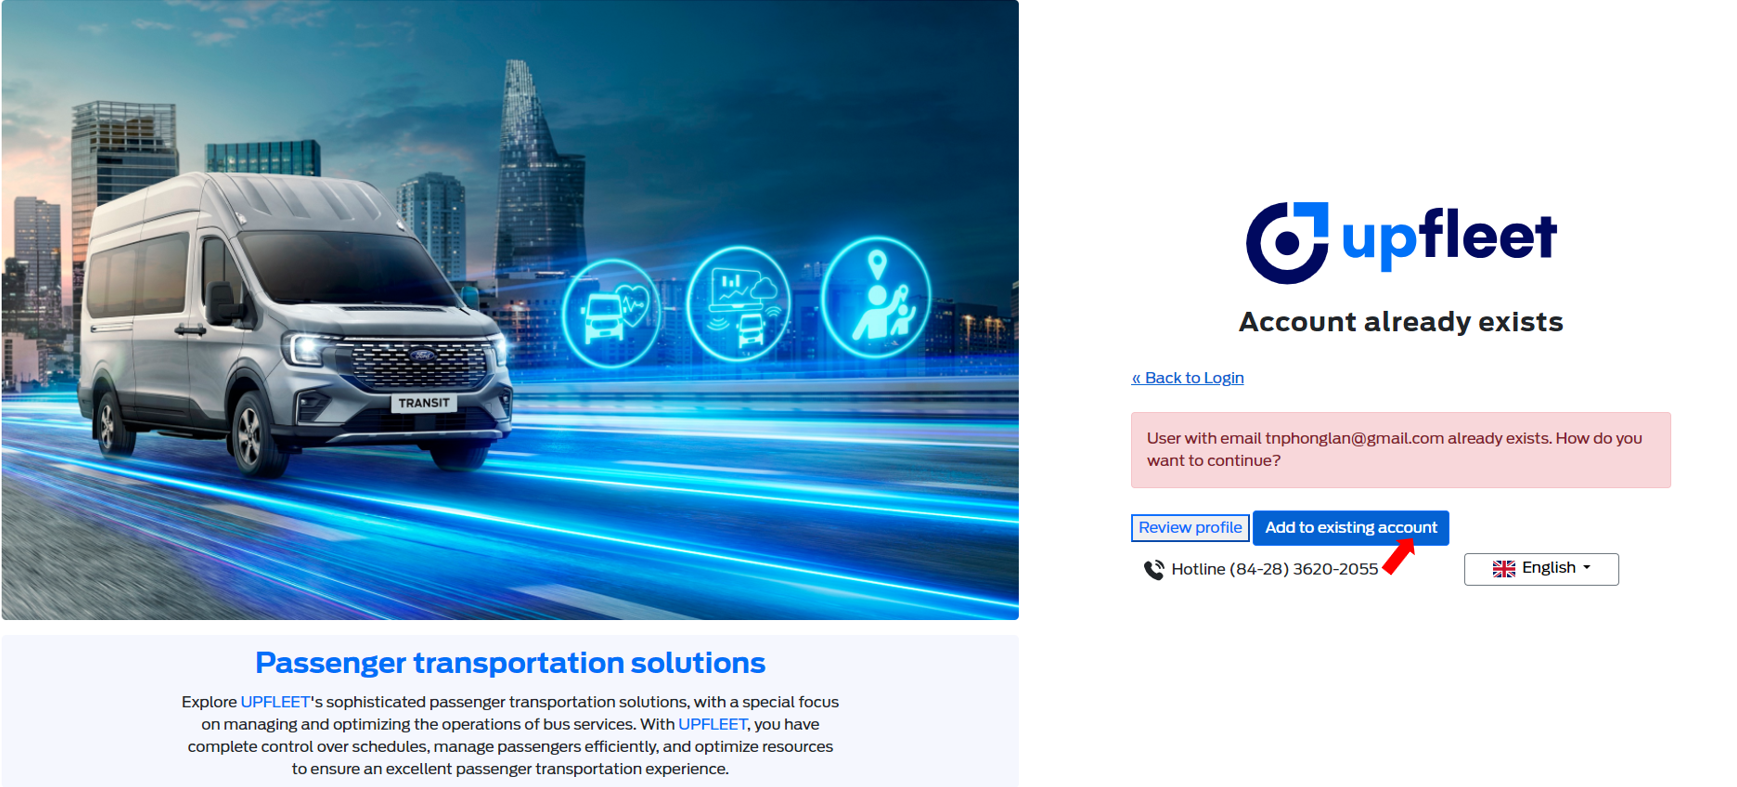
- In case the Email is already registered in the system: The email associated with your Apple account has been added to the system but you have not yet logged in using Apple within the system.
On the "Update Account Information" page, enter your account details and click the "Submit" button. Note that for the Email field must be the one registered in the system.
 Click the "Add to current account" button: the system will add the Apple login method to your existing account.
 The system sends a verification email to the email you entered: click on the link in the email to verify and complete the process.
 On the Workspace List page, select the Workspace you want to work in.
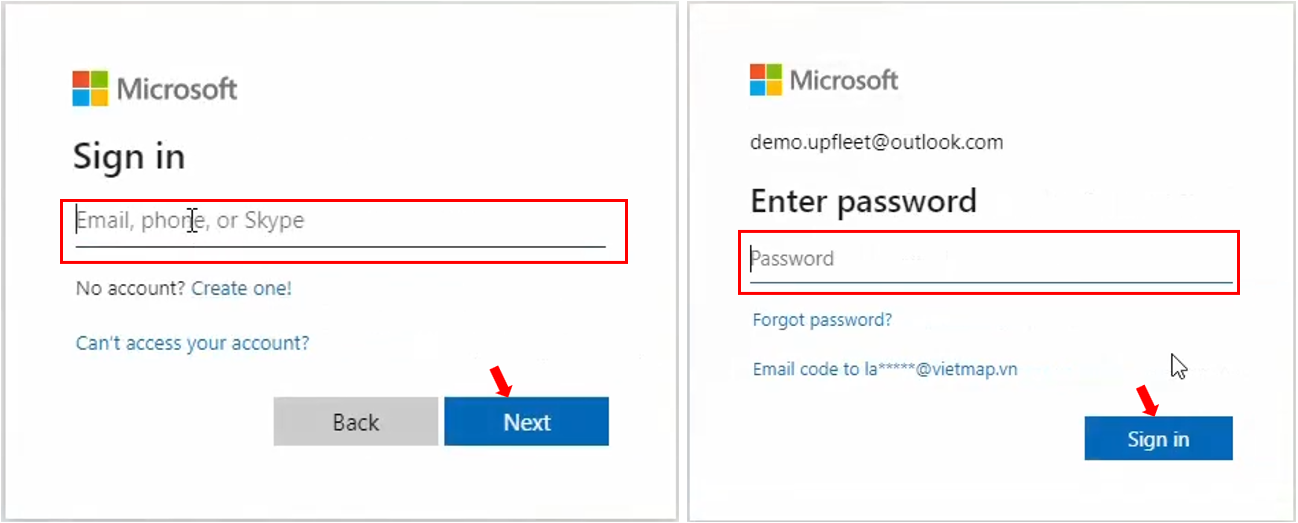
1.4 - Login using Microsoft
On the Login page, users click on the "Microsoft" button.
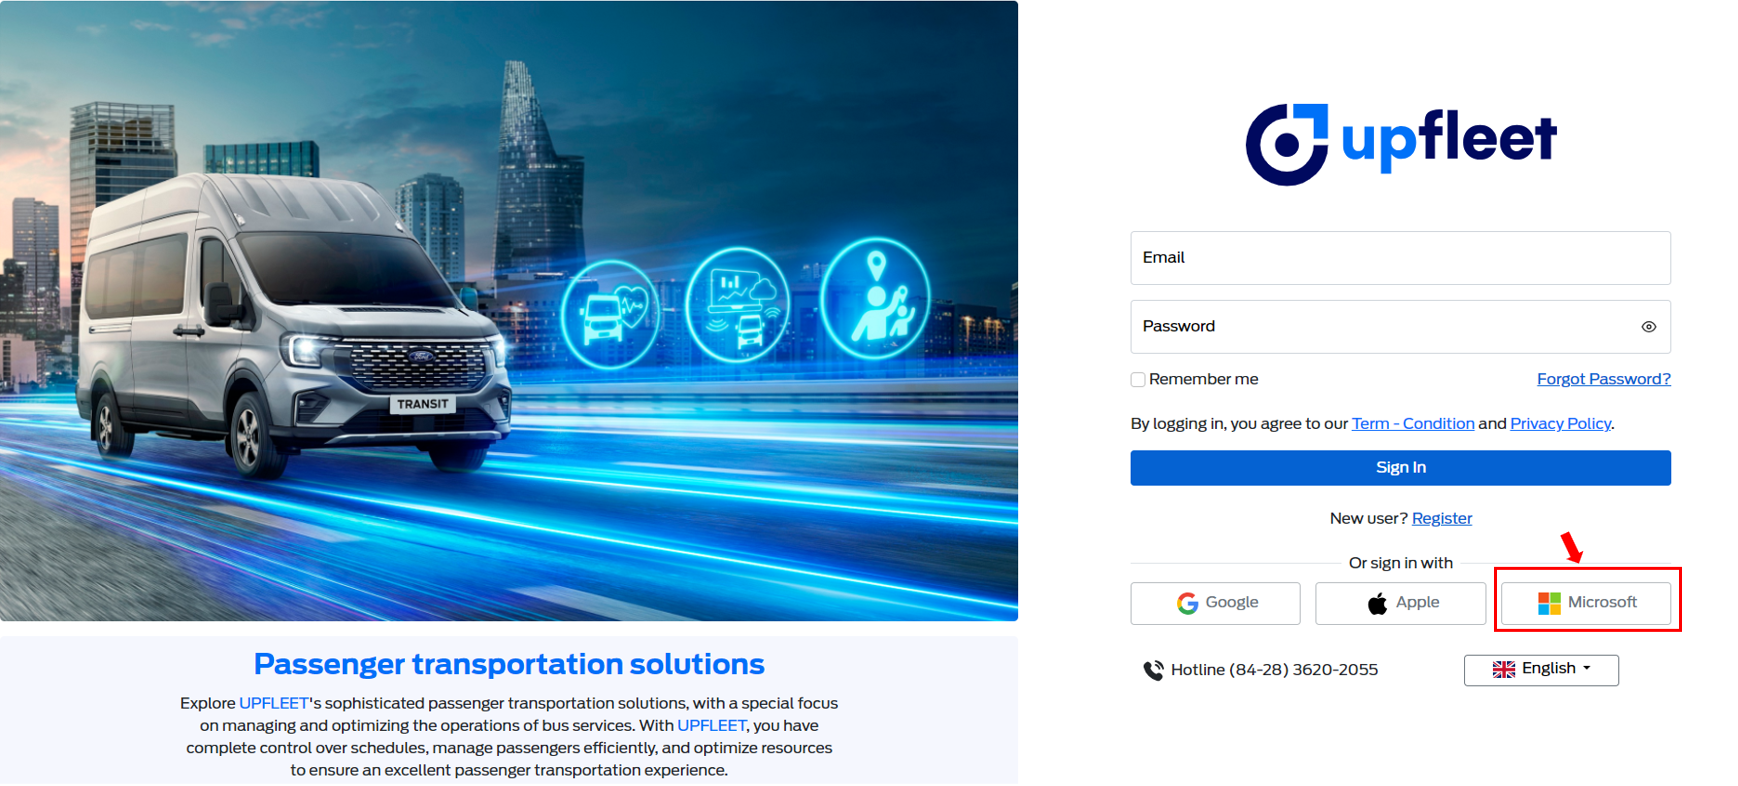 Enter your Microsoft account Email and Password, then click "Sign in".
-
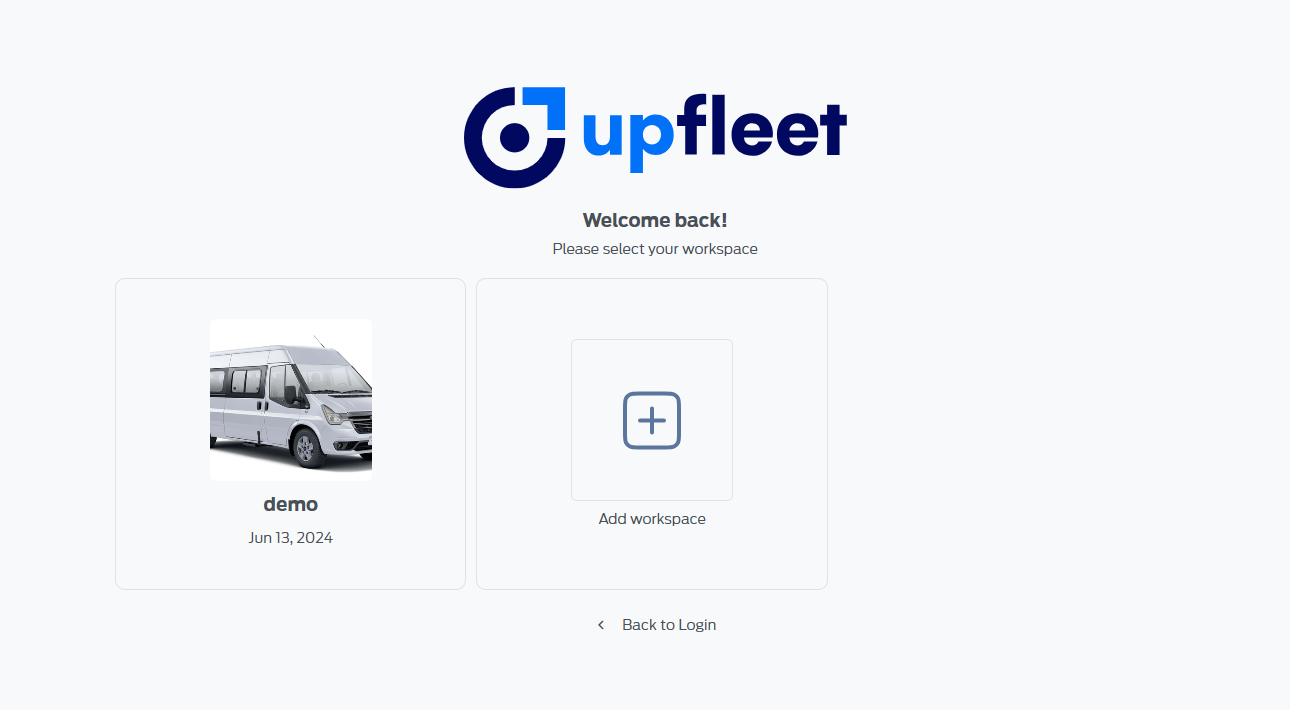
In case the Email is not registered in the system: On the Workspace List page, create a new Workspace to start using the system.
-
In case the Email is already registered in the system: On the Workspace List page, select the Workspace you want to work in.
2. Workspace
Workspace is defined as a workspace for a company or organization in the Upfleet system. Each Workspace will have full features such as:
- Vehicle management
- Employee management
- Route, bus, trip management
- Vehicle rental management
- ...
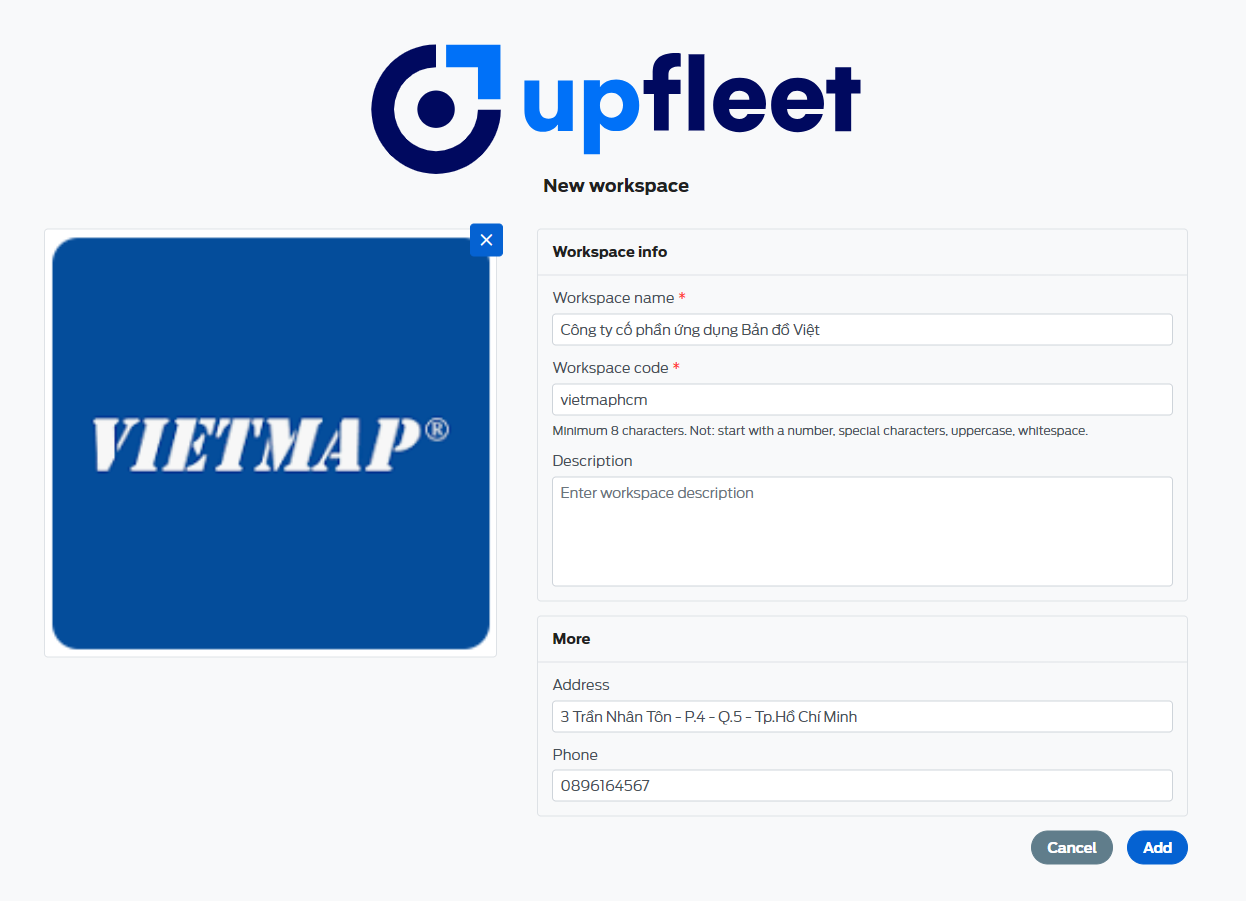
Create Workspace
At the Workspace list interface, the user clicks on "Add workspace", the system will go to the Workspace creation interface, the user enters complete information and clicks "Add" to create Workspace.
3. Vehicle management
The place to manage all vehicles of the garage.

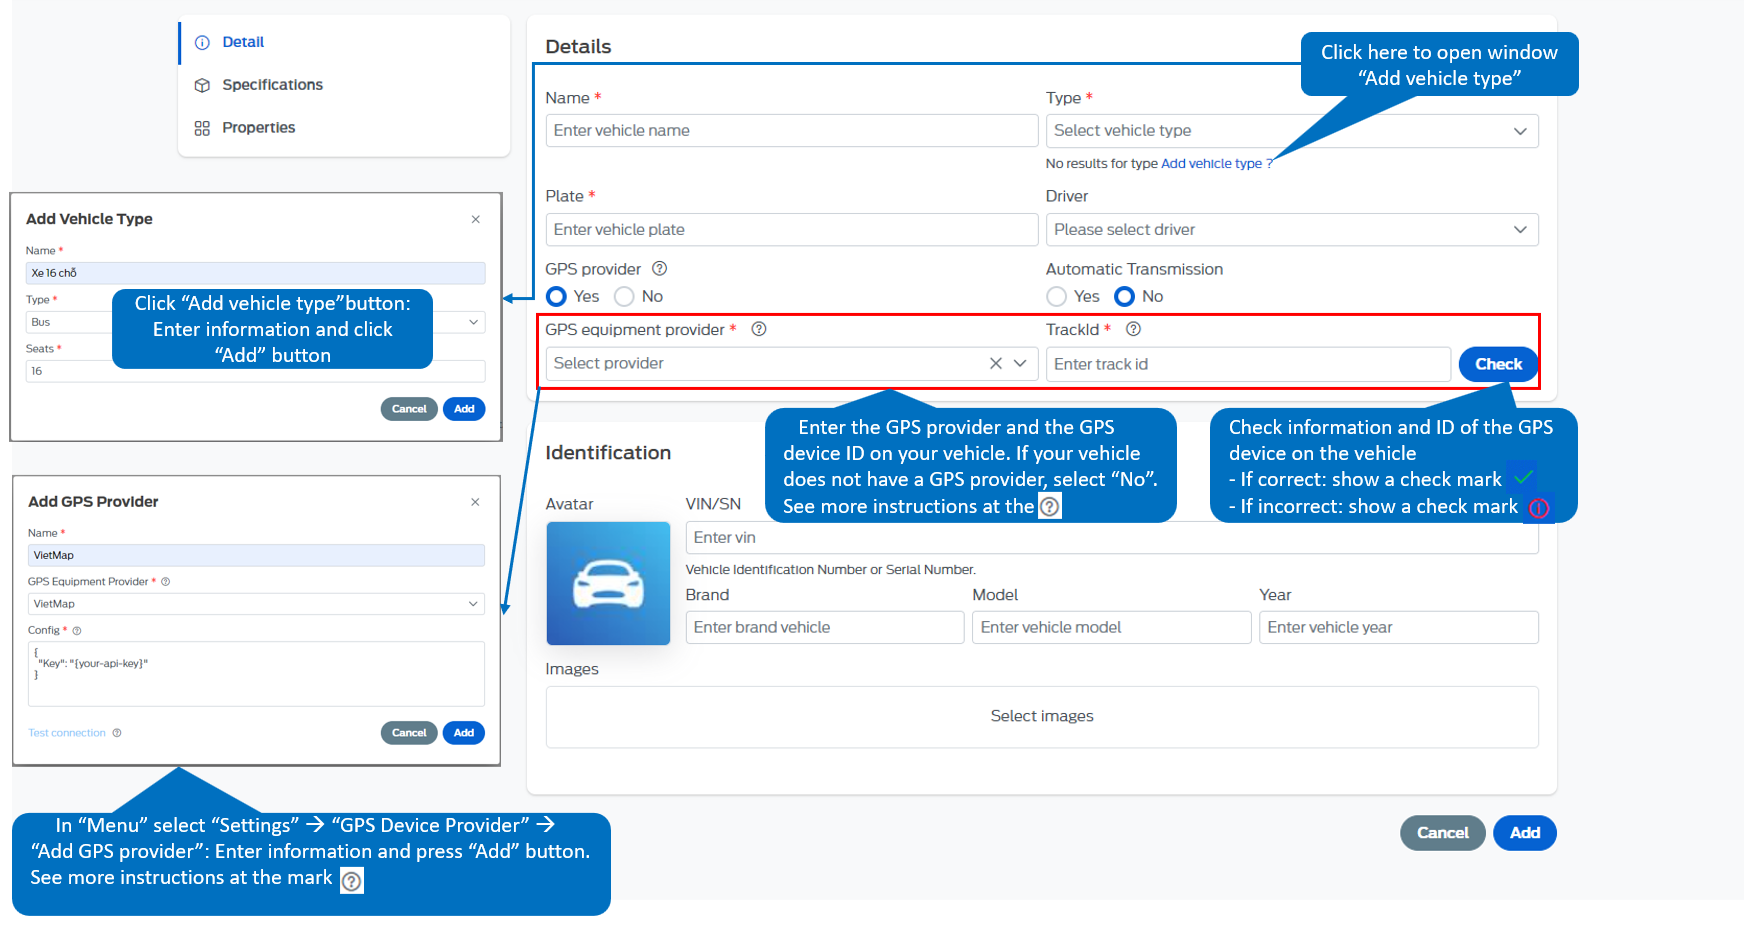
3.1 - Add vehicle
-
In the vehicle list, click on the "Add vehicle" button.
-
Fill in the vehicle information as shown below and click "Add".
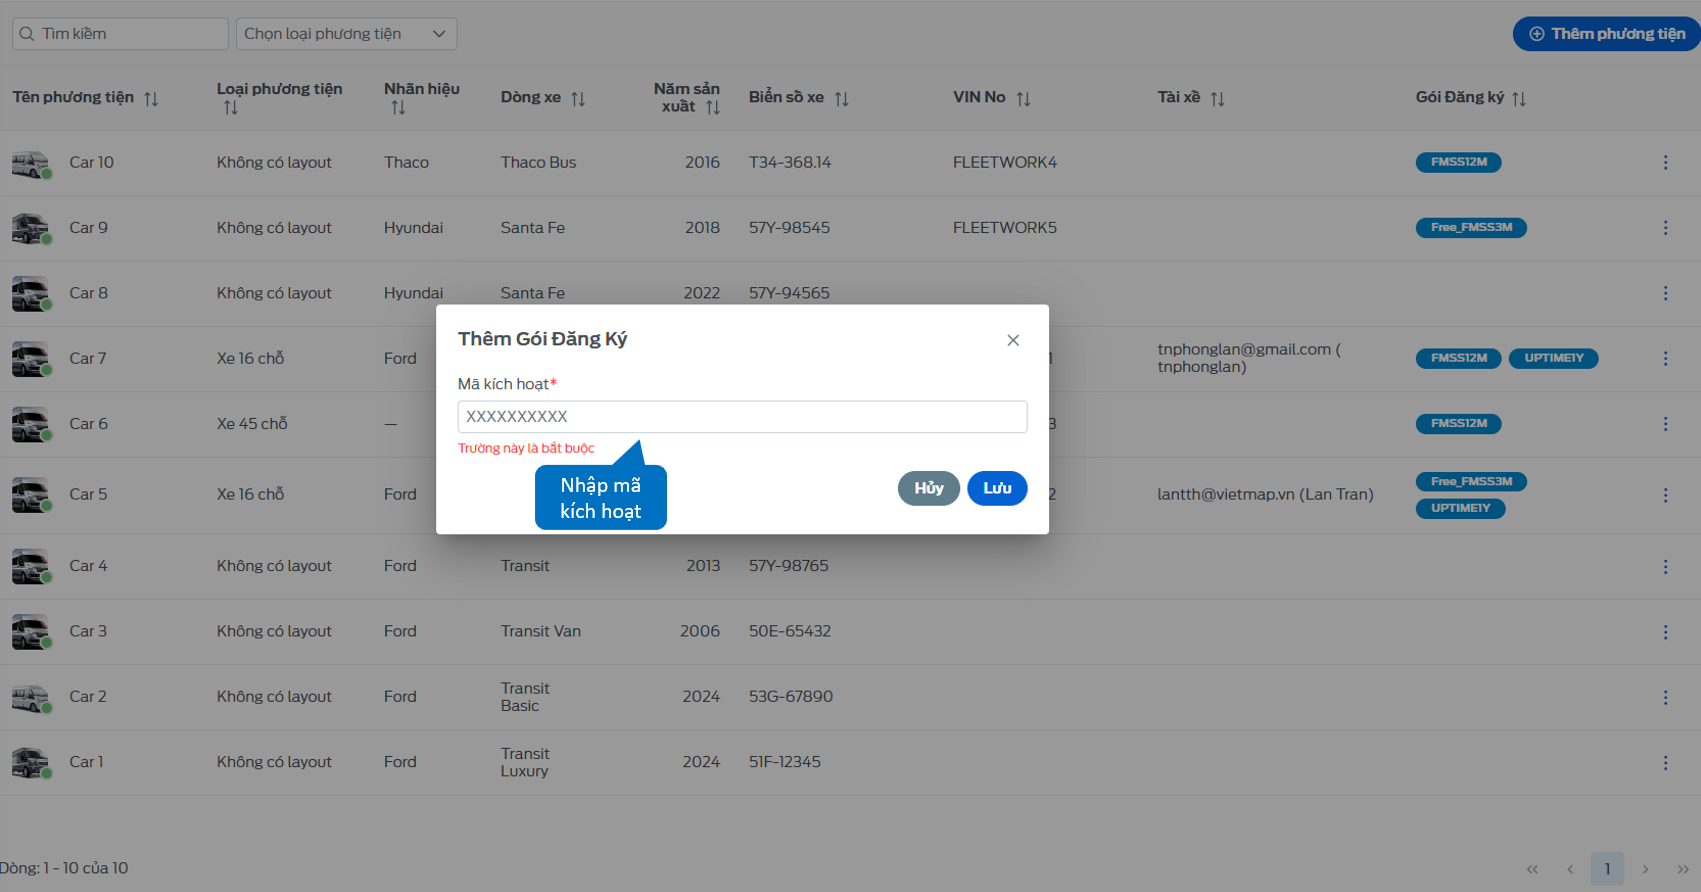
3.2 - Add subscription
After completing the purchase of the vehicle management package, the user is provided with a corresponding activation code. To activate this code, the user should follow these steps: - On the Vehicle List page, select the vehicle you want to register by clicking the three-dot icon and choose "Subscription Package.
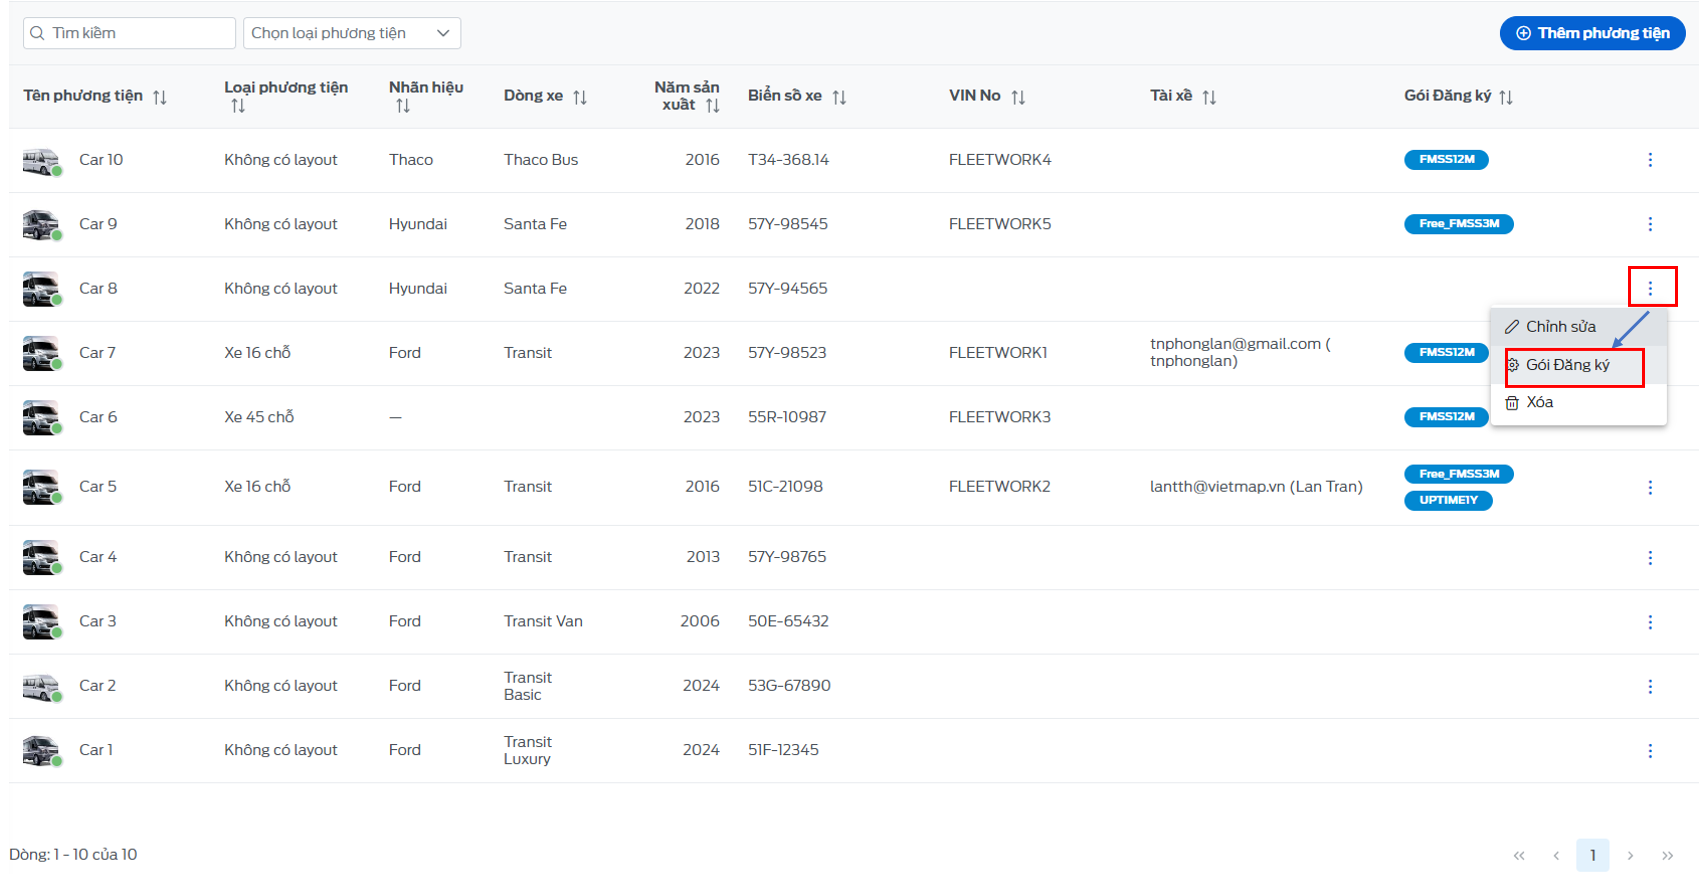
Enter the activation code and click the "Save" button.
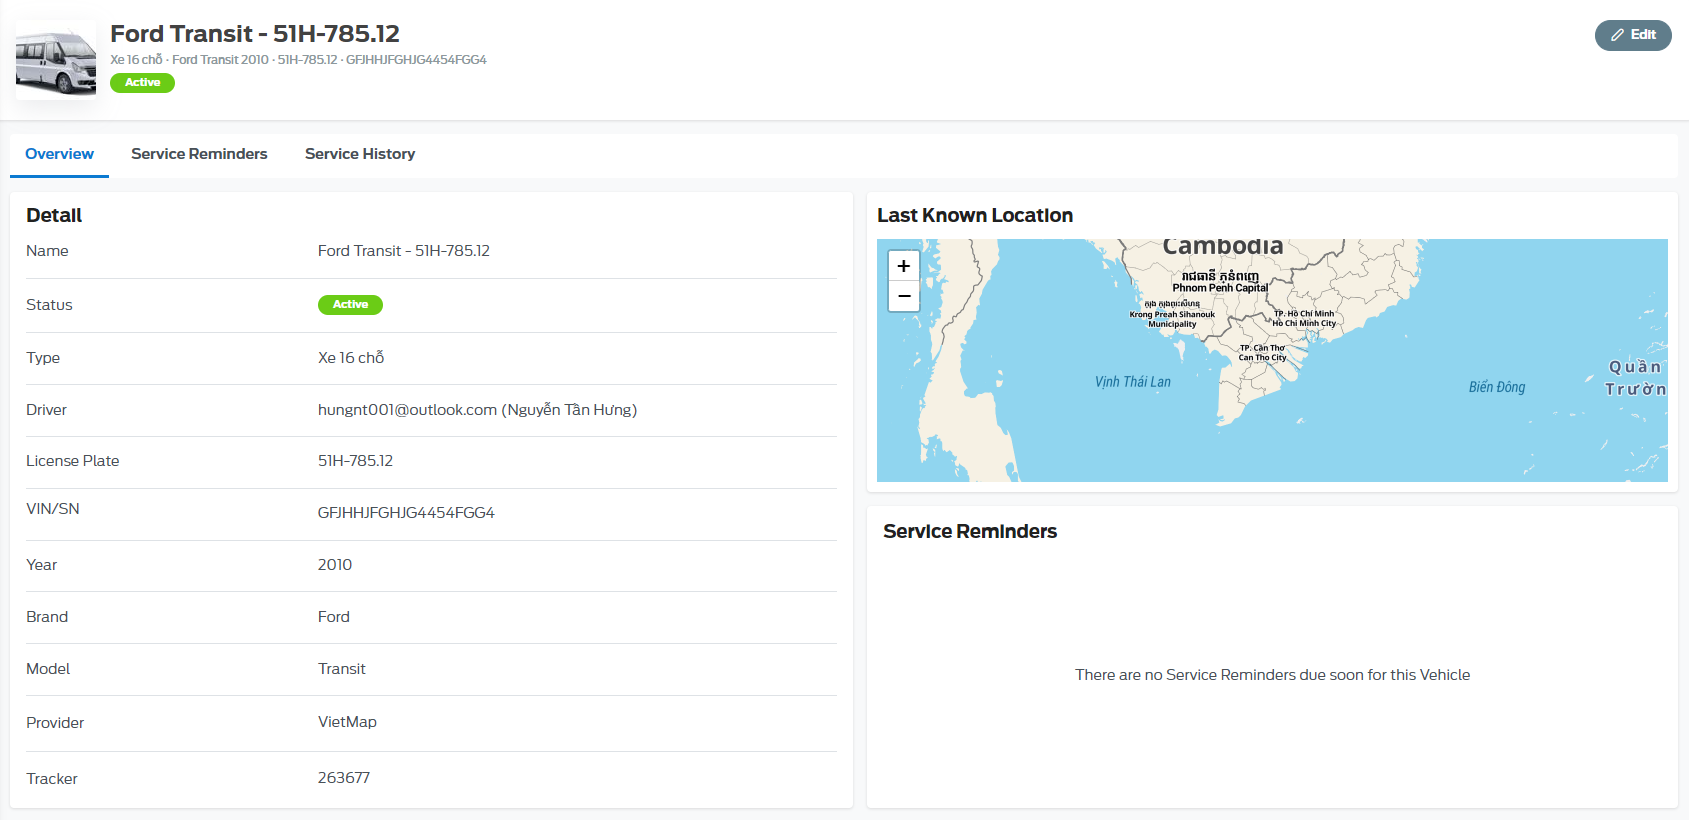
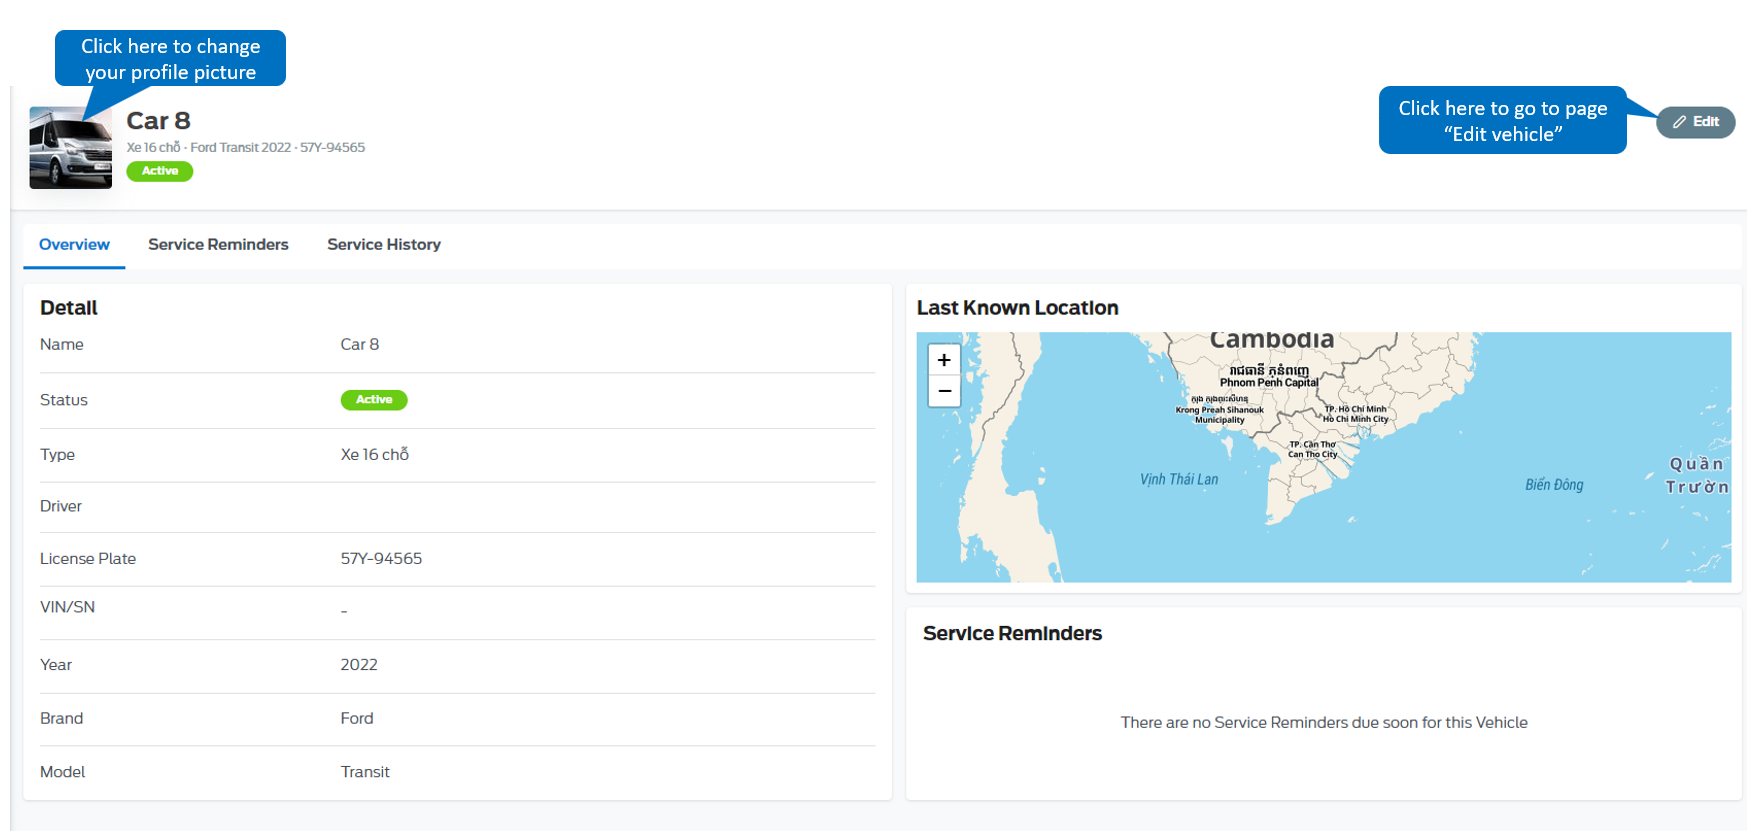
3.3 - View vehicle details
-
In the vehicle list page, click on the vehicle line you want to view, the system will automatically switch to the vehicle's detail page.
-
Here, you can view:
-
Vehicle details.
-
Service reminder list.
-
Service history.
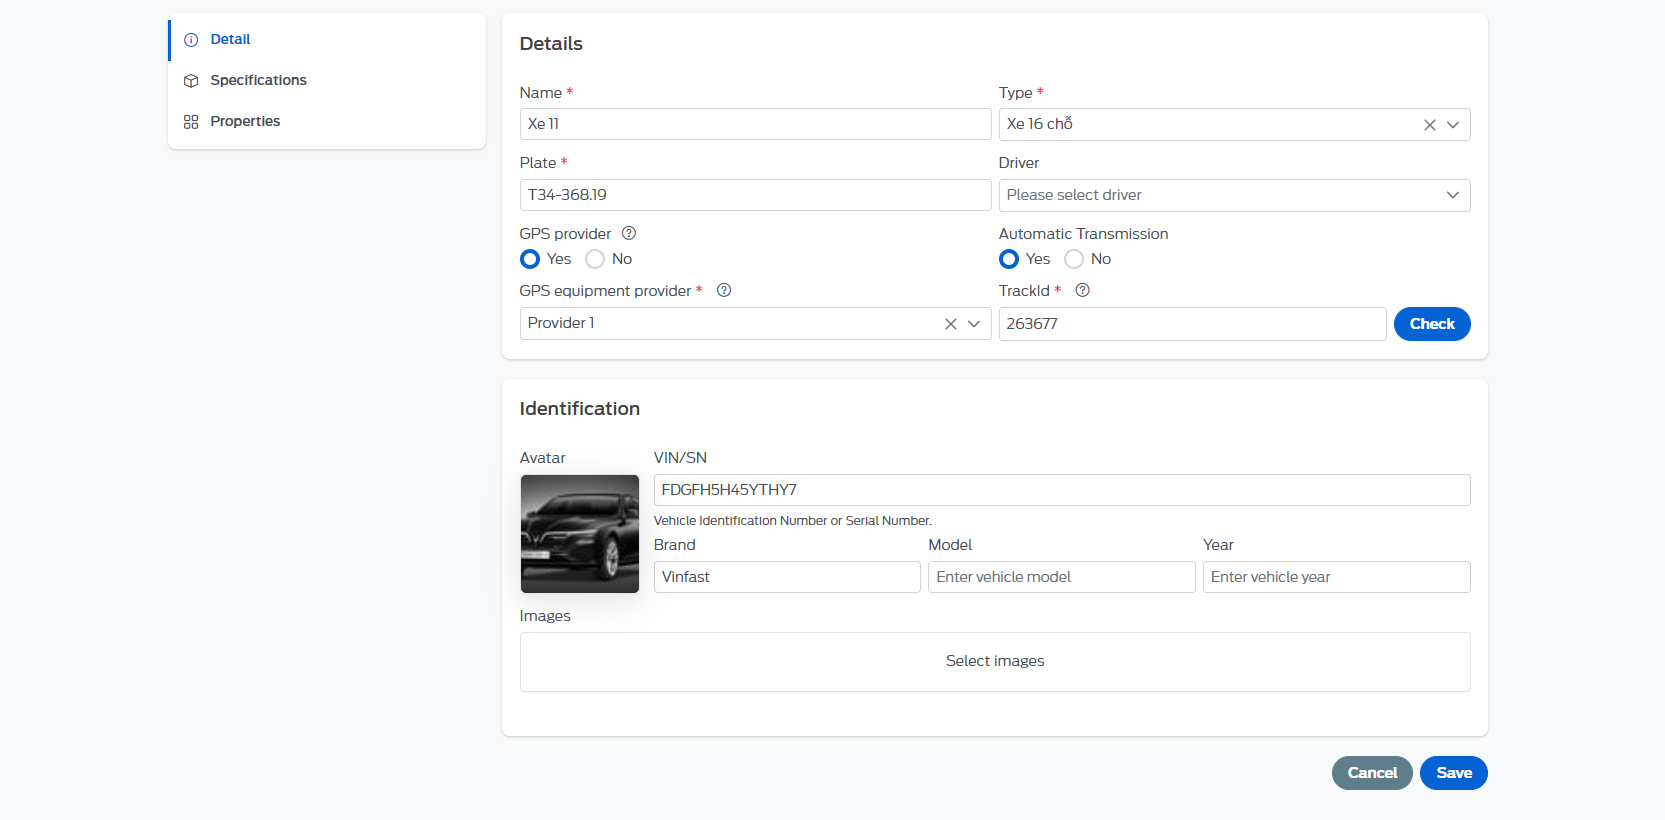
3.4 - Edit vehicle
-
To change vehicle information, users can choose one of the following two ways:
-
Method 1: On the vehicle list page, click the icon.

-
All vehicle information will appear, you can change any information here and click "Save" to complete.
-
Method 2: On the vehicle list page, click on the information field you want to change. After changing, press the "Enter" key or click outside the editing box to complete.
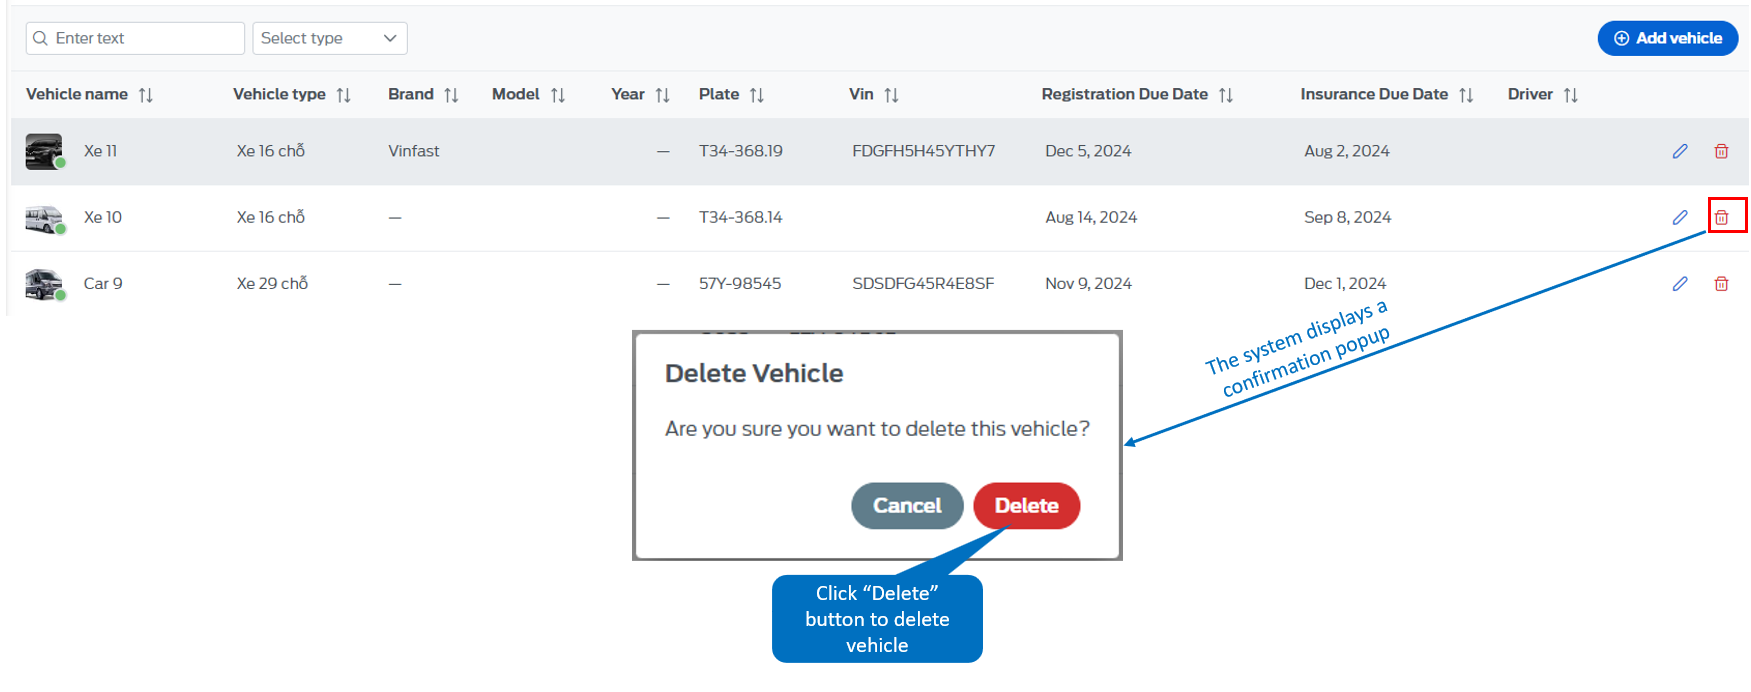
3.5 - Delete vehicle
- On the vehicle list page, click the icon.
4. Employee management
The place to manage all employee accounts including system administrators, operators, drivers.
4.1 - Add employee
-
To add employees, users choose one of the following two ways
-
Method 1: On the employee list page, select the "Add employee" button.

-
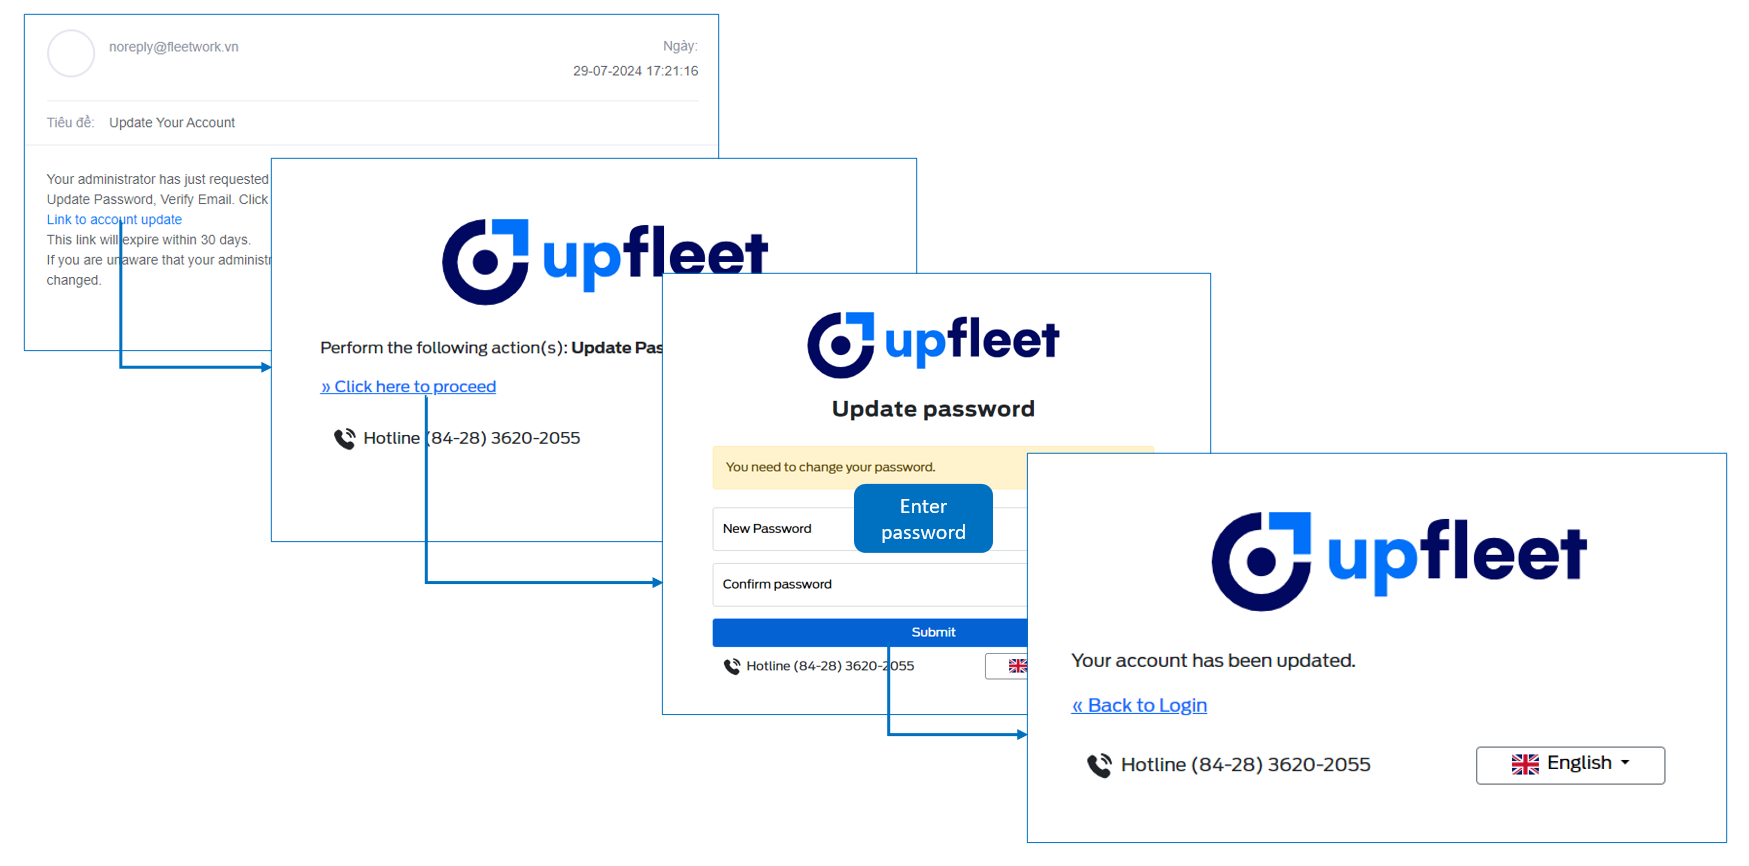
The system sends a verification email to the employee's email: you must complete the verification steps, set a password and click the "Send" button to complete.
-
Method 2: Upload the employee list from an excel file. On the employee list page, select the "Upload" button.
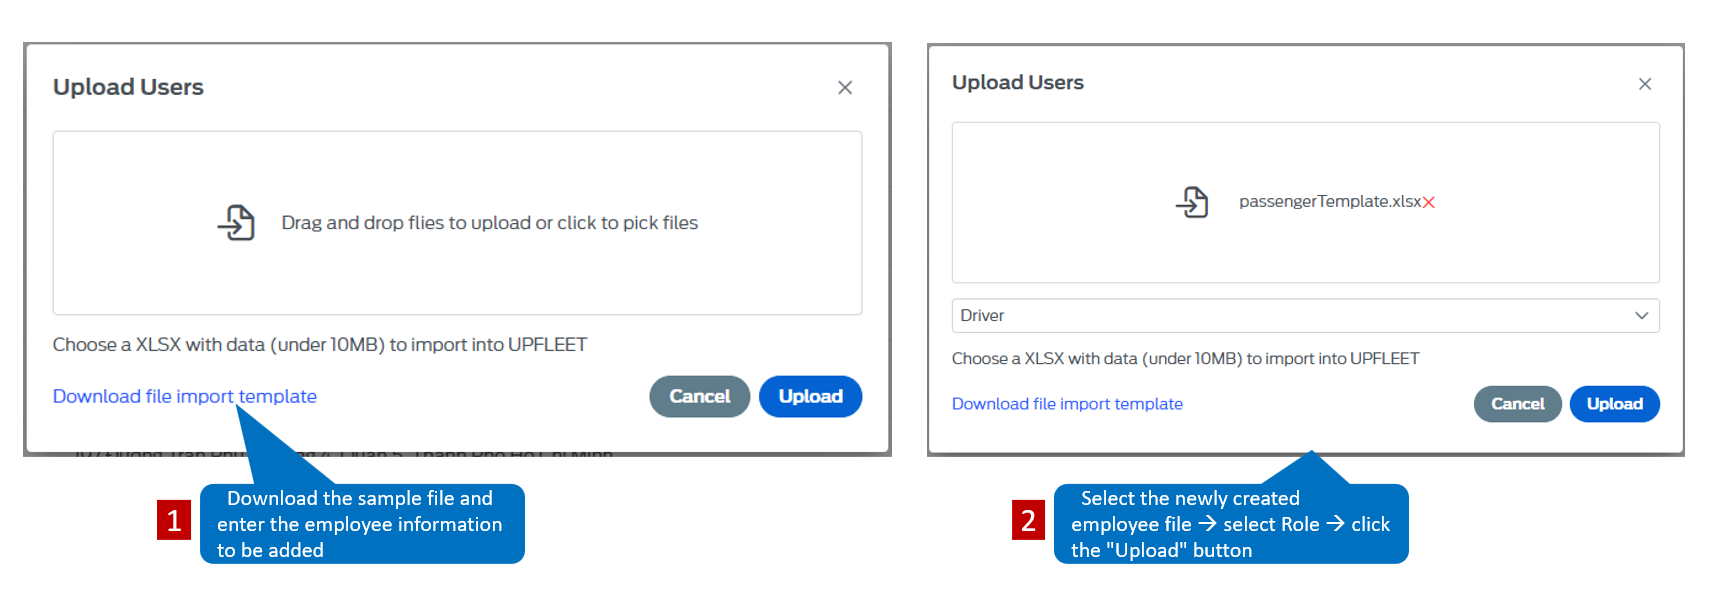
-
After the file is uploaded, the system will send a verification email to the employee's email. You must authenticate and set a password for the account as in method 1.
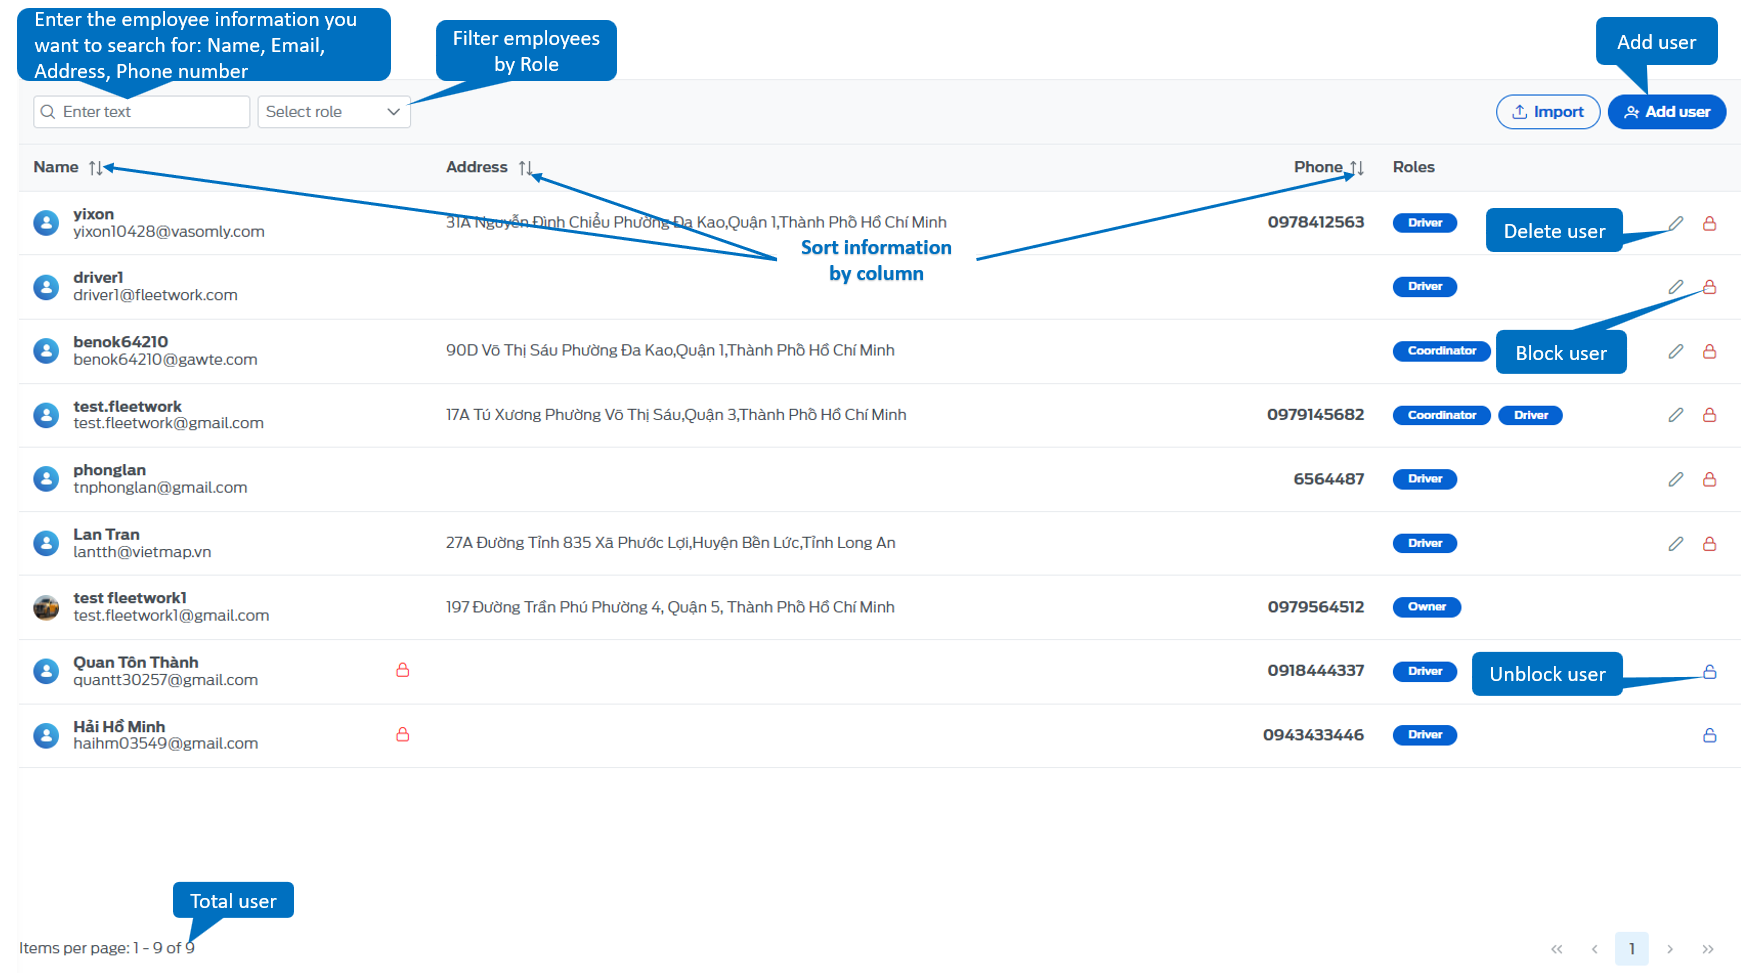
4.2 - Edit employee
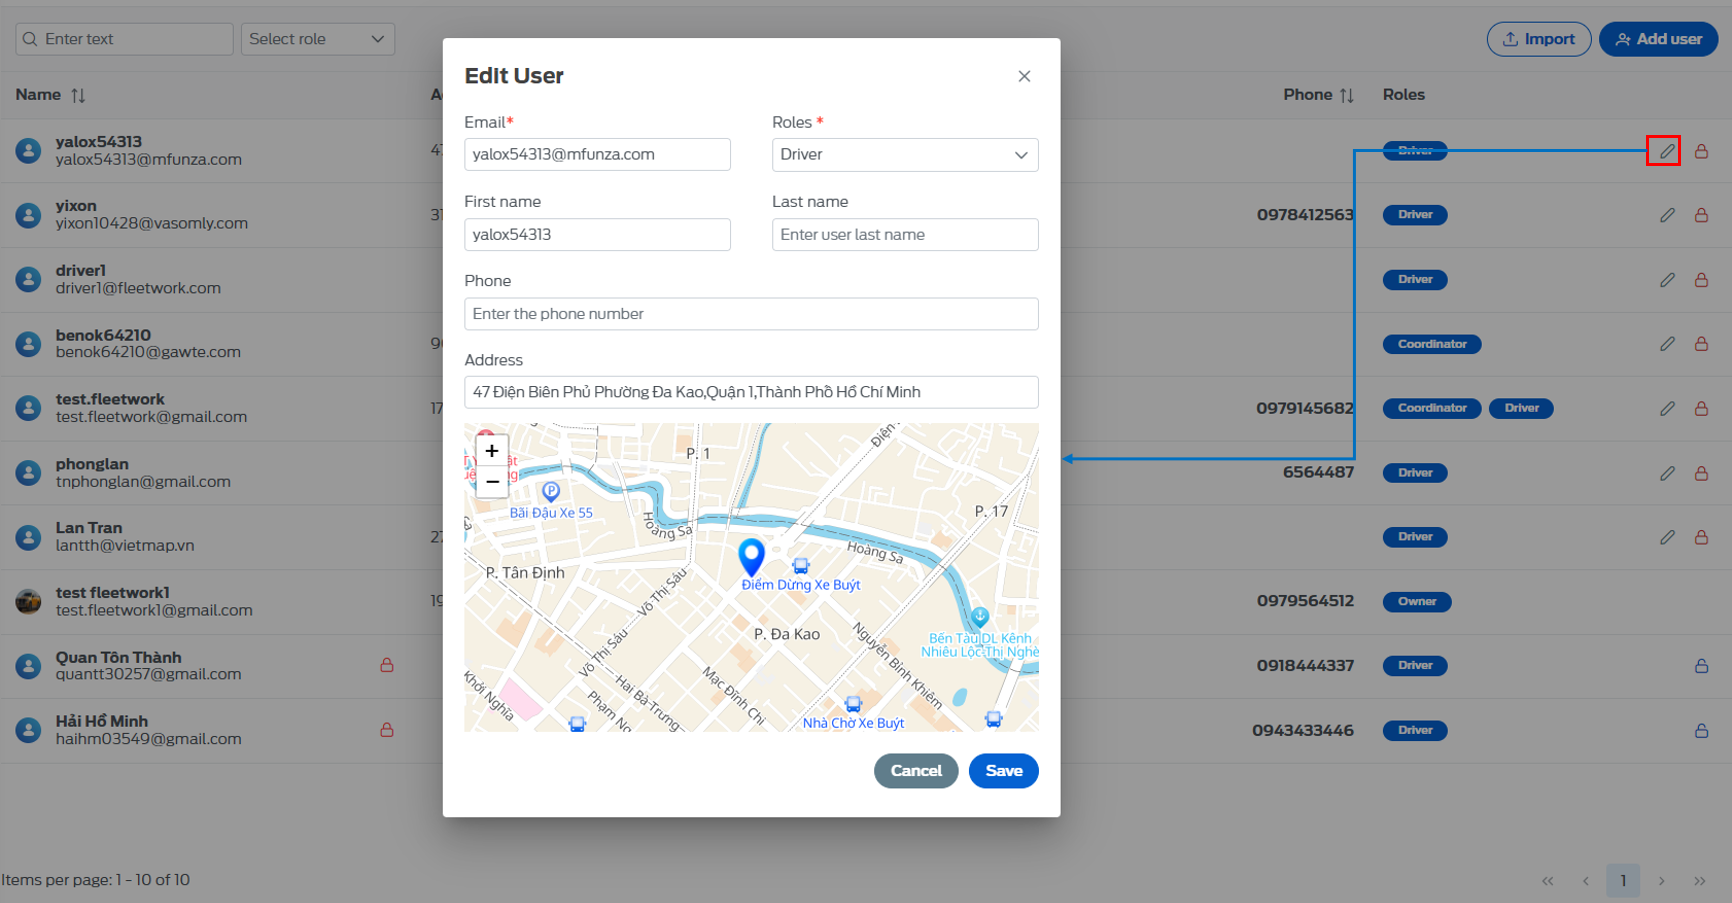
- On the employee list page, select the icon, all information about the employee will appear, you can change any information here and click "Save" to complete.
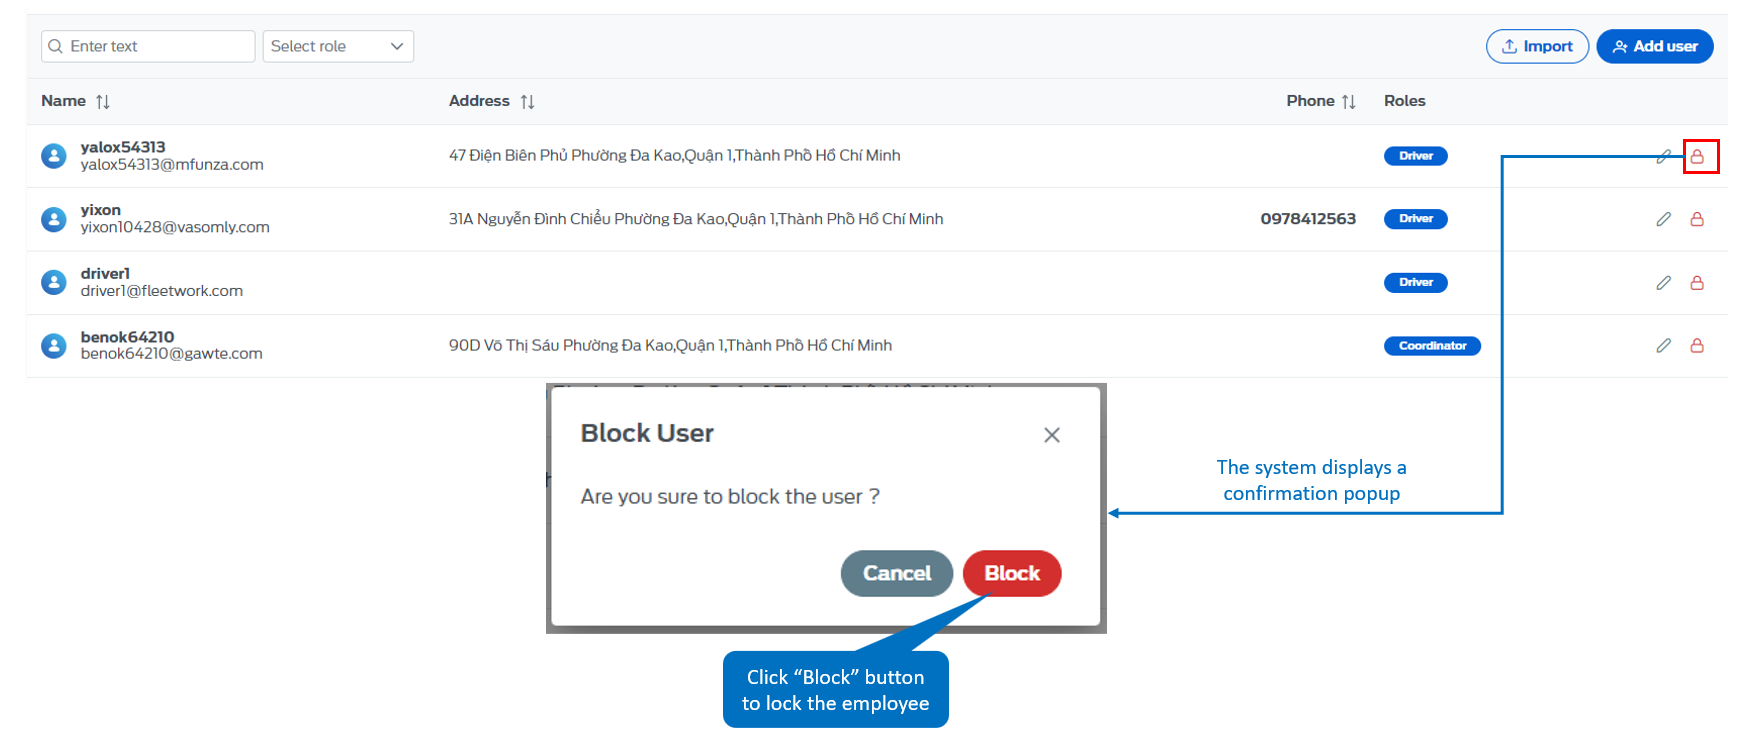
4.3 - Lock employee
- On the employee list page, select the icon, the screen will display a voicemail box to confirm whether the user is sure to lock this employee.
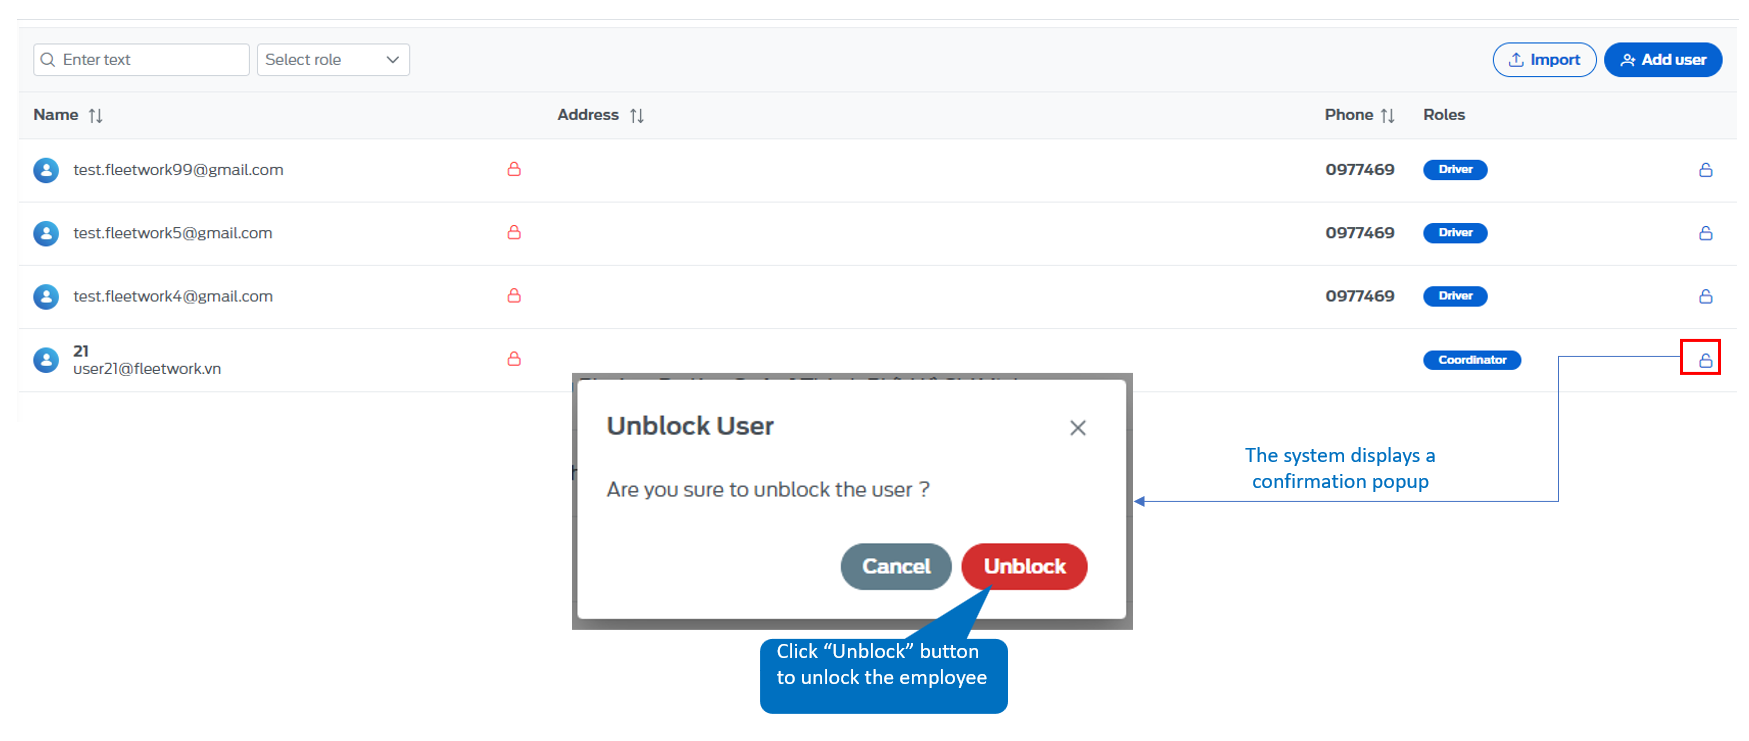
4.4 - Unlock employee
- On the employee list page, select the icon, the screen will display a voicemail box to confirm whether the user is sure to unlock this employee.
5. Route and Trip management
5.1 - Route management
The place to manage all routes that the bus company operates, transporting passengers, employees, students,...
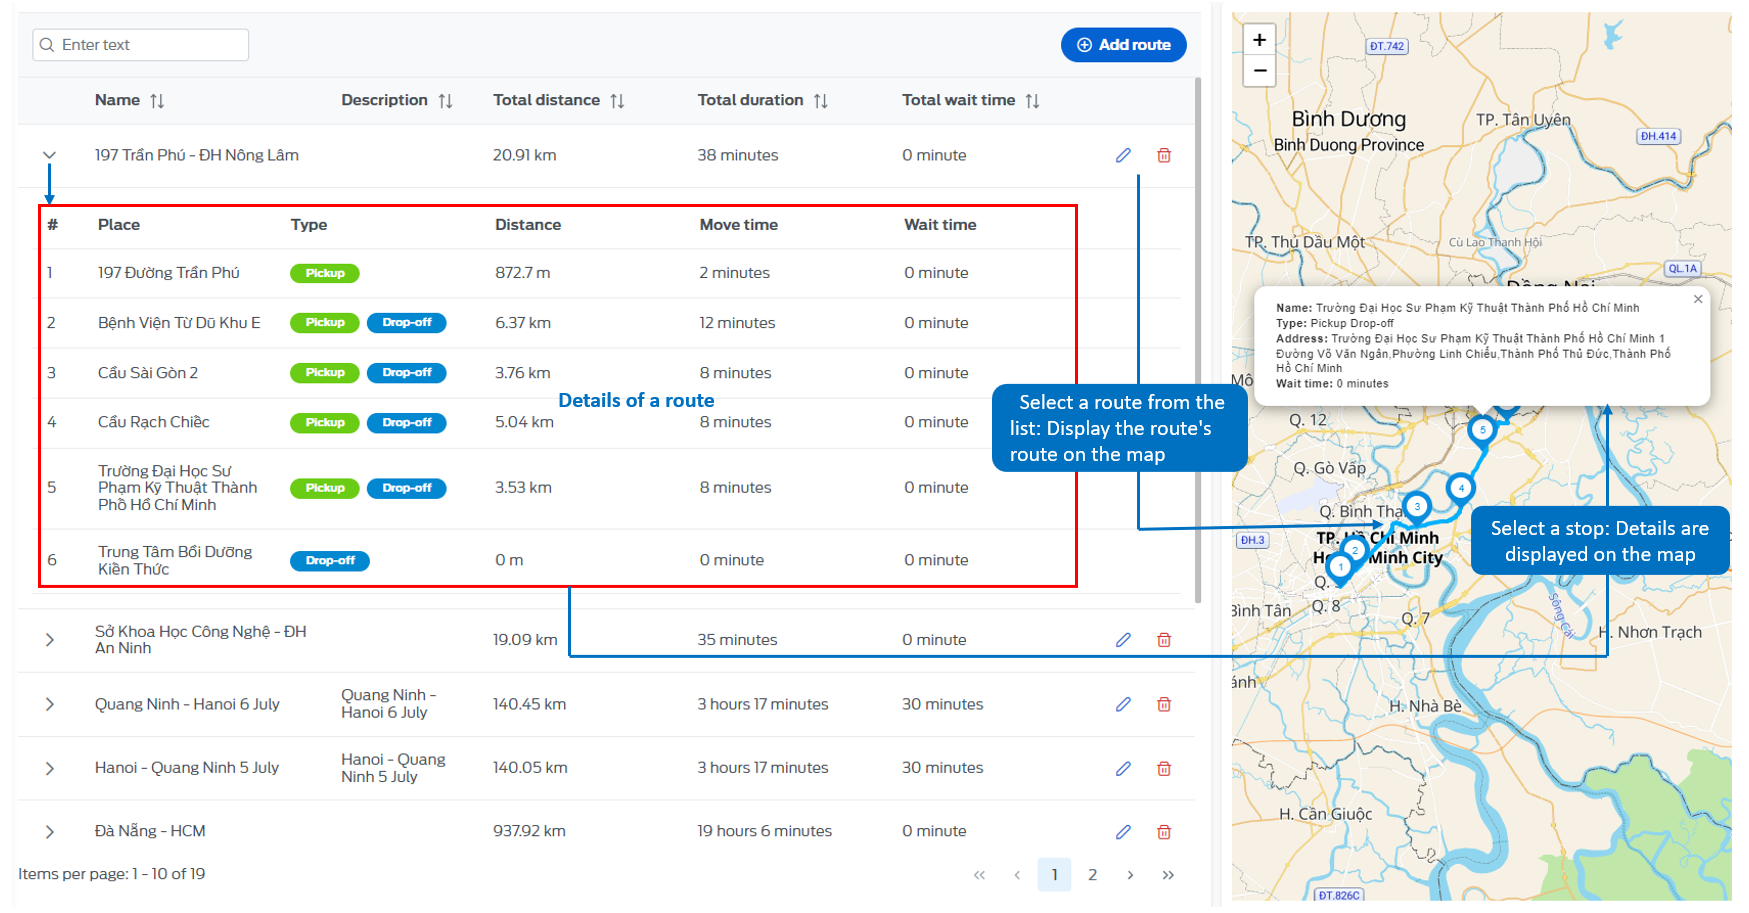
5.1.1 - Add route
- On the route list page, select the "Add route" button. Fill in all the information as shown below and select "Add"
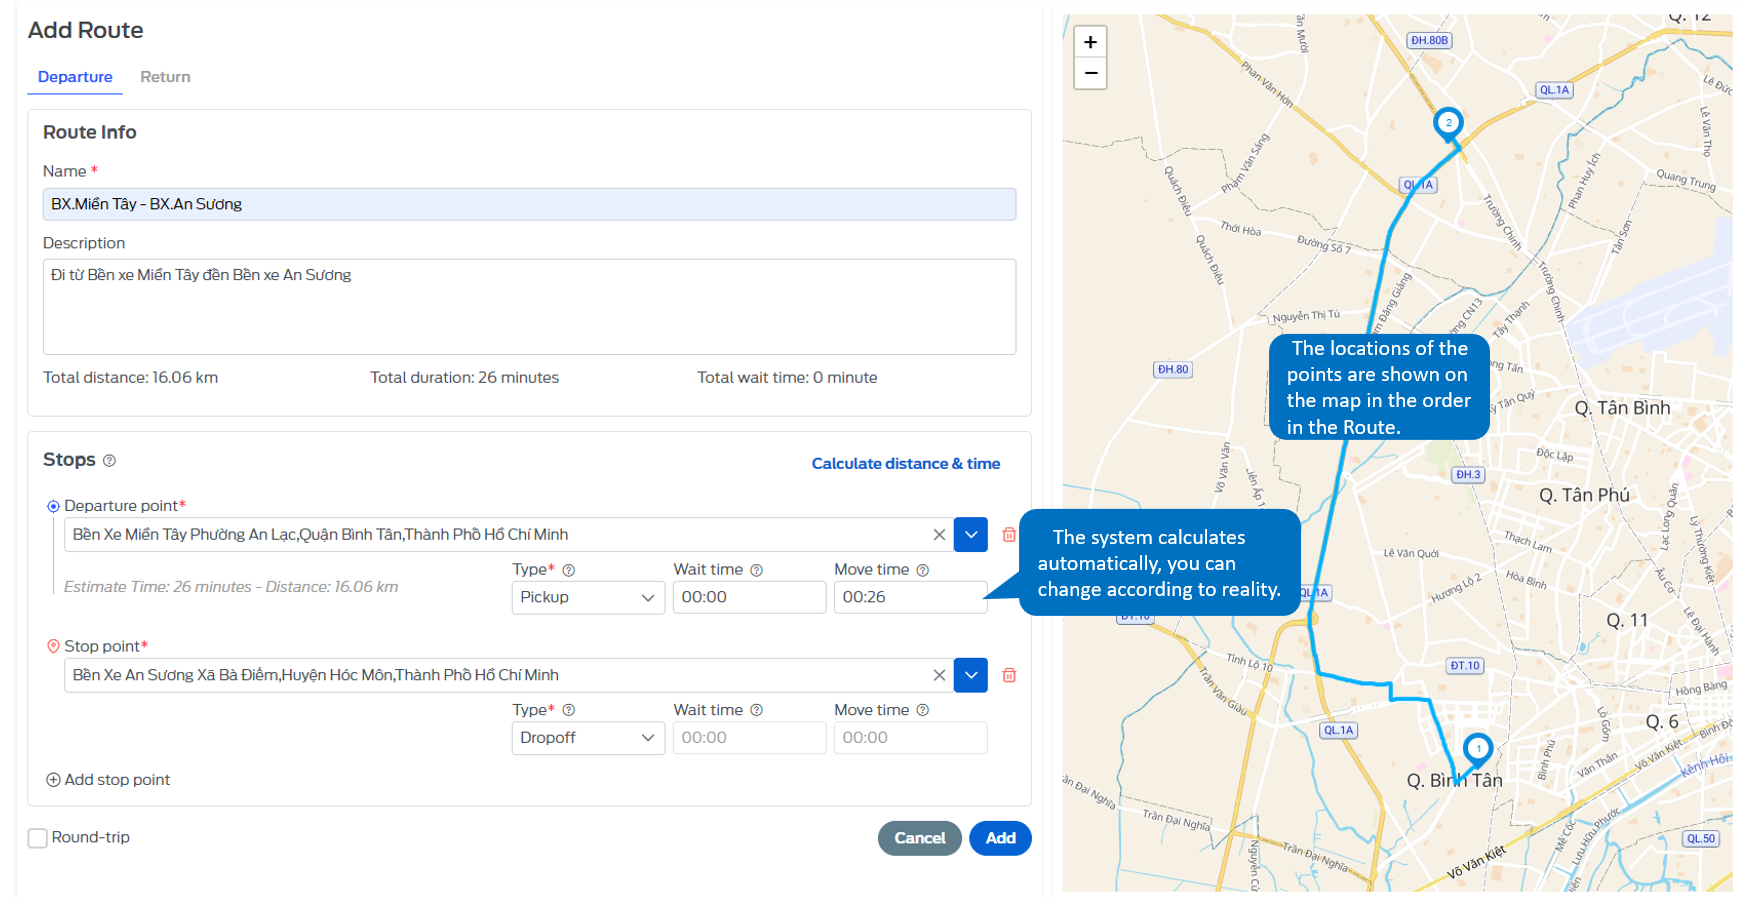
- Here, users can create additional return routes by clicking on the "Round trip" box, all available information in the outbound direction will be updated in the return direction, users need to go to the return direction section to review the entered information, can edit if there is an error, then click the "Add" button for the system to create the route.
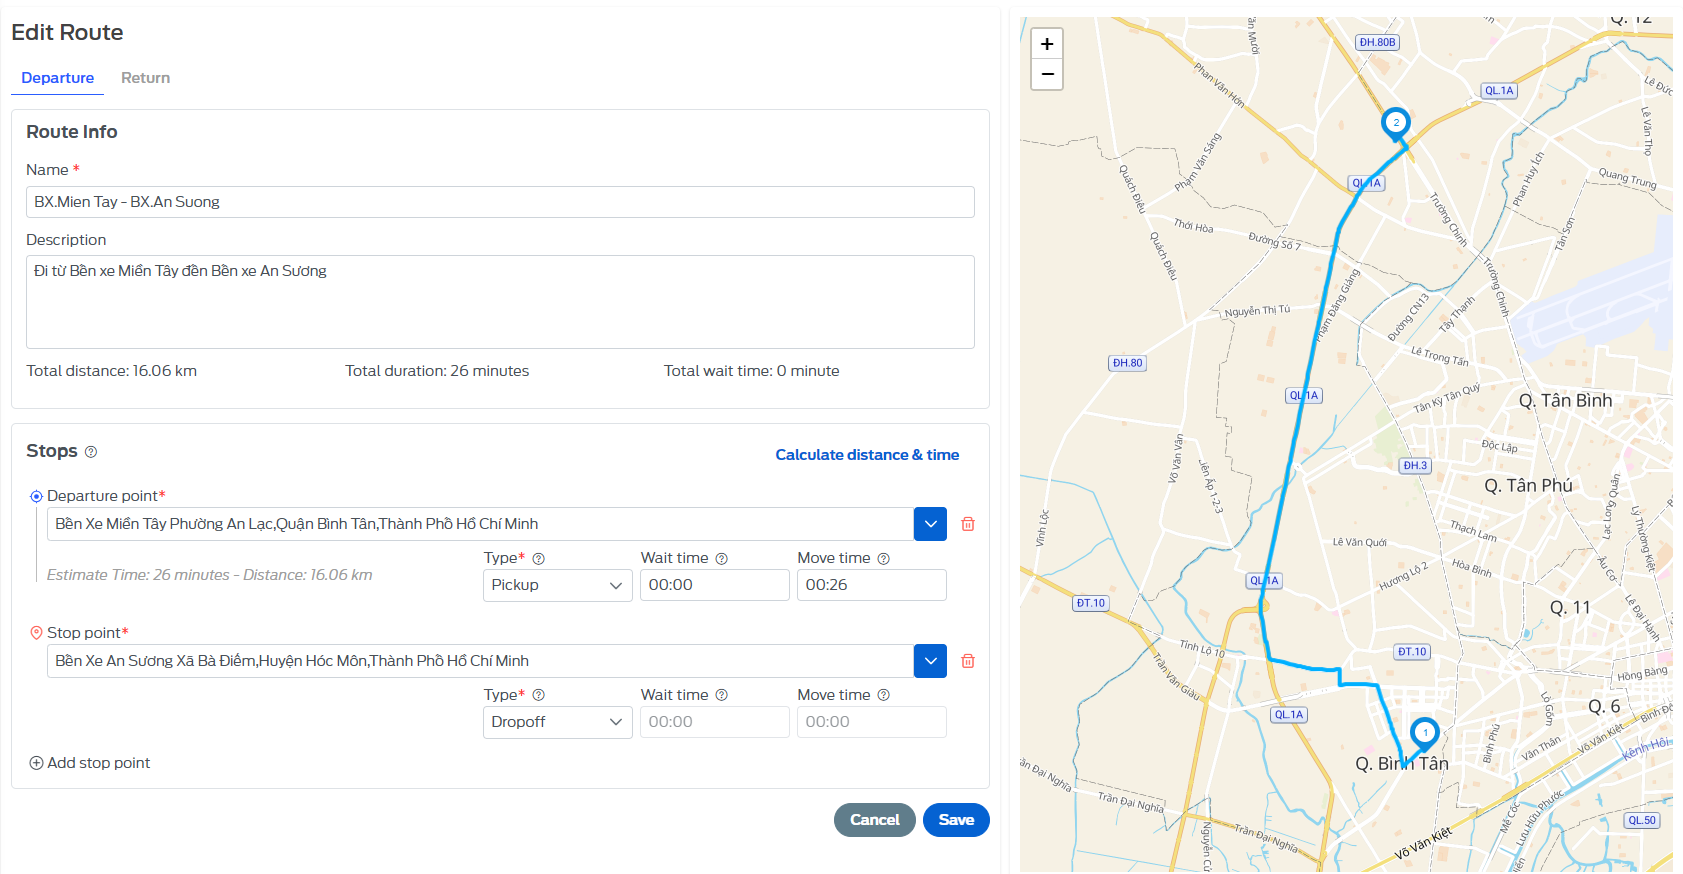
5.1.2 - Edit route
- On the route list page, select the icon, all information about the route will appear, you can change any information here and click "Save" to complete editing.
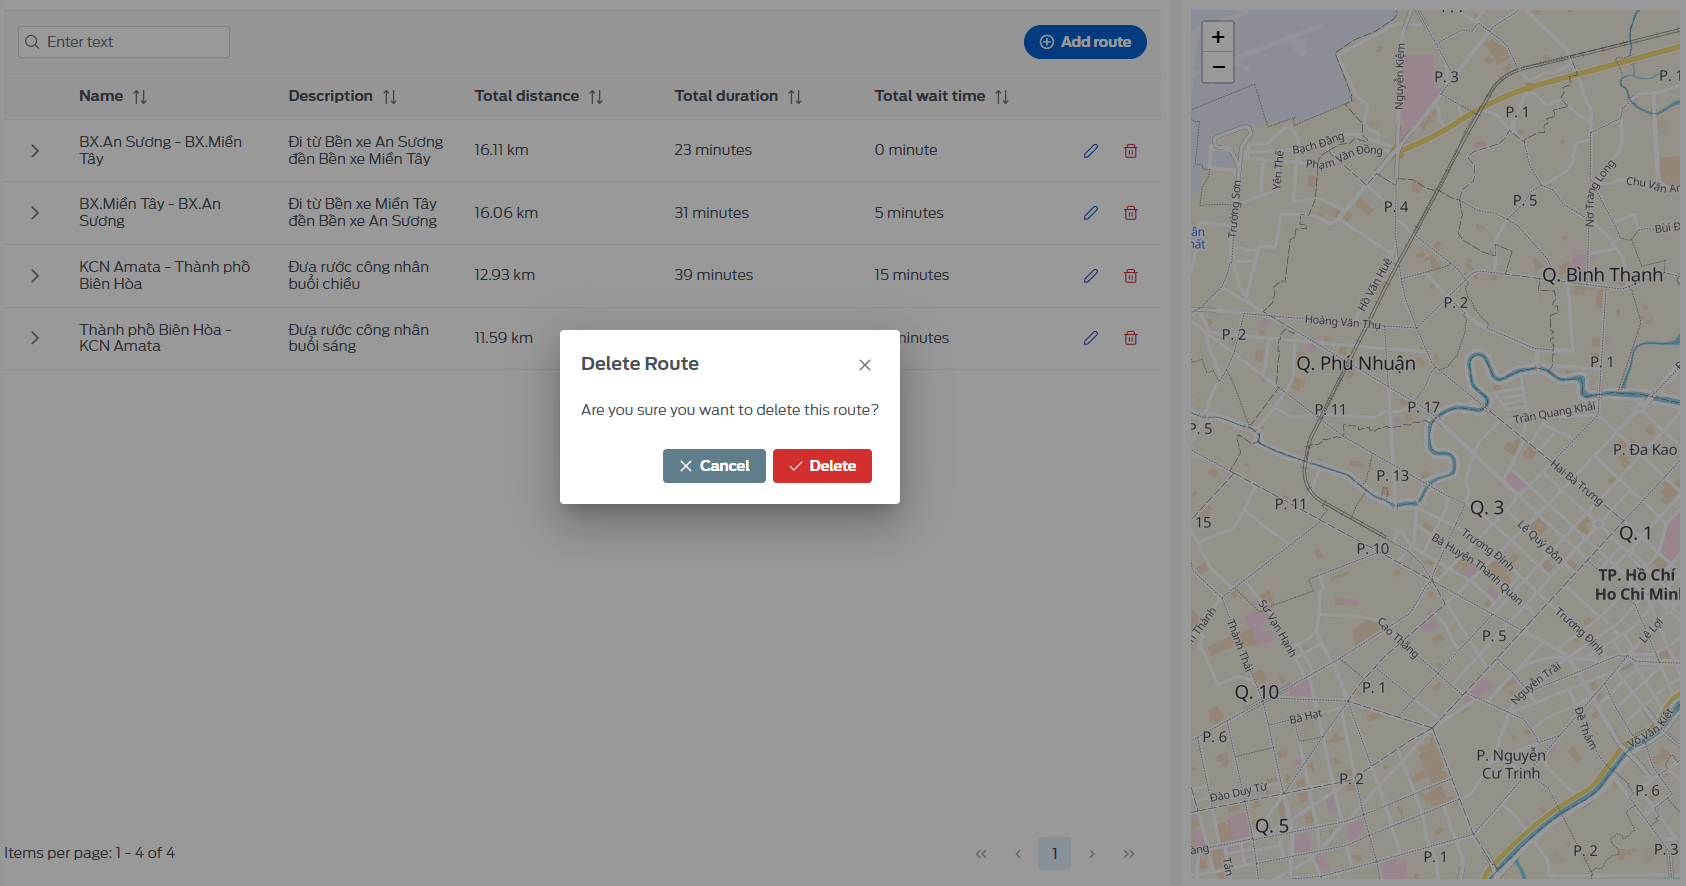
5.1.3 - Delete route
- On the route list page, select the icon, the screen will display a voicemail to confirm whether the user is sure to delete this route.
5.2 - Trip management
Manage the entire operating schedule: running date, start time, vehicle type, ... for all routes that the carrier is operating.
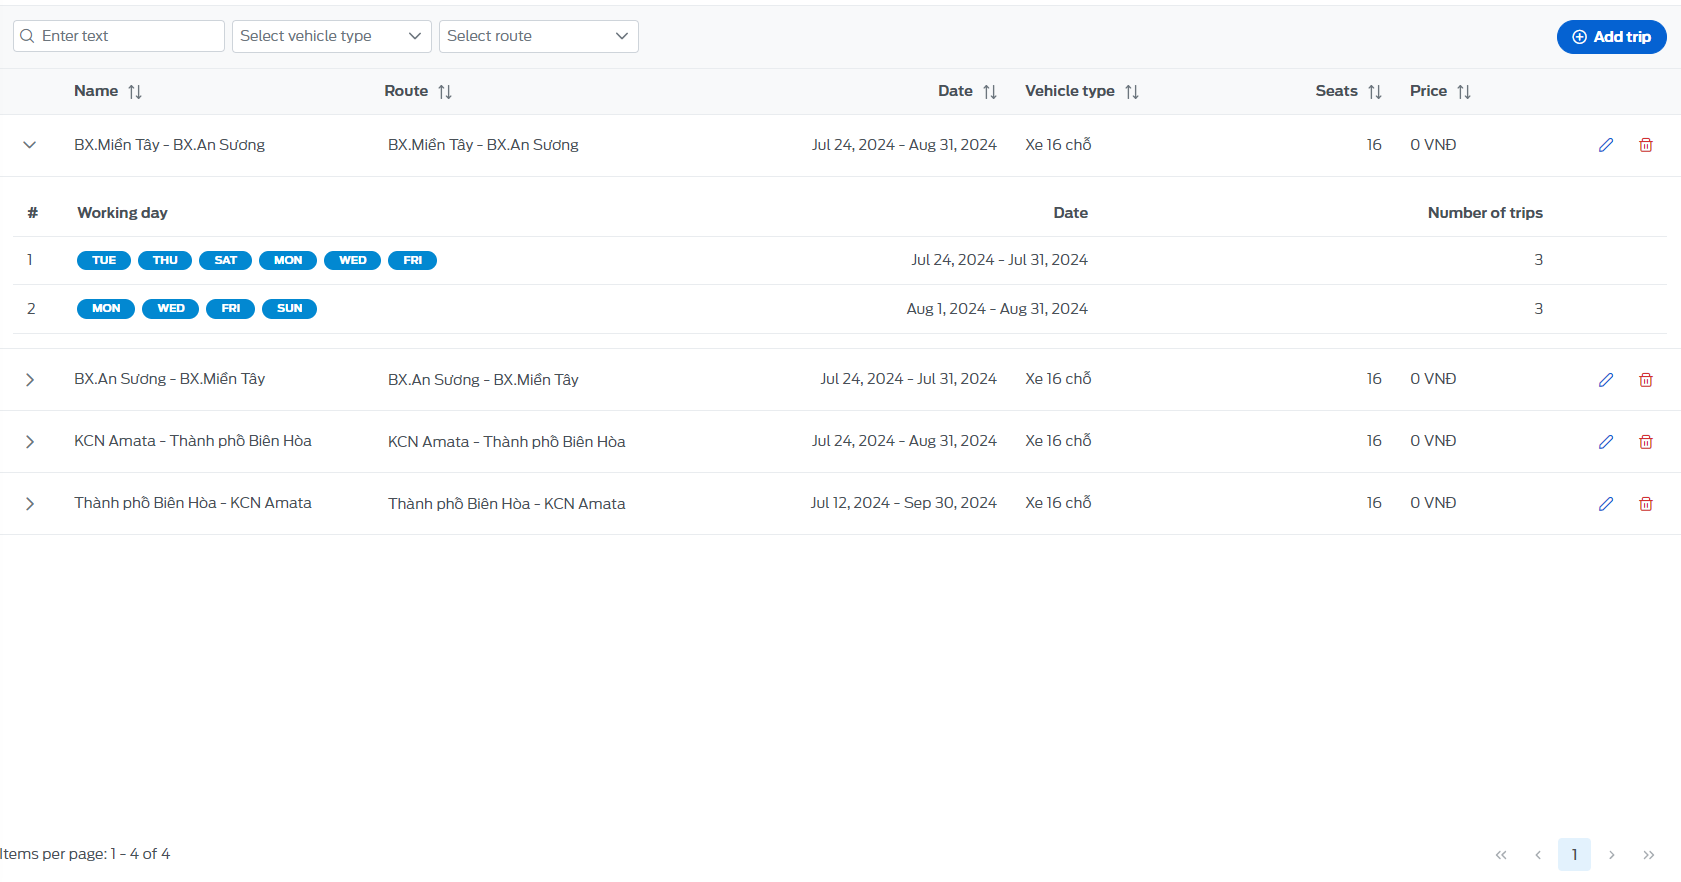
5.2.1 - Add trip
- On the bus route list page, select the "Add trip" button. Fill in all the information as shown below and select "Add"
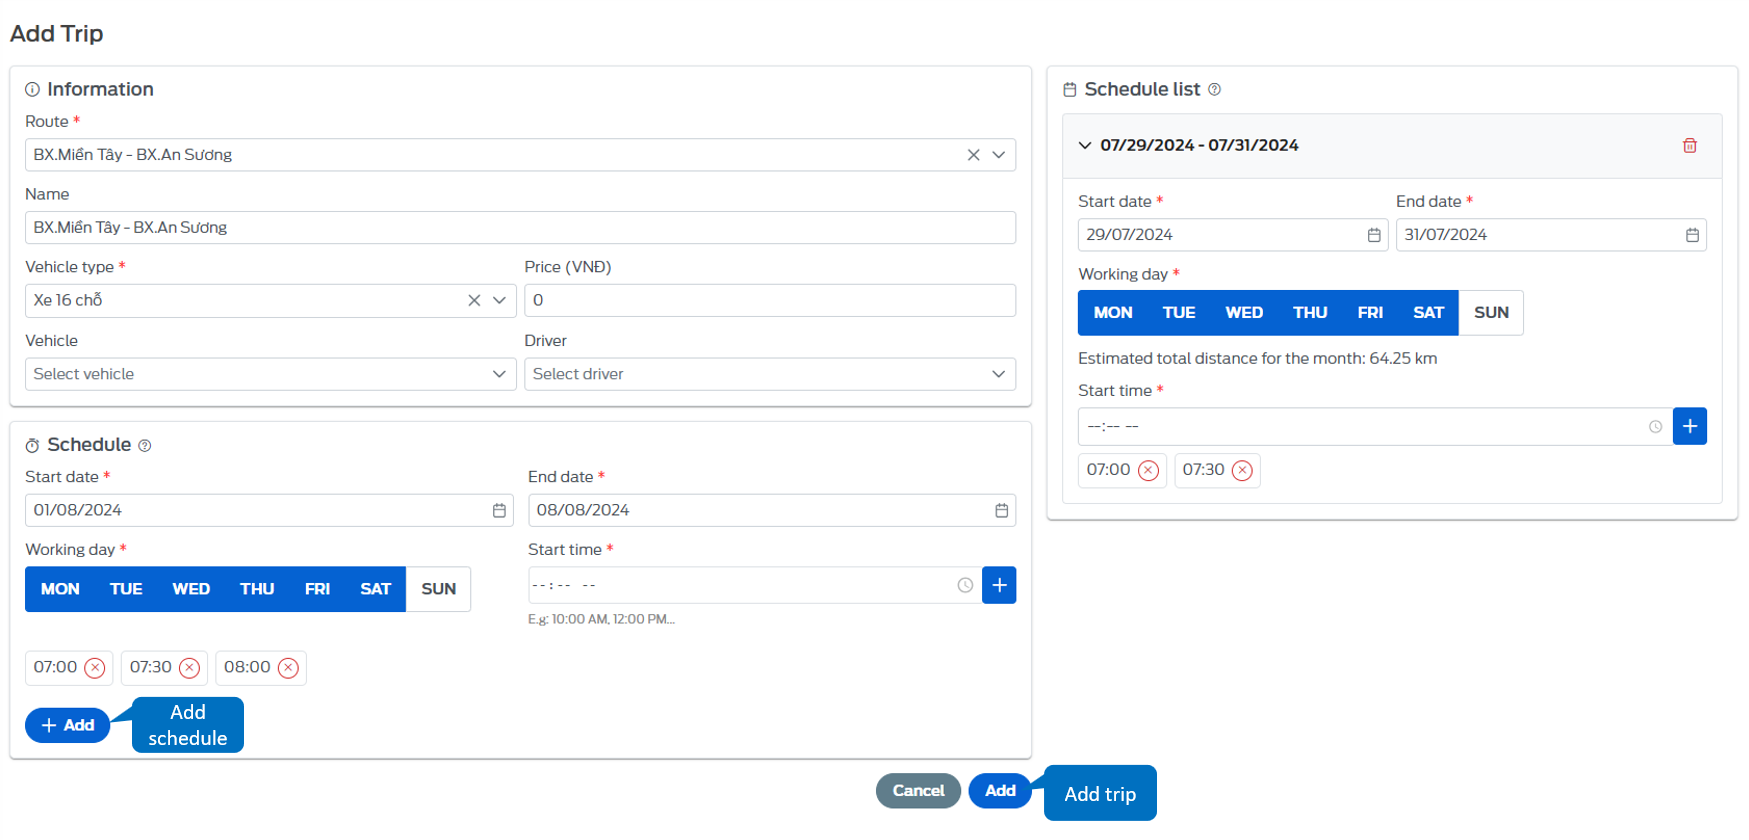
- In the "Schedule" section, users can enter multiple times to serve the route operated according to the time period such as operating the trip on Tet holiday, holidays need to increase the number of vehicles, running time, or normal days need to reduce running time,...
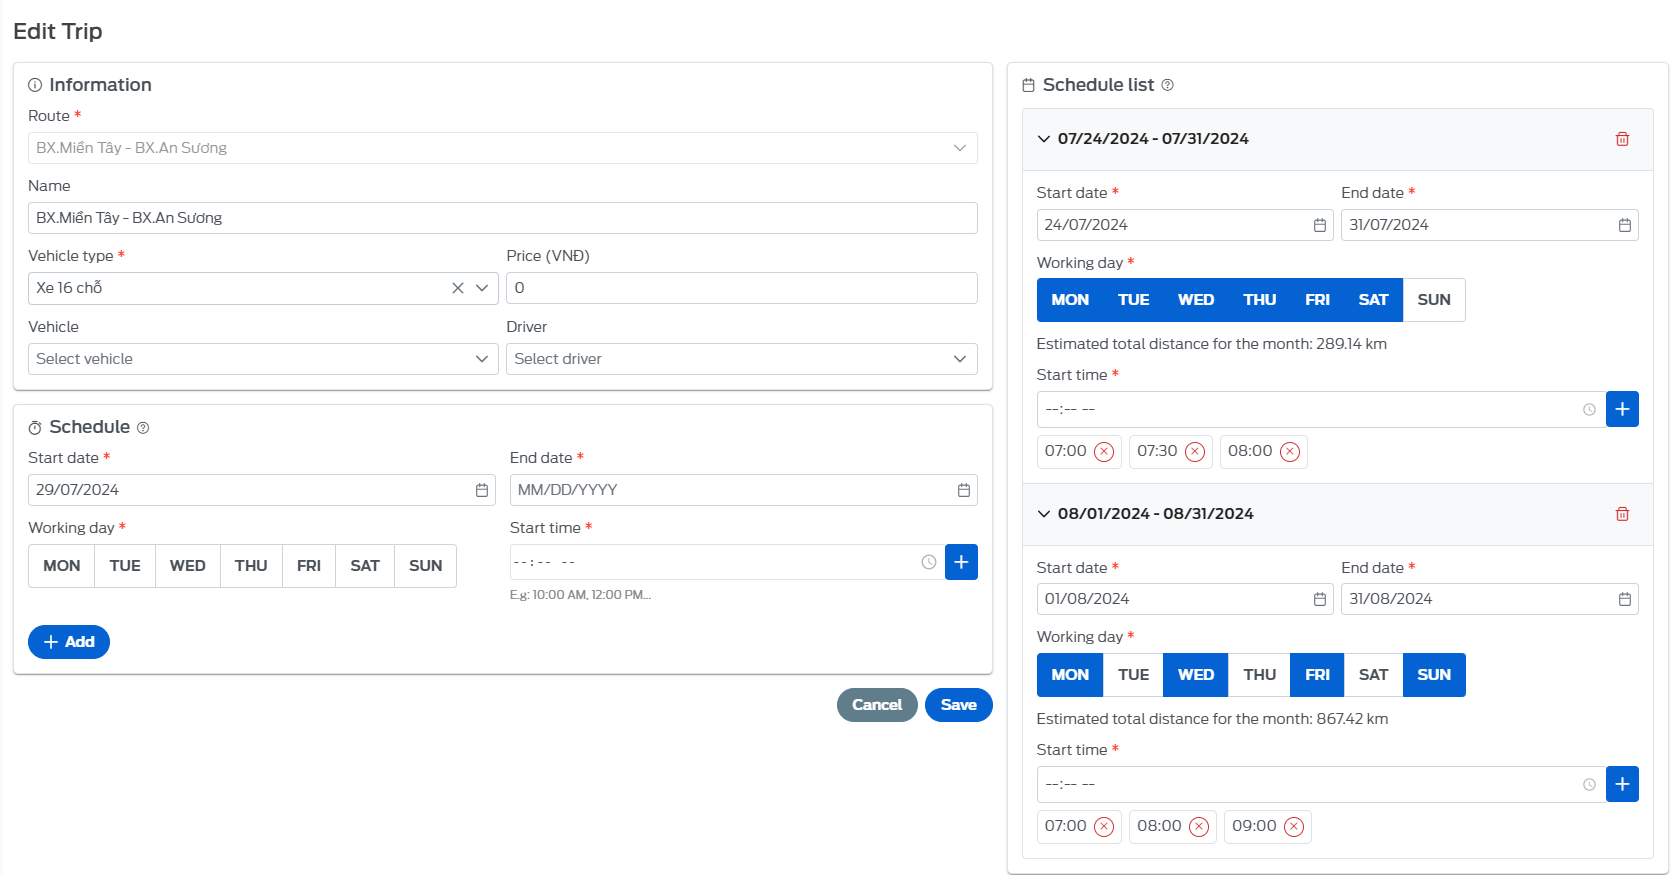
5.2.2 - Edit trip
- On the bus route list page, select the icon, all information about the bus route will appear, you can change any information here and click "Save" to complete the edit.
- In the "Schedule" section, users can add to serve the route operated according to the time period such as operating the route on Tet holiday, holidays need to increase the number of vehicles, running time, or normal days need to reduce running time,...
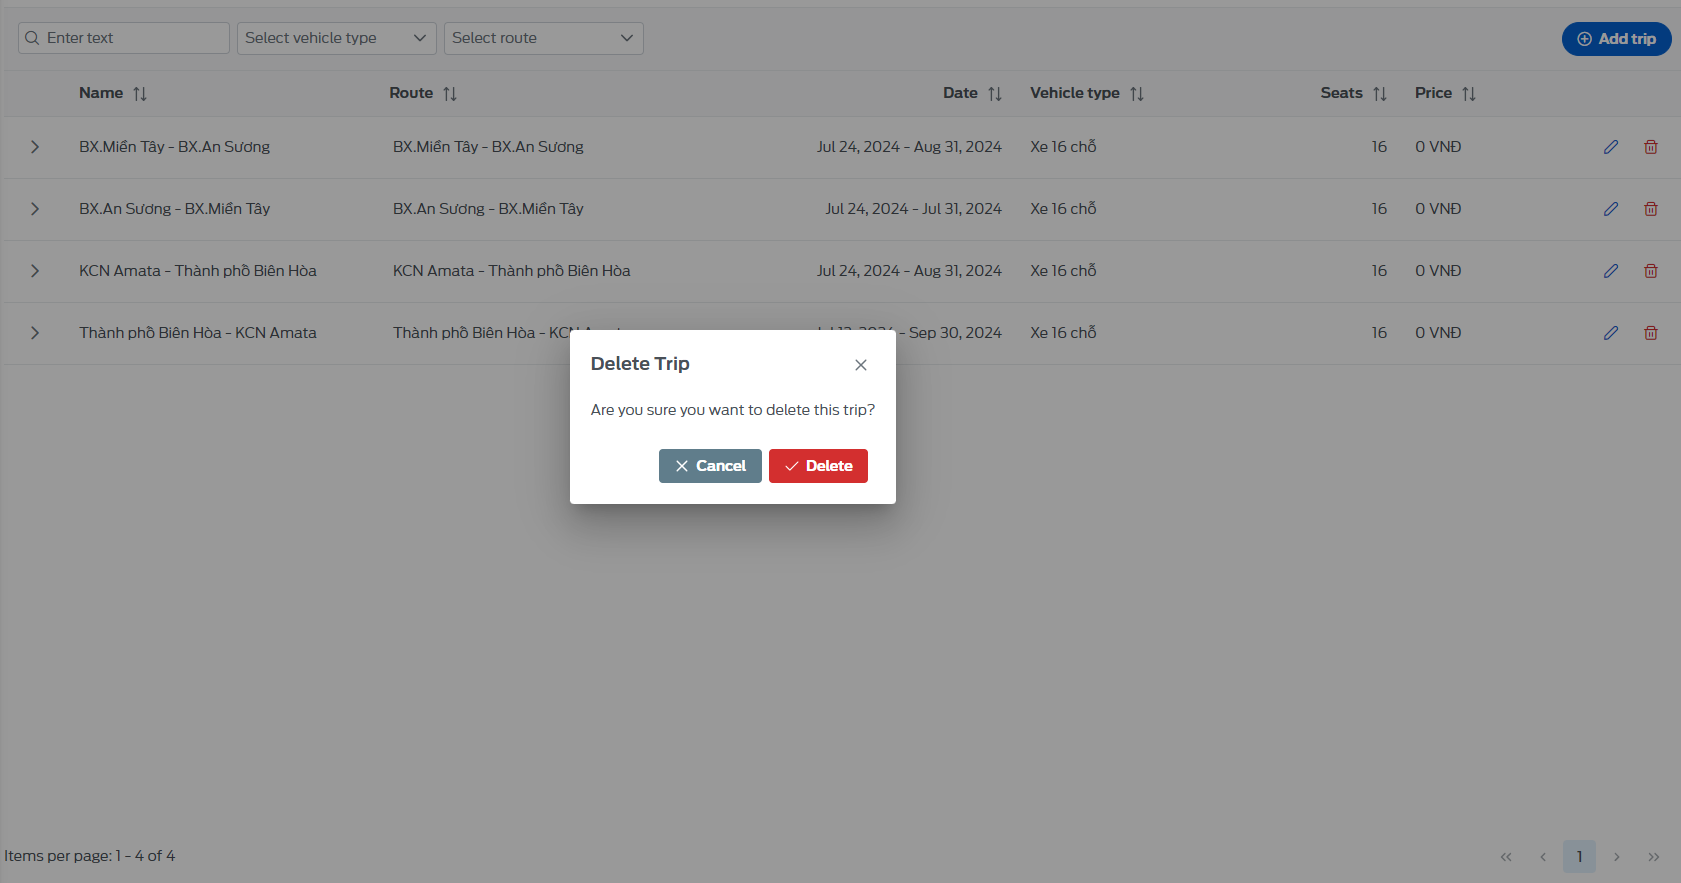
5.2.3 - Delete trip
- On the route list page, select the icon , the screen will display a voicemail to confirm whether the user is sure to delete this route.
6. Trip booking management
After the user has entered the trip information including: route, time (date, departure time), vehicle type,... the system has automatically created trips booking, the user will see a list of trips booking serving by day, route,...
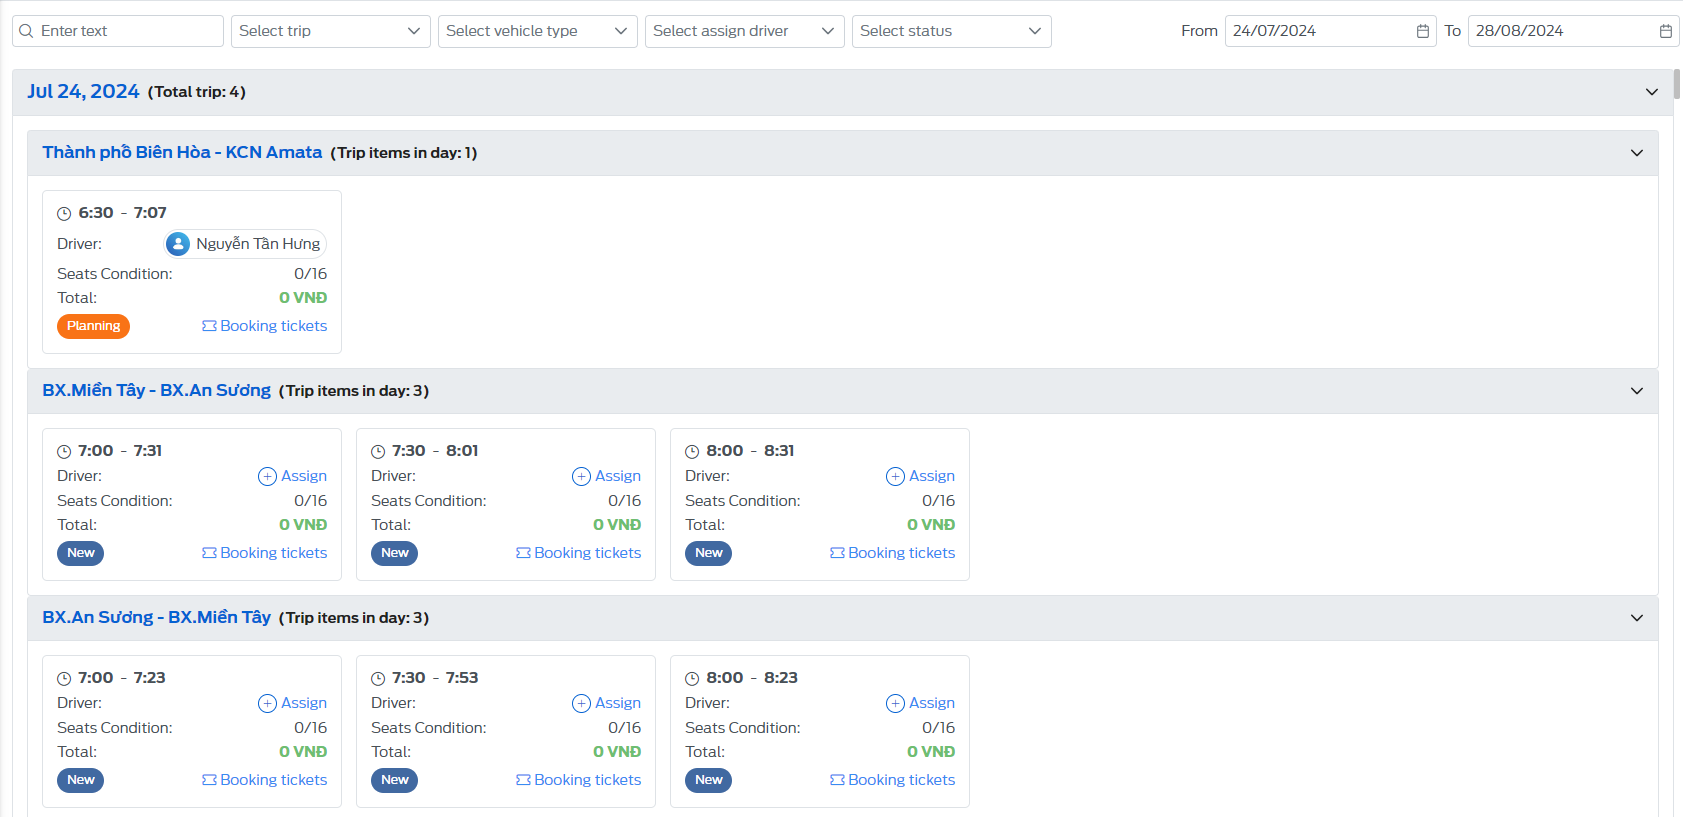
6.1 - View details
- The user selects the trip booking to view detailed information by clicking on that trip booking
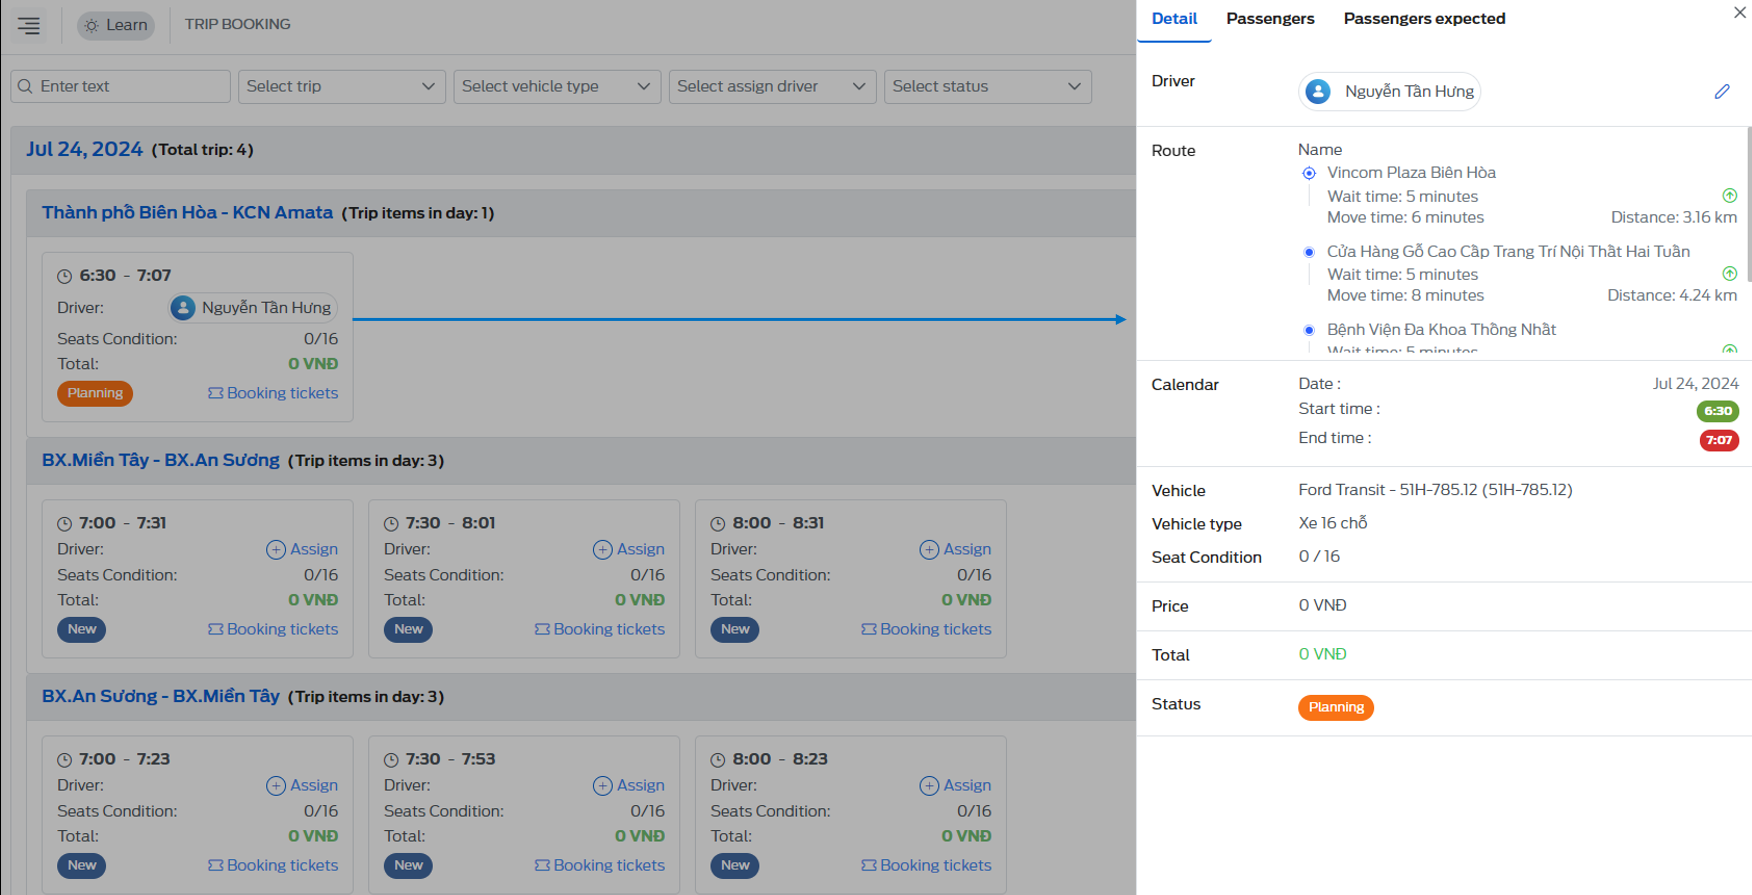
- Here the user can see detailed information of the trip booking such as: driver information, route, schedule, vehicle name, seat number, ticket price, status,...
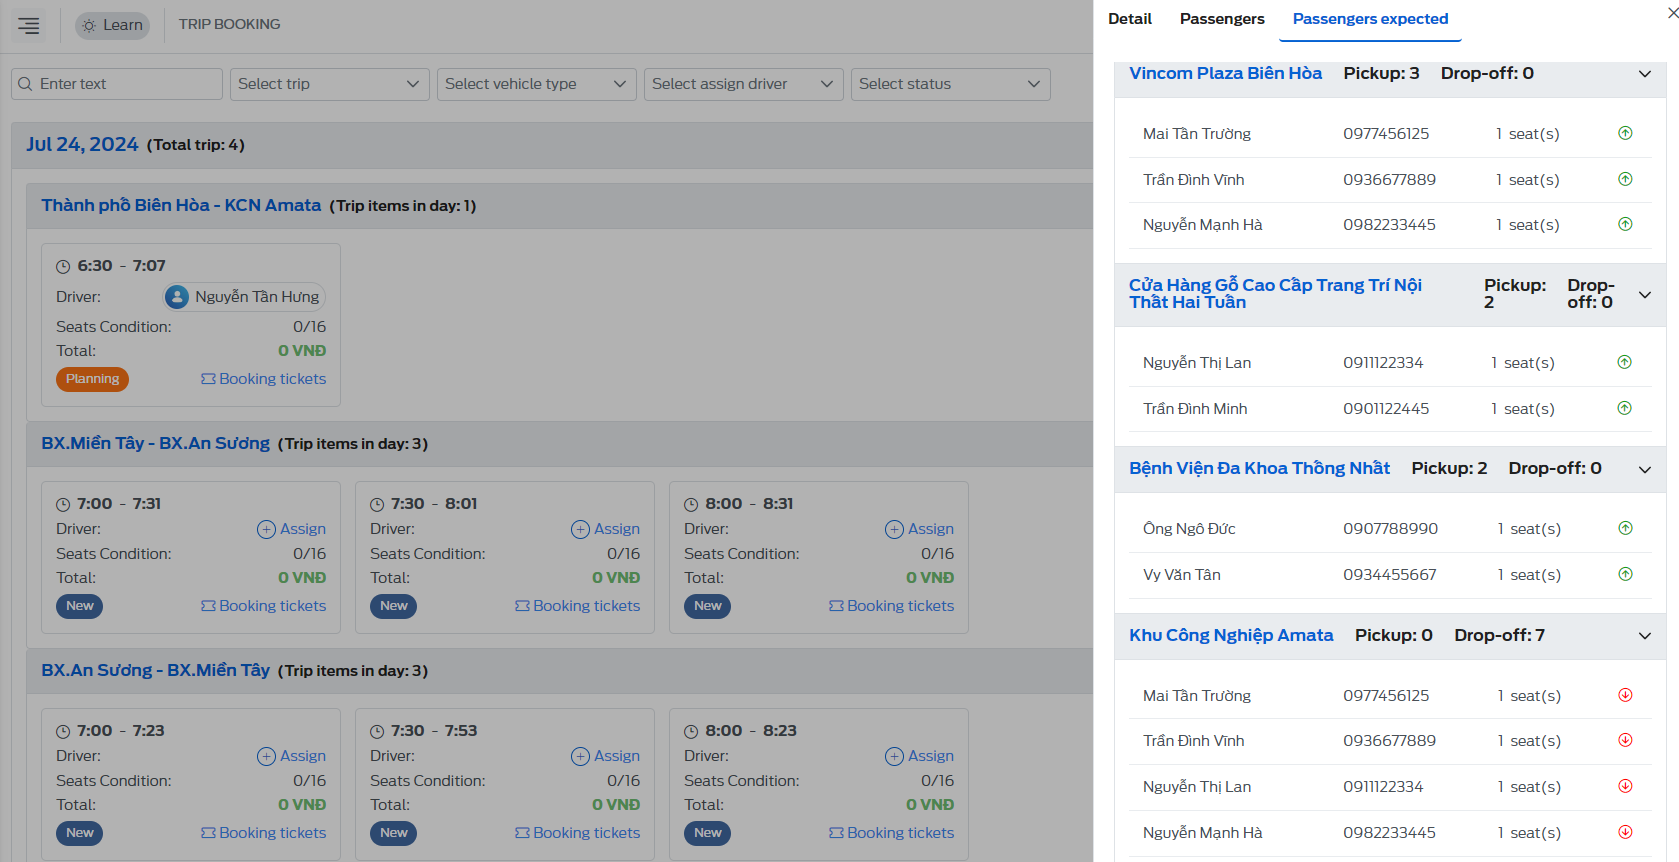
- The user can also see the list of passengers who have boarded the bus in the "Passengers" section and the list of passengers expected to join that trip booking.
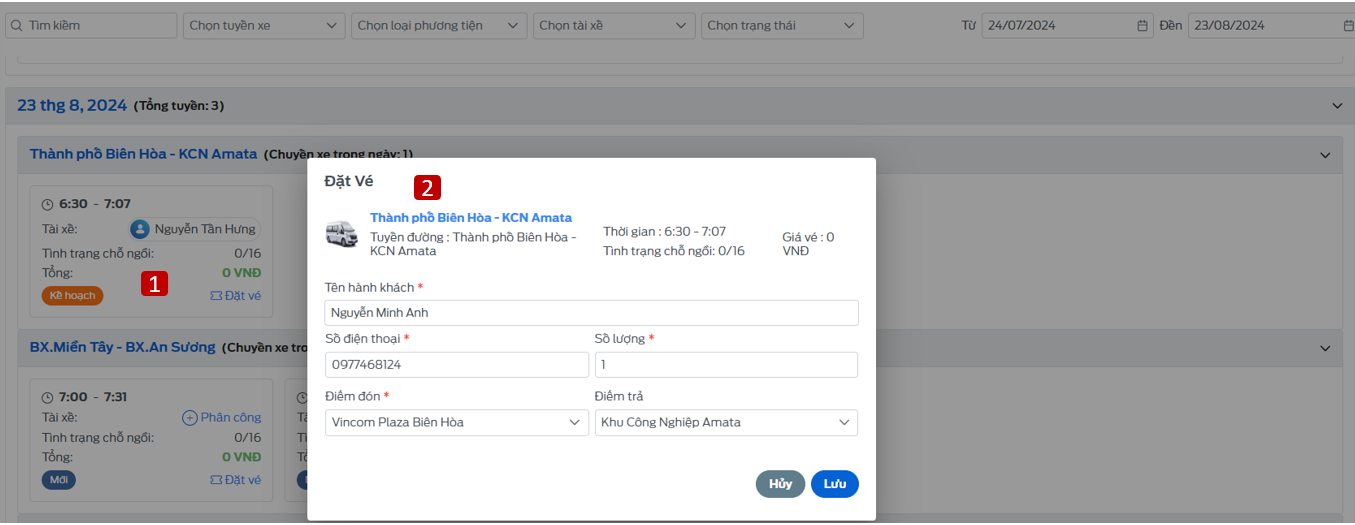
6.2 - Booking tickets
-
Booking tickets is where the passenger's booking information is entered when the staff and System Manager receive the booking information from the passenger's call.
-
Click on the "Book tickets" button, fill in all the information in the fields and click the "Save" button.
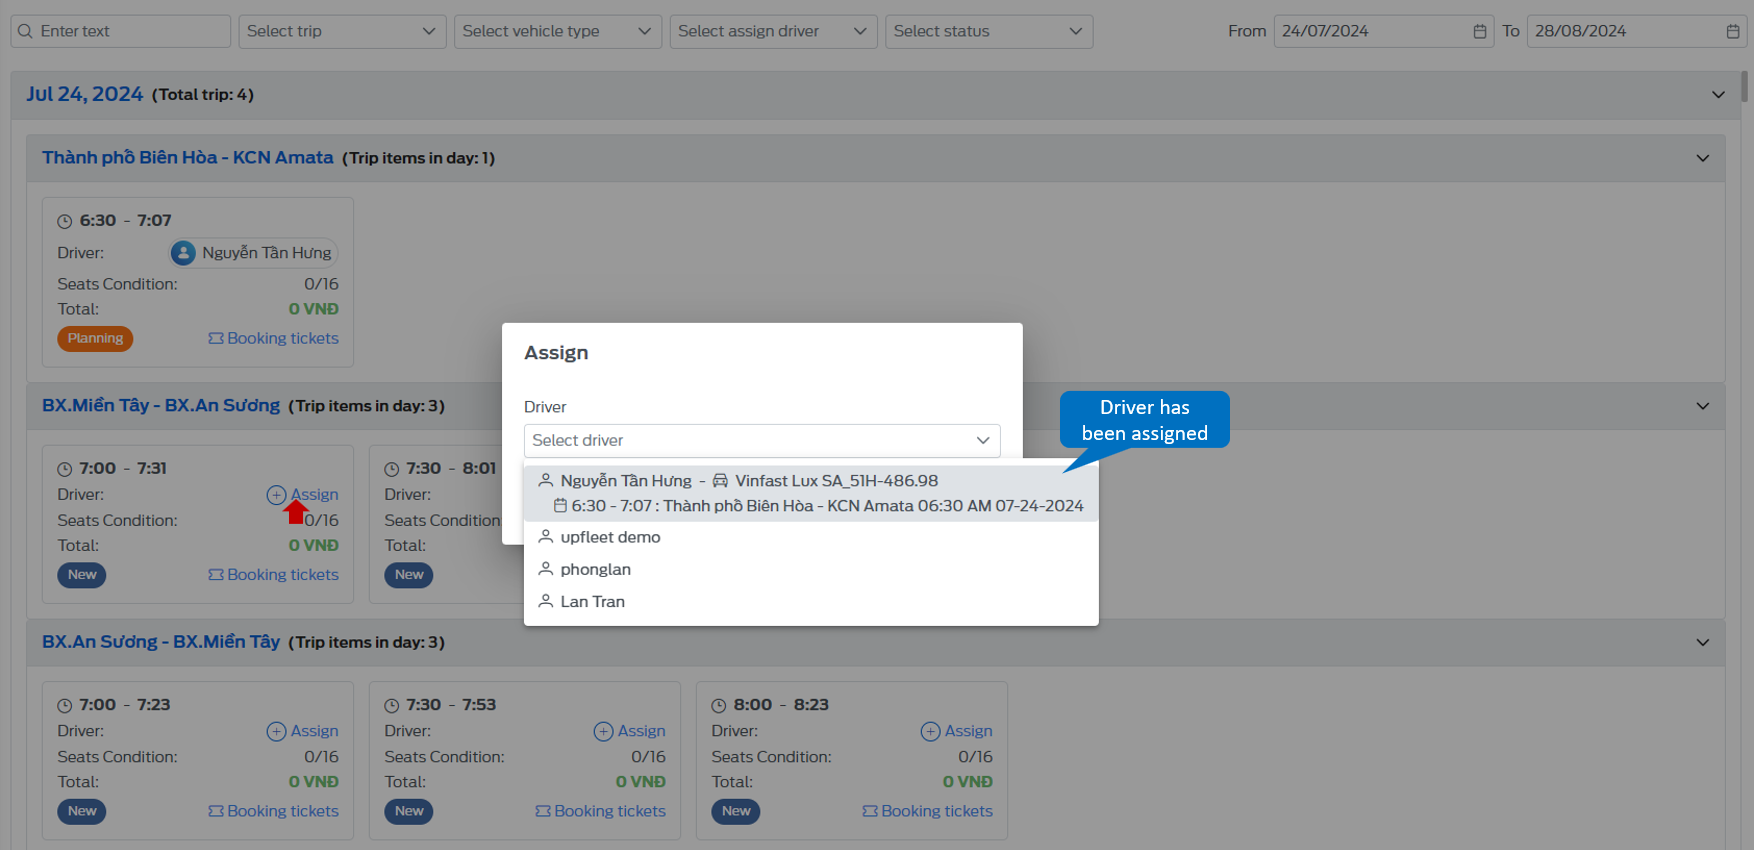
6.3 - Assignment
- Assignment is to assign a driver to a trip booking, click on the "Assign" button, a pop up will appear on the screen, where you choose the driver to run that trip.
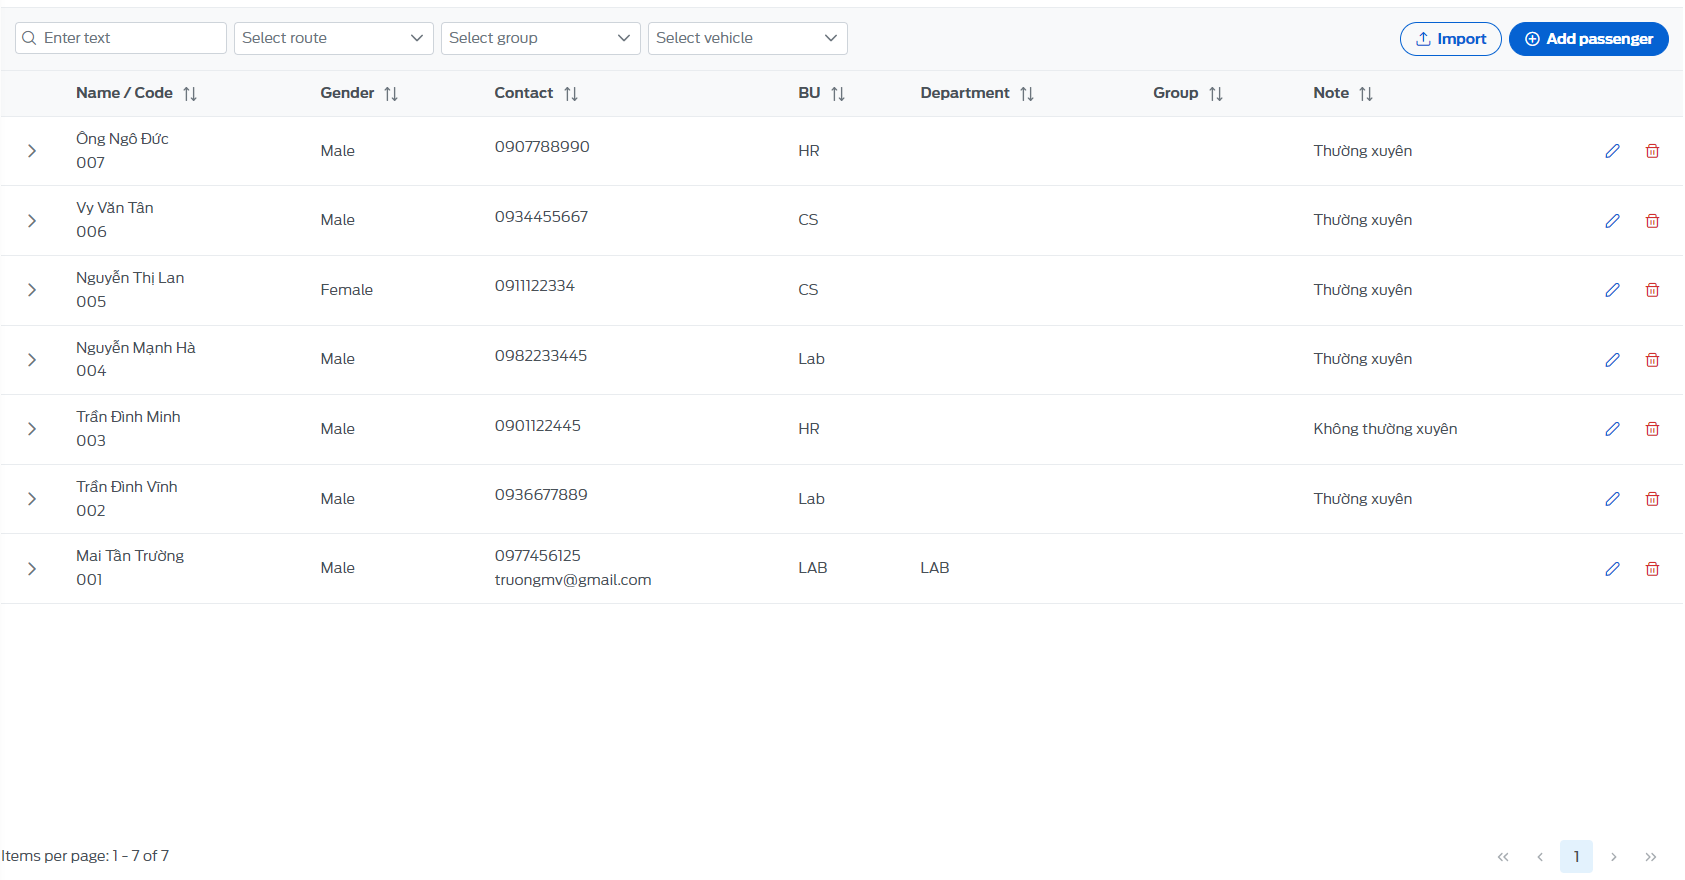
7. Passenger Management
A place to manage employees and students from customers of the bus companies, serving the purpose of picking up and dropping off employees to work or picking up students to school, ensuring that no employees or students are left behind when the driver picks them up.
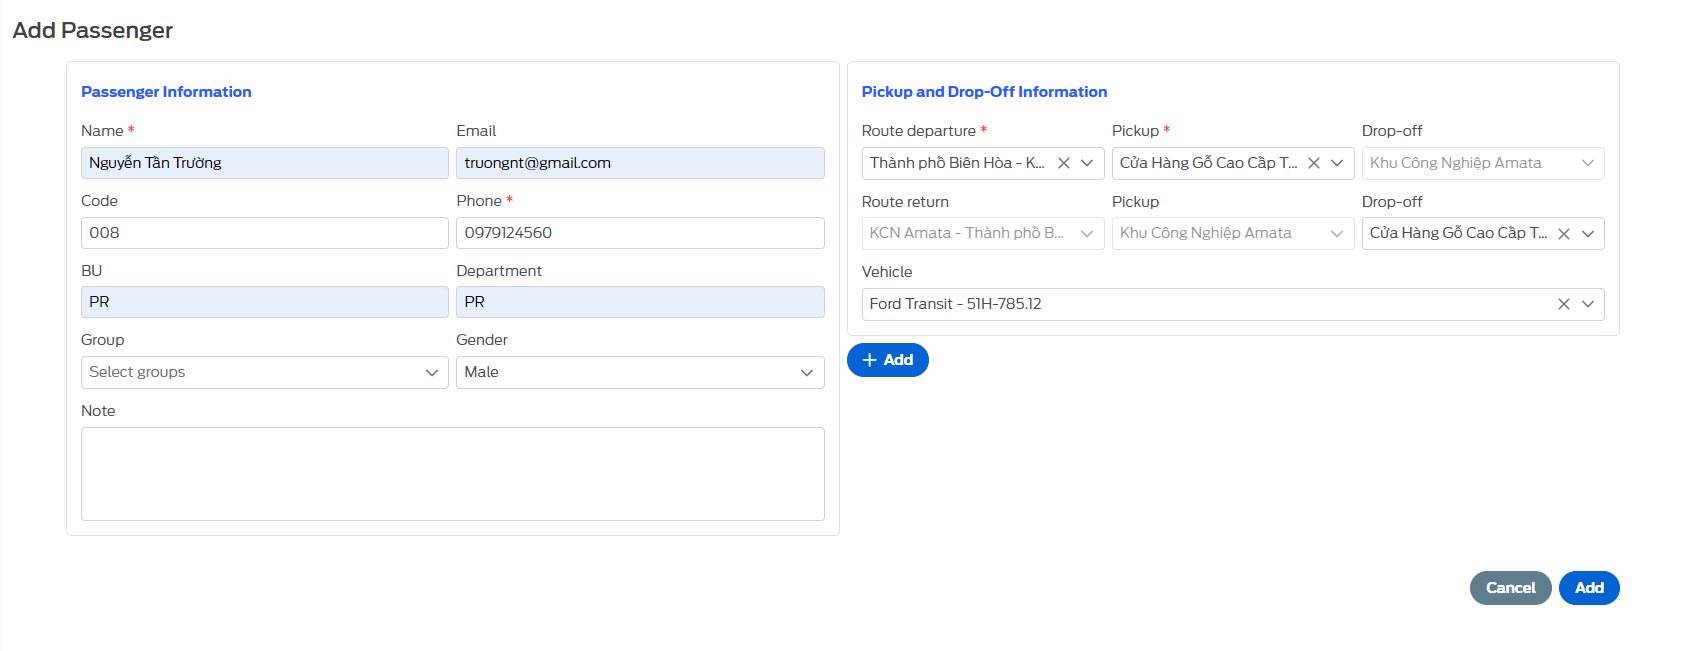
7.1 - Add passengers
-
Method 1: On the passenger list page, select the "Add passenger" button. Fill in all the information as shown below and select "Add"
-
The system sends an authentication email to the passenger's email: you must complete the authentication steps, set a password and press the "Send" button to complete.
-
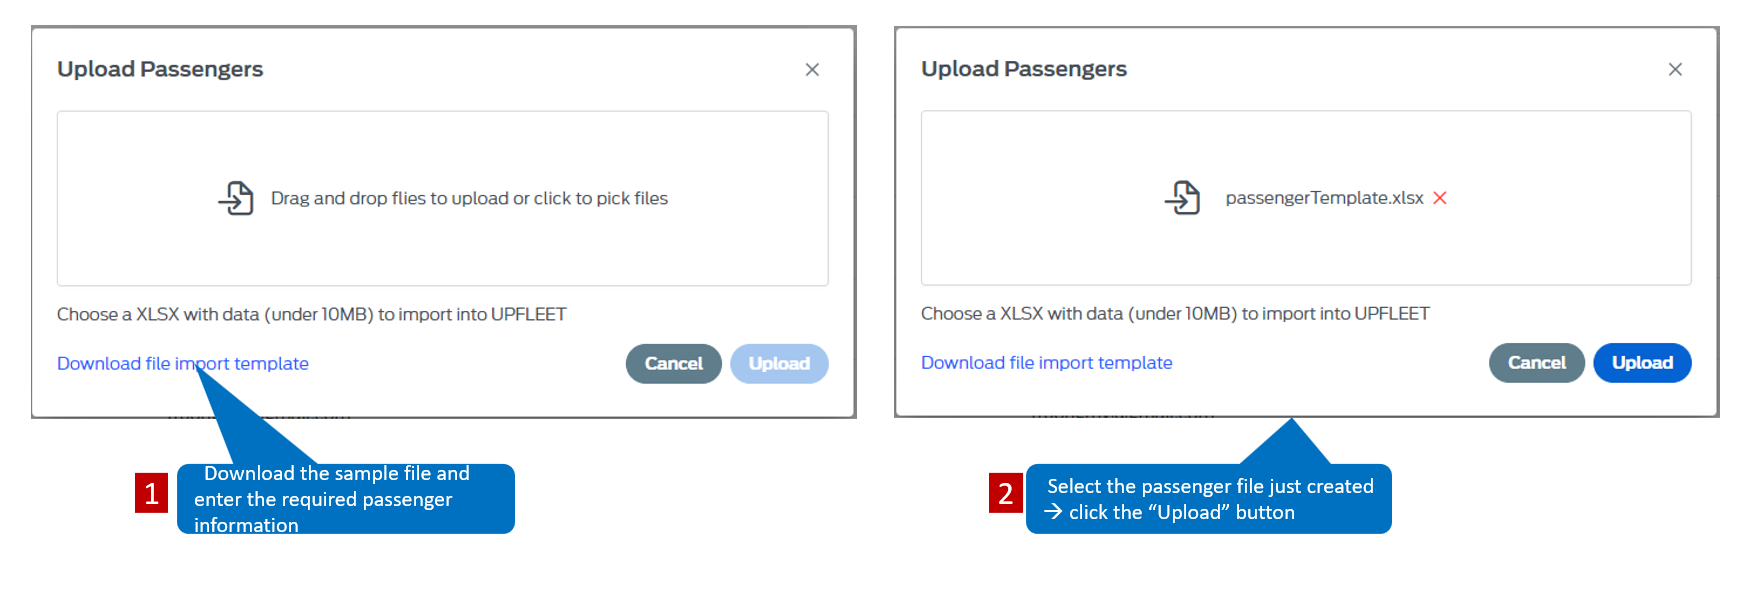
Method 2: Upload the passenger list from an excel file. On the passenger list page, select the "Upload" button
-
After the file is uploaded, the system will send a verification email to the passenger's email. You must verify and set a password for the account as in method 1.
-
In the "Pick-up information" section, the System manager can add multiple times to serve the pick-up process so that employees can be picked up at different stations.
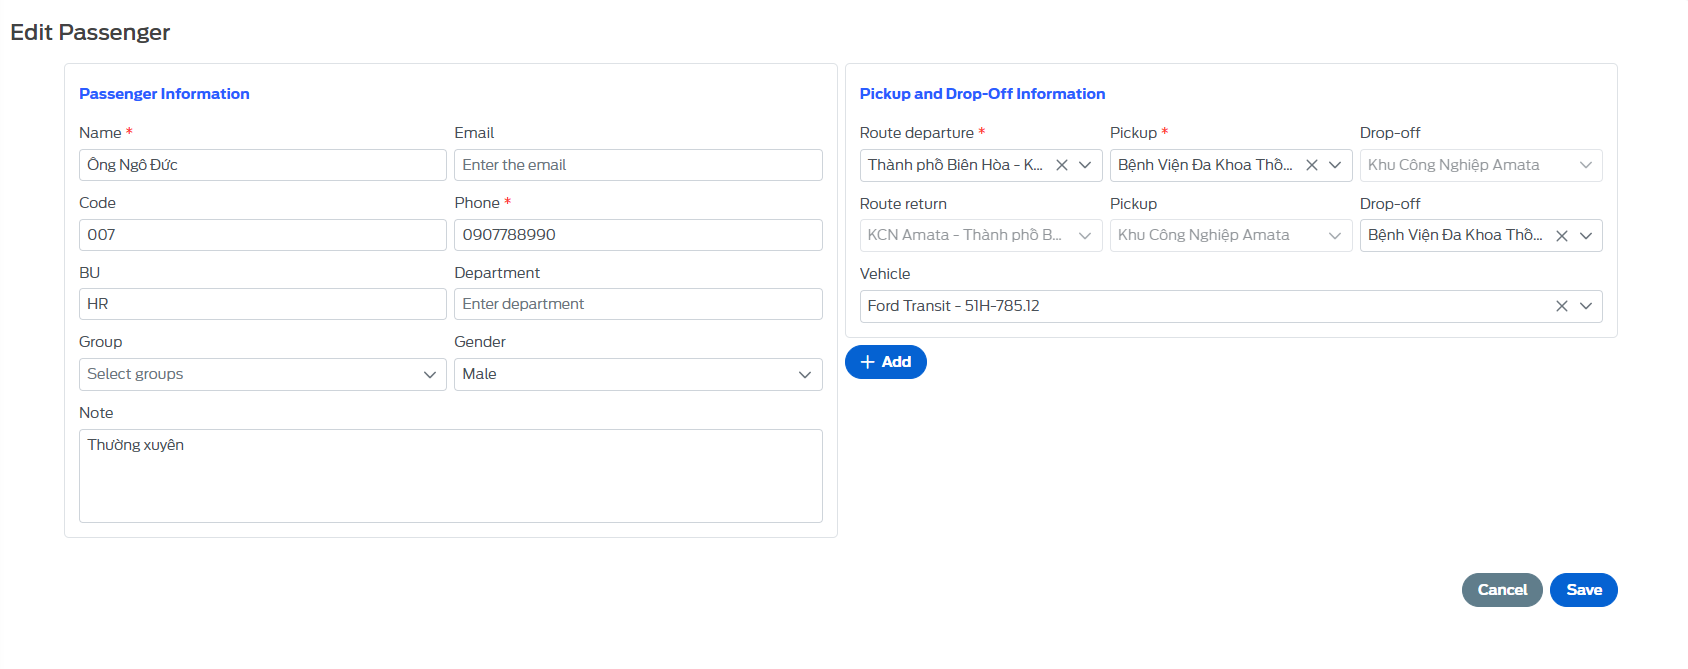
7.2 - Edit passenger
- On the passenger list page, select the icon, all passenger information will appear, you can change any information here and click "Save" to complete editing.
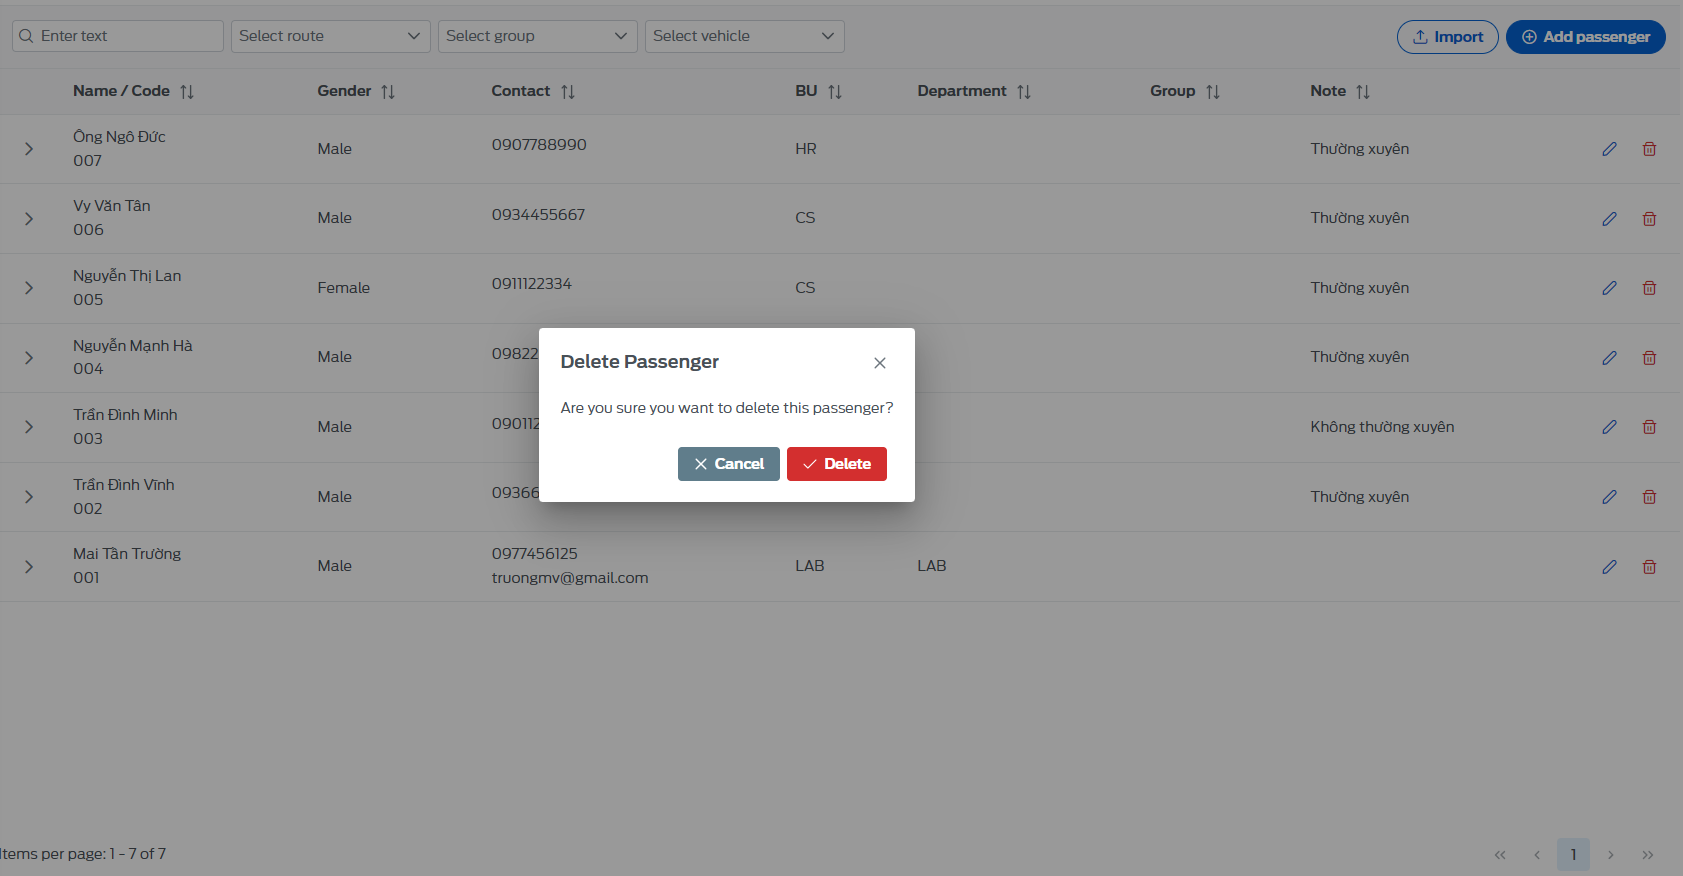
7.3 - Delete passenger
- On the passenger list page, select the icon, the screen will display a voicemail box to confirm whether the user is sure to delete this passenger.
8. Ticket Management
The place to manage the list of tickets that passengers have booked, here the Manager can view the list of tickets, ticket status, passenger pick-up points, passenger information,...

8.1 - View ticket details
- Users can view detailed information of the ticket by clicking on the icon
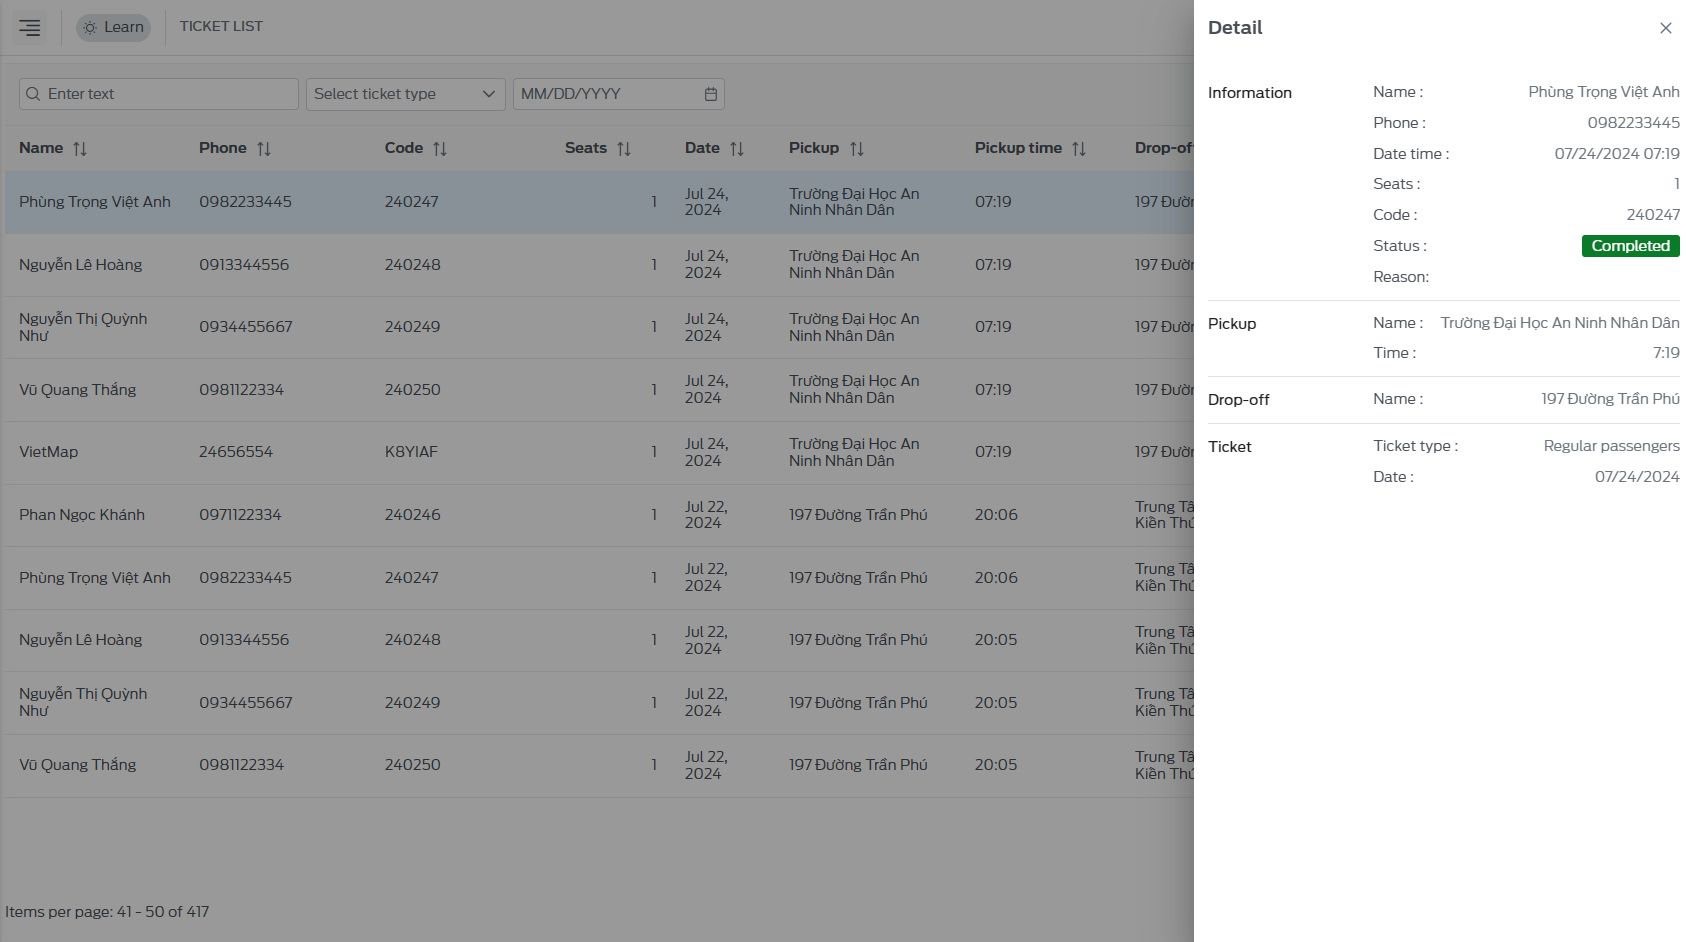
- On the user interface, you can see all the information of the ticket: information of the passenger who booked the ticket, pick-up point, drop-off point, ticket information,...
8.2 - Edit ticket
- On the passenger list page, select the icon , the screen will display a dialog box about changing the information of the ticket that the passenger booked.
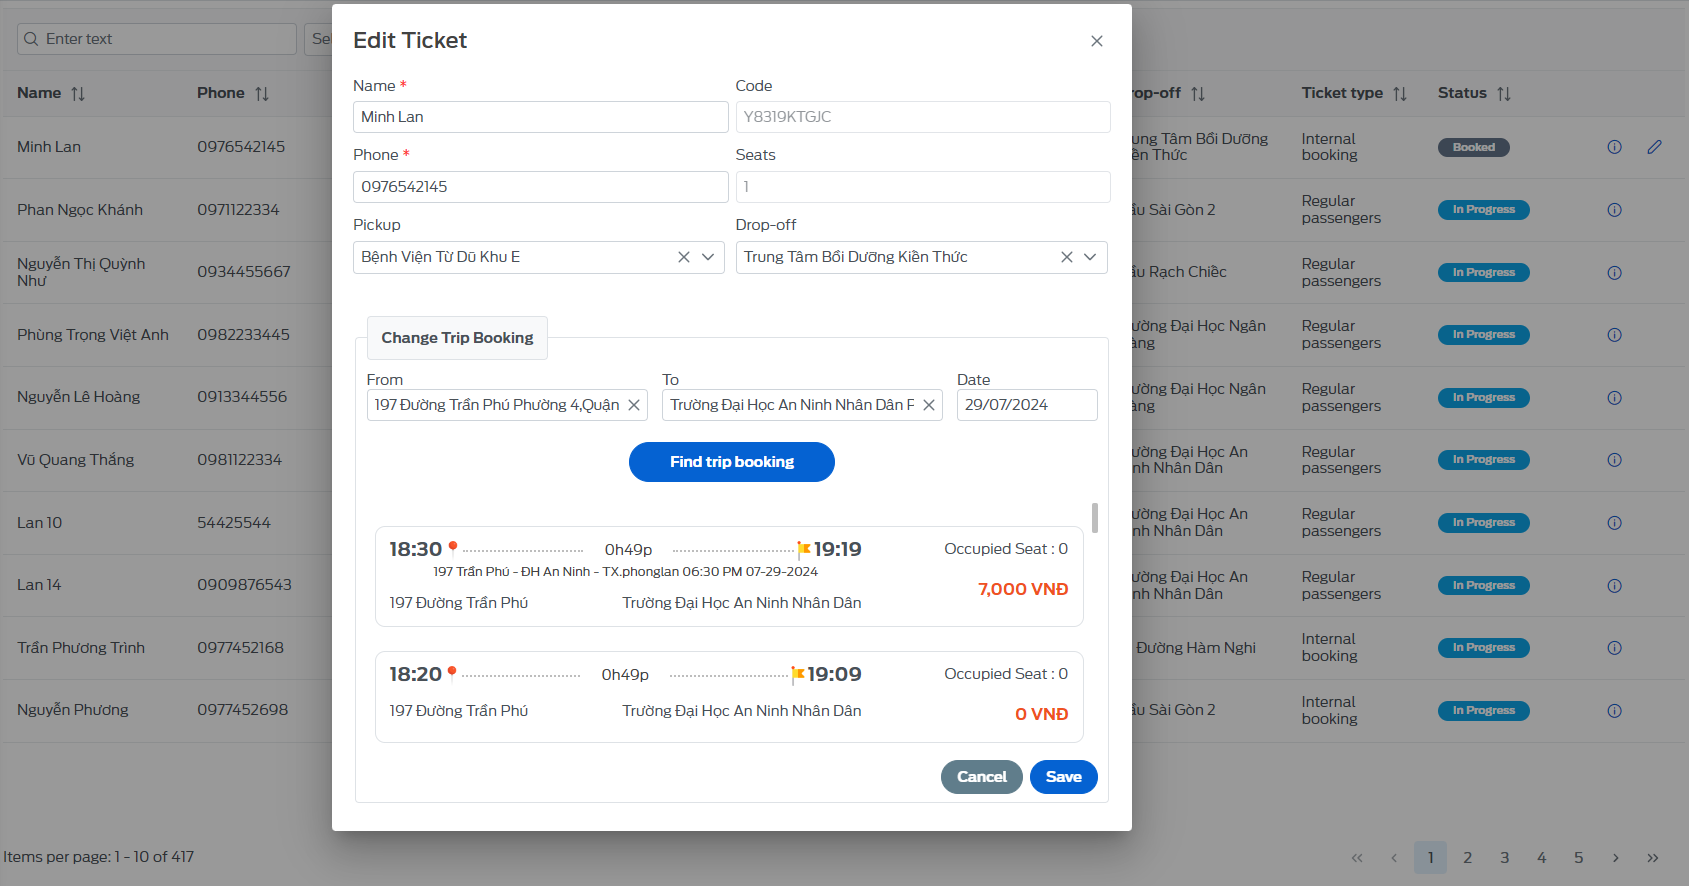
- Here users can search for flights by date that match the passenger's information to be changed and select, after selecting, click the "Save" button to complete.
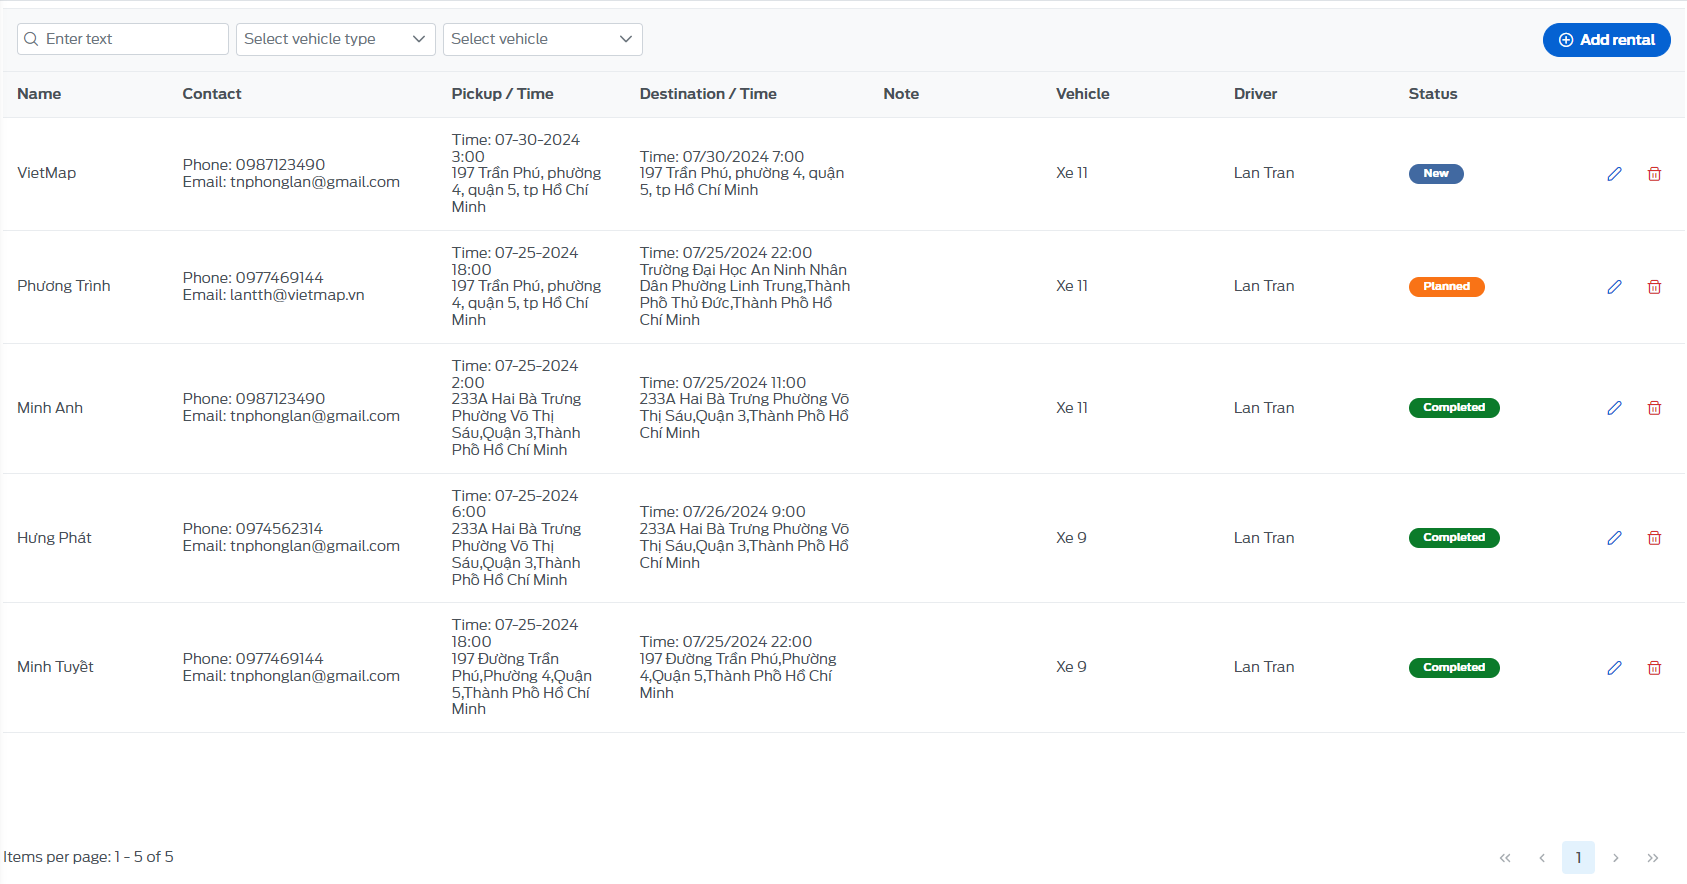
9. Car rental management
Displays all vehicle rental requests from customers, vehicle rental information,...
9.1 - List of vehicle rental requests
Displays the entire list of vehicle rental request information including information: customer information, pick-up point, drop-off point, vehicle, request status,...
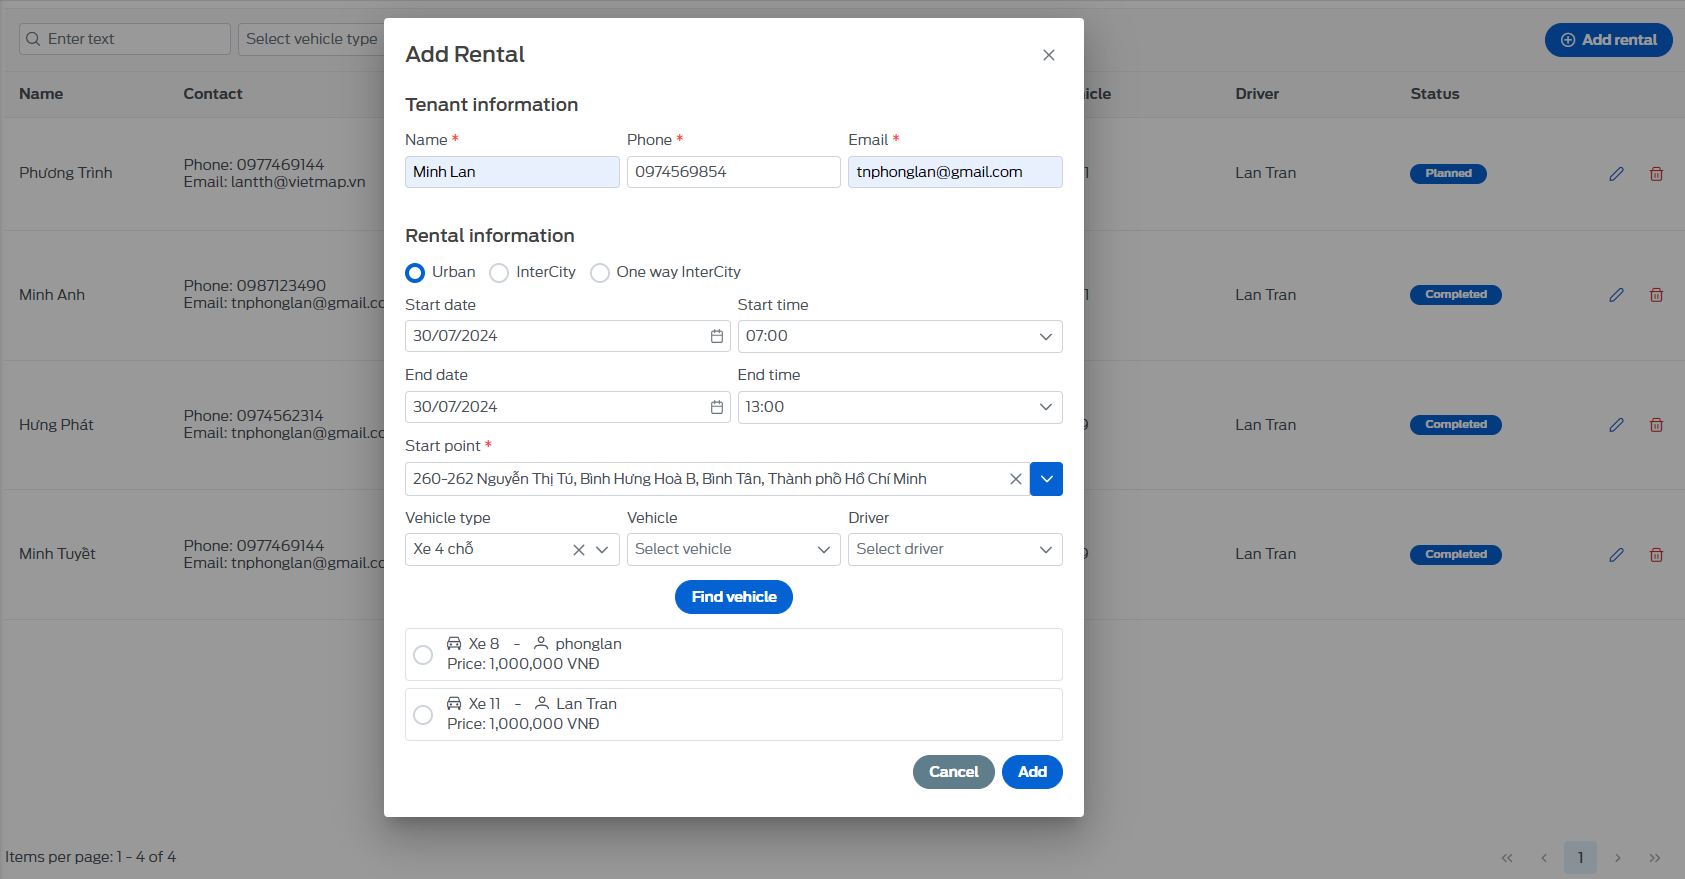
9.1.1 - Add vehicle rental request
- In the request list, click the "Add rental" button
- Fill in the vehicle information and click the “Find vehicle” button: the system will display vehicles that match your rental request. Select the vehicle you want to rent and click the “Add” button.
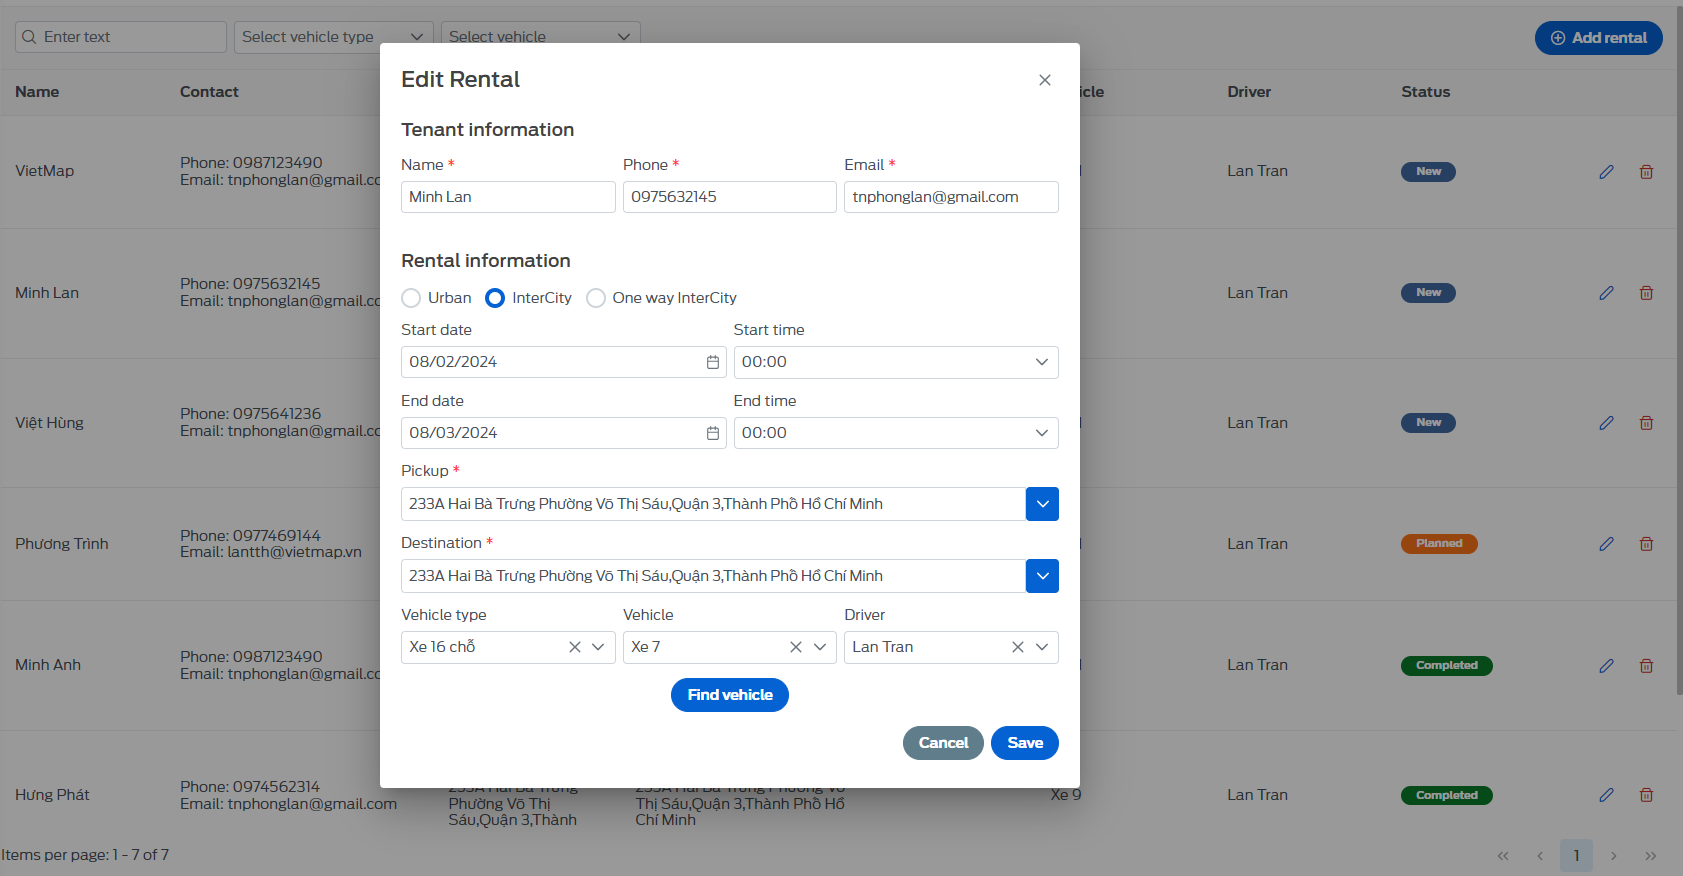
9.1.2 - Edit request
- On the passenger list page, select the icon, all information about the request will appear, you can Change any information here and click "Save" to complete editing.
9.1.3 - Delete request
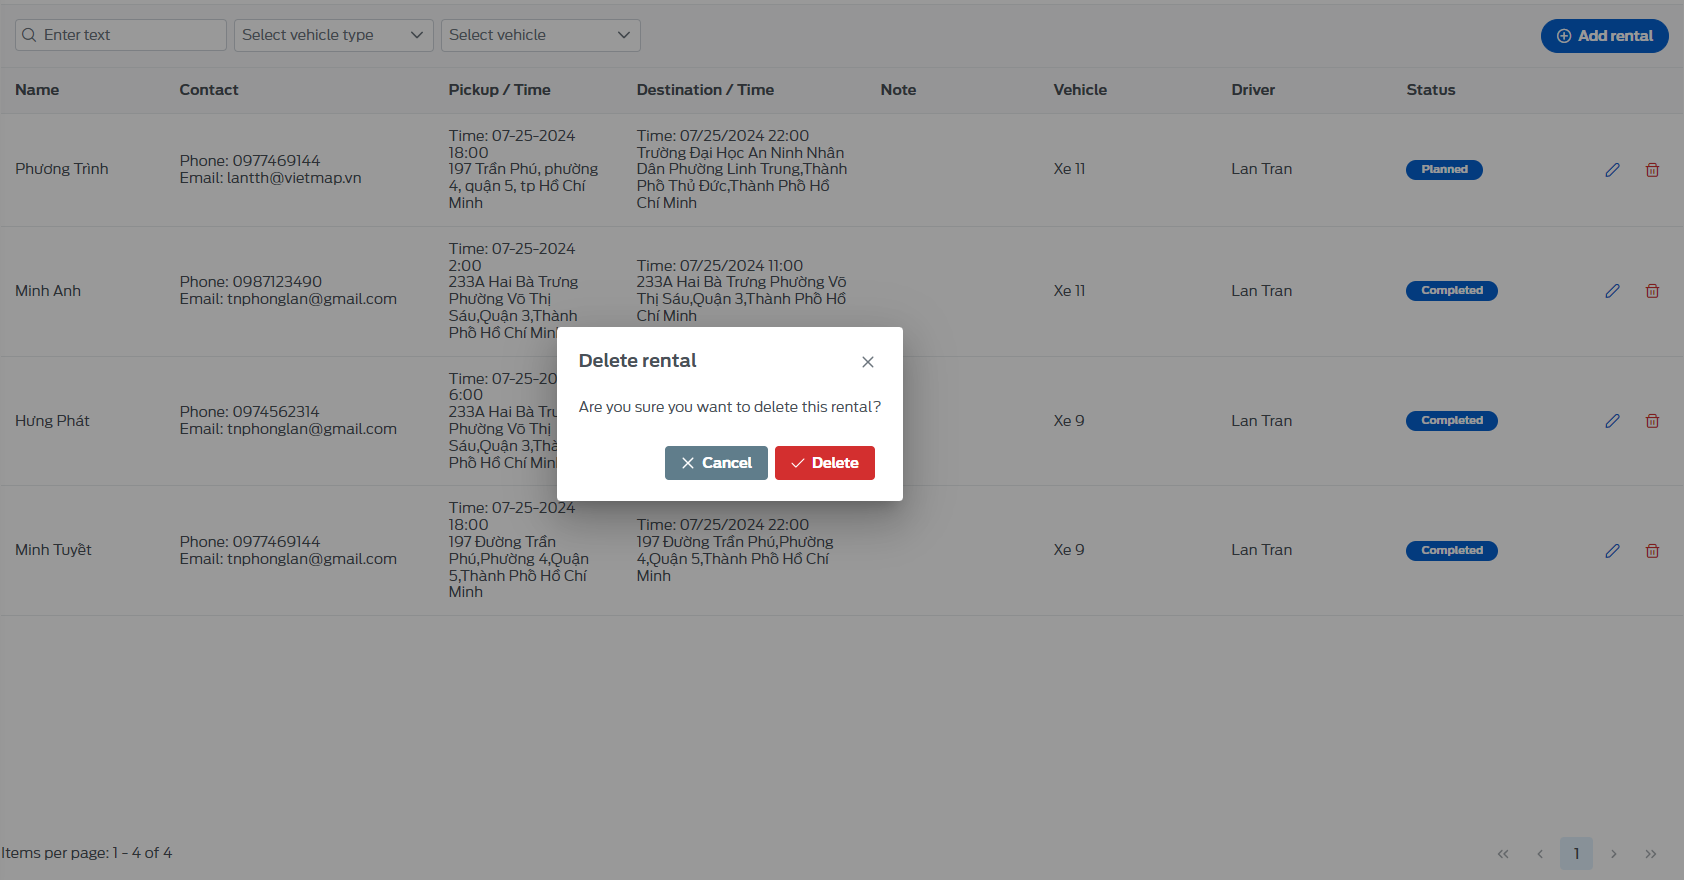
- On the list page, click the icon, the screen will display a dialog box to confirm whether the user is sure to delete this request.
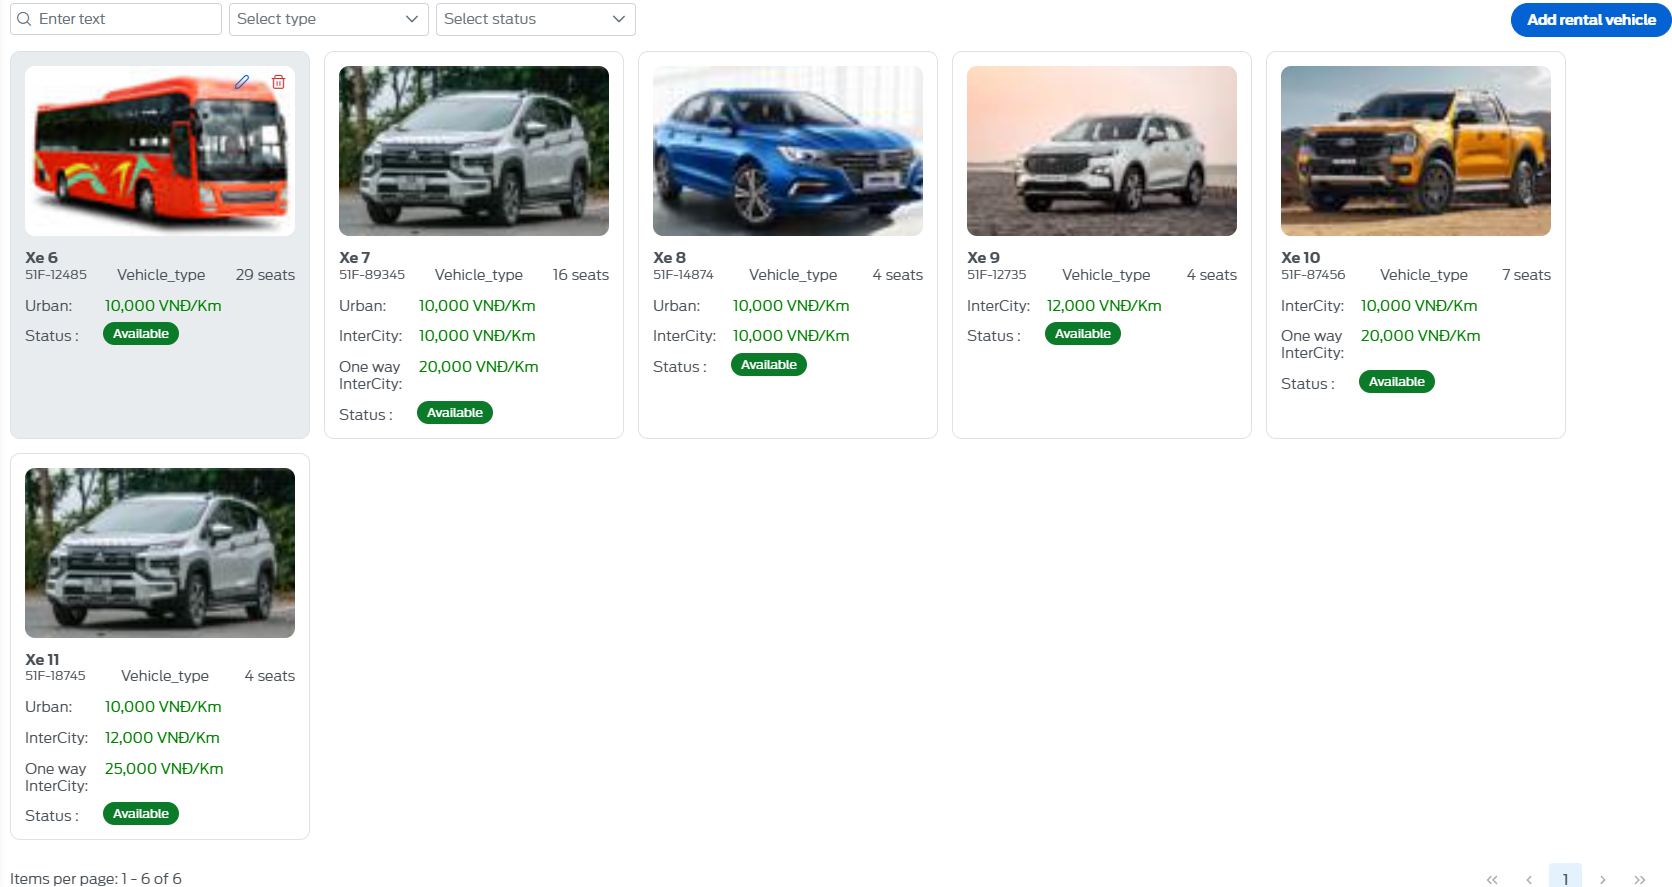
9.2 - List of vehicles for rent
Display the entire list of vehicles for rent, vehicle price information, status,...
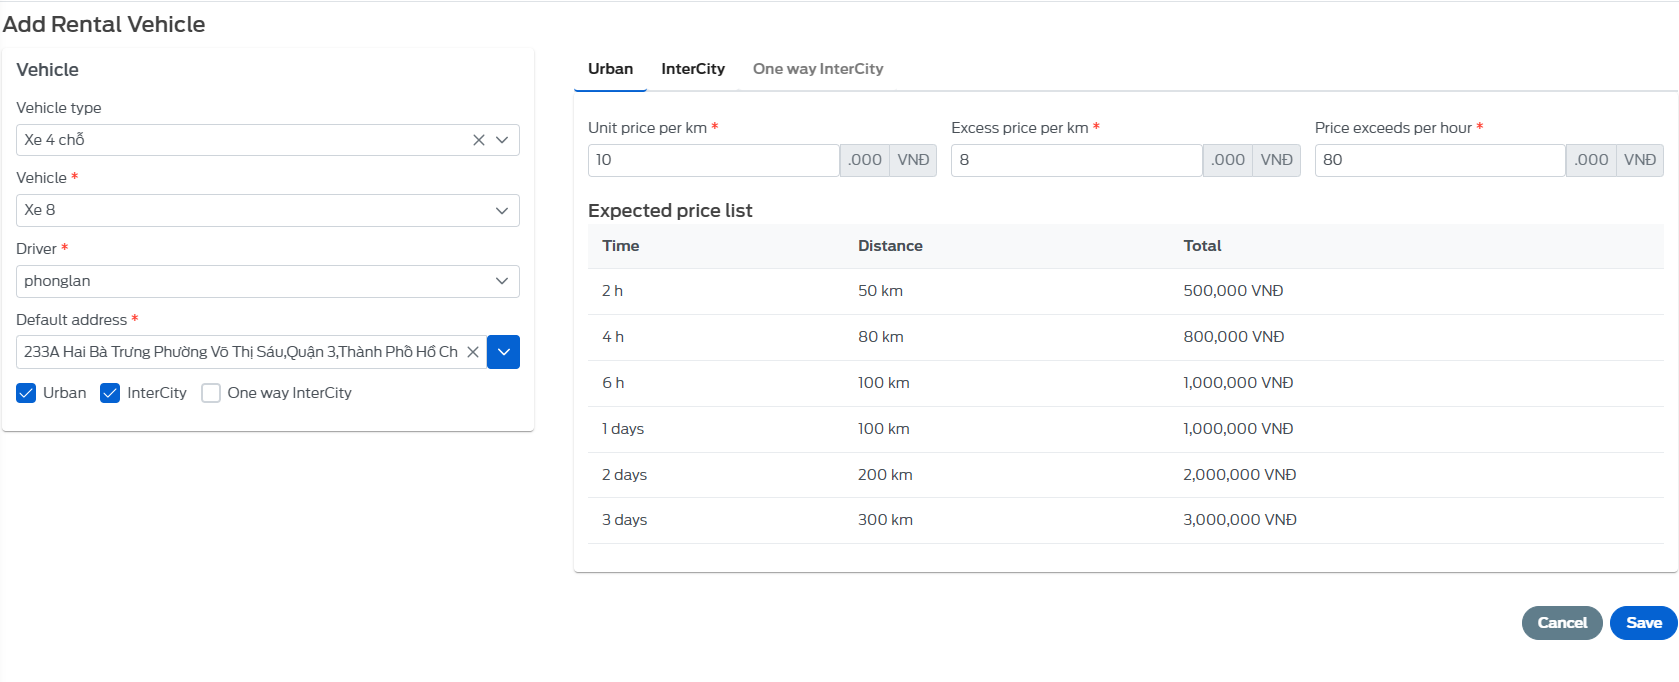
9.2.1 - Add a vehicle for rent
- In the vehicle list, click on the "Add rental vehicle" button
- Fill in the vehicle information as shown below and click "Save"
9.2.2 - Vehicle rental vehicle details
- On the vehicle list page, click on the vehicle you want to view, the system will automatically switch to the vehicle's detail page
-
Here, you can see:
-
Vehicle details.
-
List of vehicle reservations.
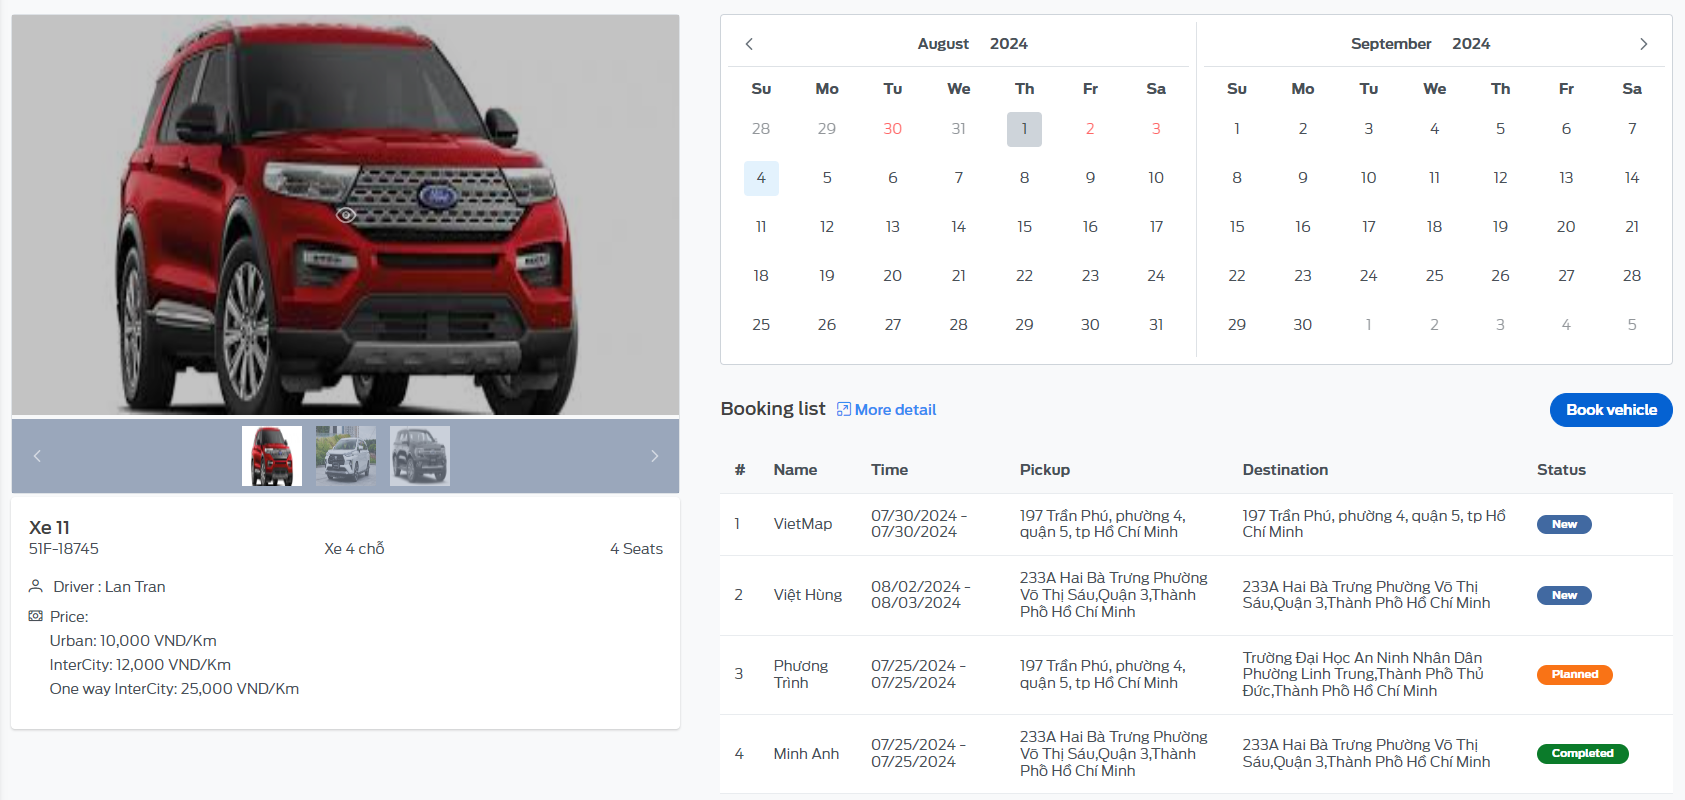
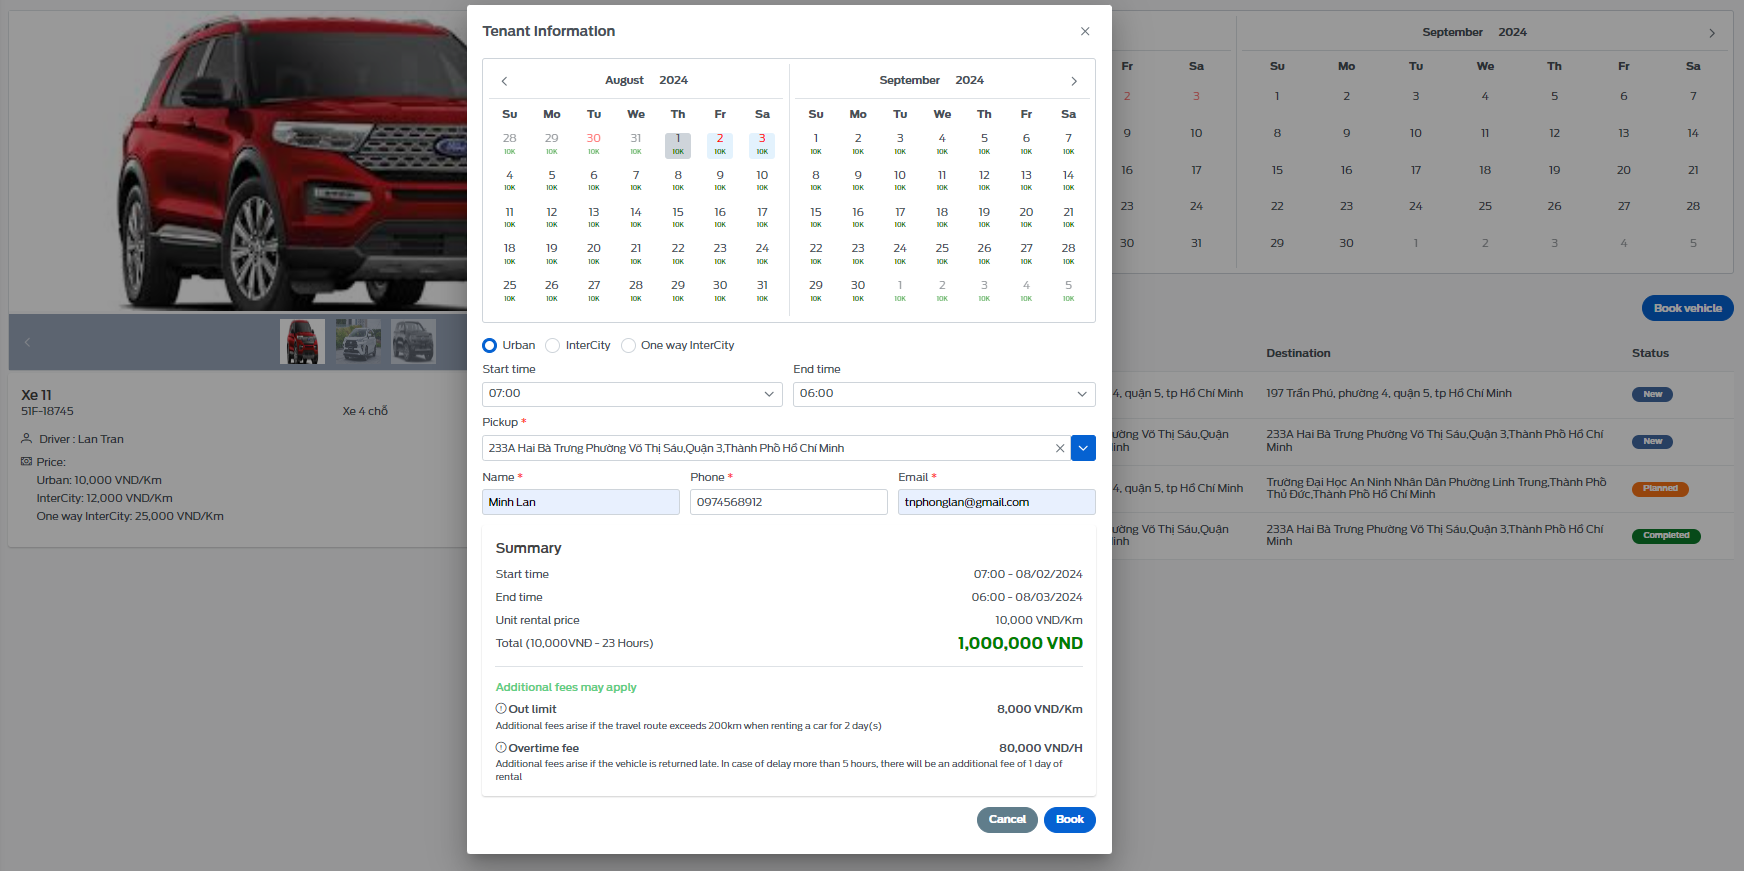
- On this screen, users can book a rental car by clicking the "Book vehicle" button, the screen will display a voicemail box, fill in all the information and click the "Book" button to complete.
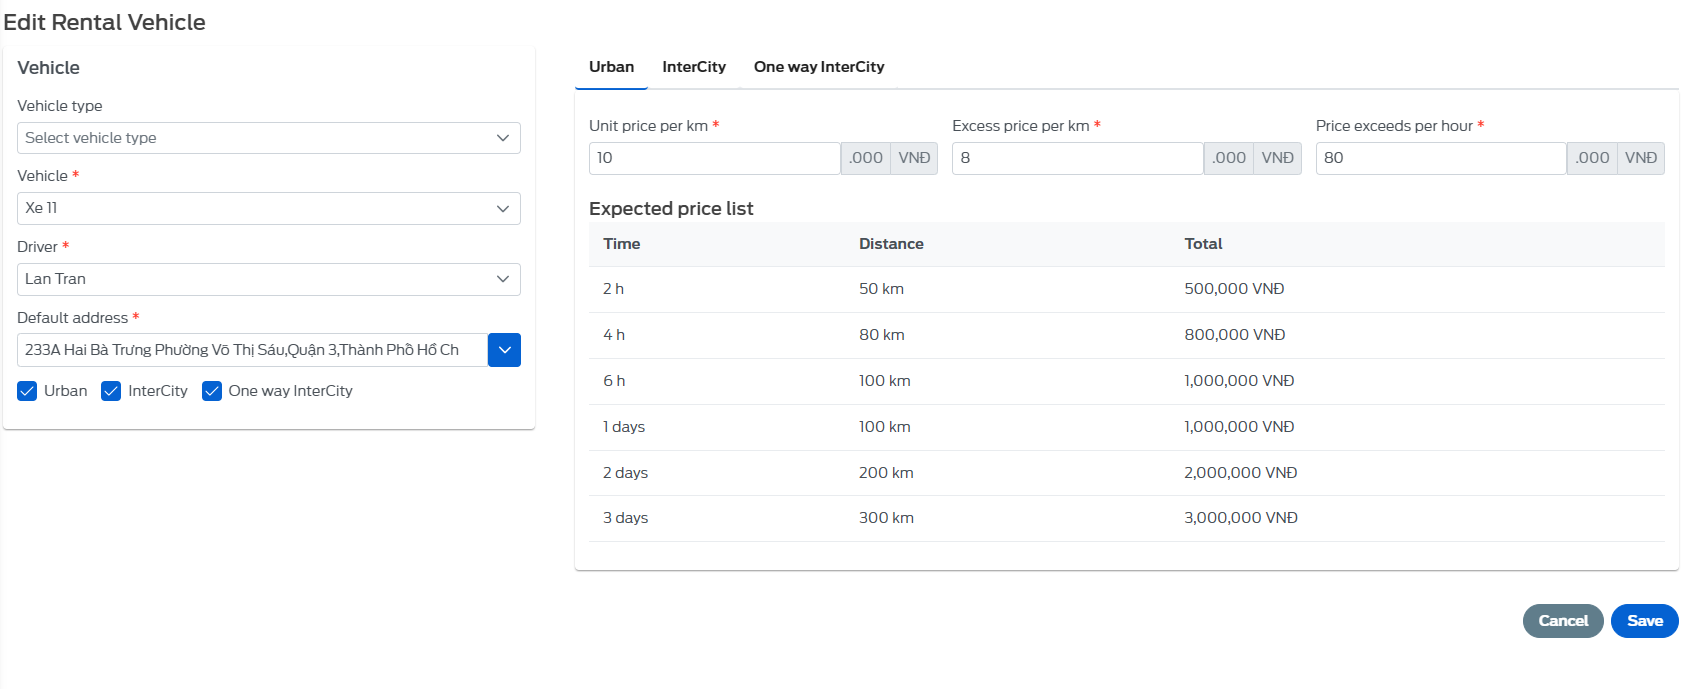
9.2.3 - Edit rental vehicle
- On the vehicle list page, select the icon, all information about the request will appear, you can change any information here and click "Save" to complete the editing.
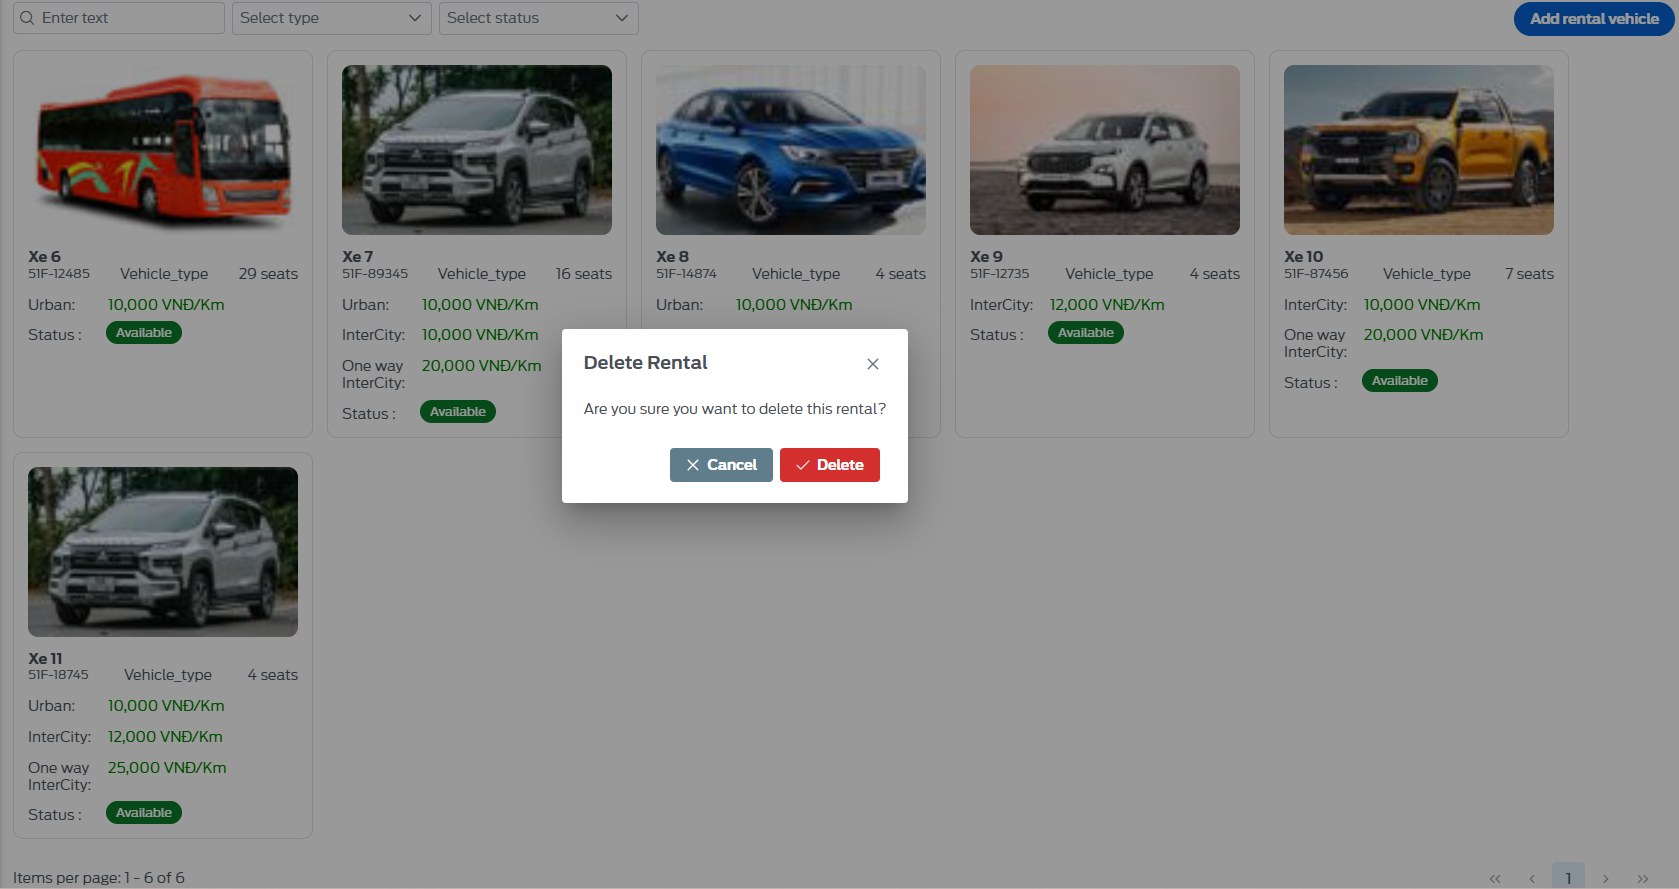
9.2.4 - Delete rental vehicle
- On the vehicle list page, click the icon, the screen will display a voicemail box to confirm whether the user is sure to delete this vehicle.
10. Livemap
- A place for managers/administrators to monitor the fleet's journey in real time, view the vehicle's travel history.
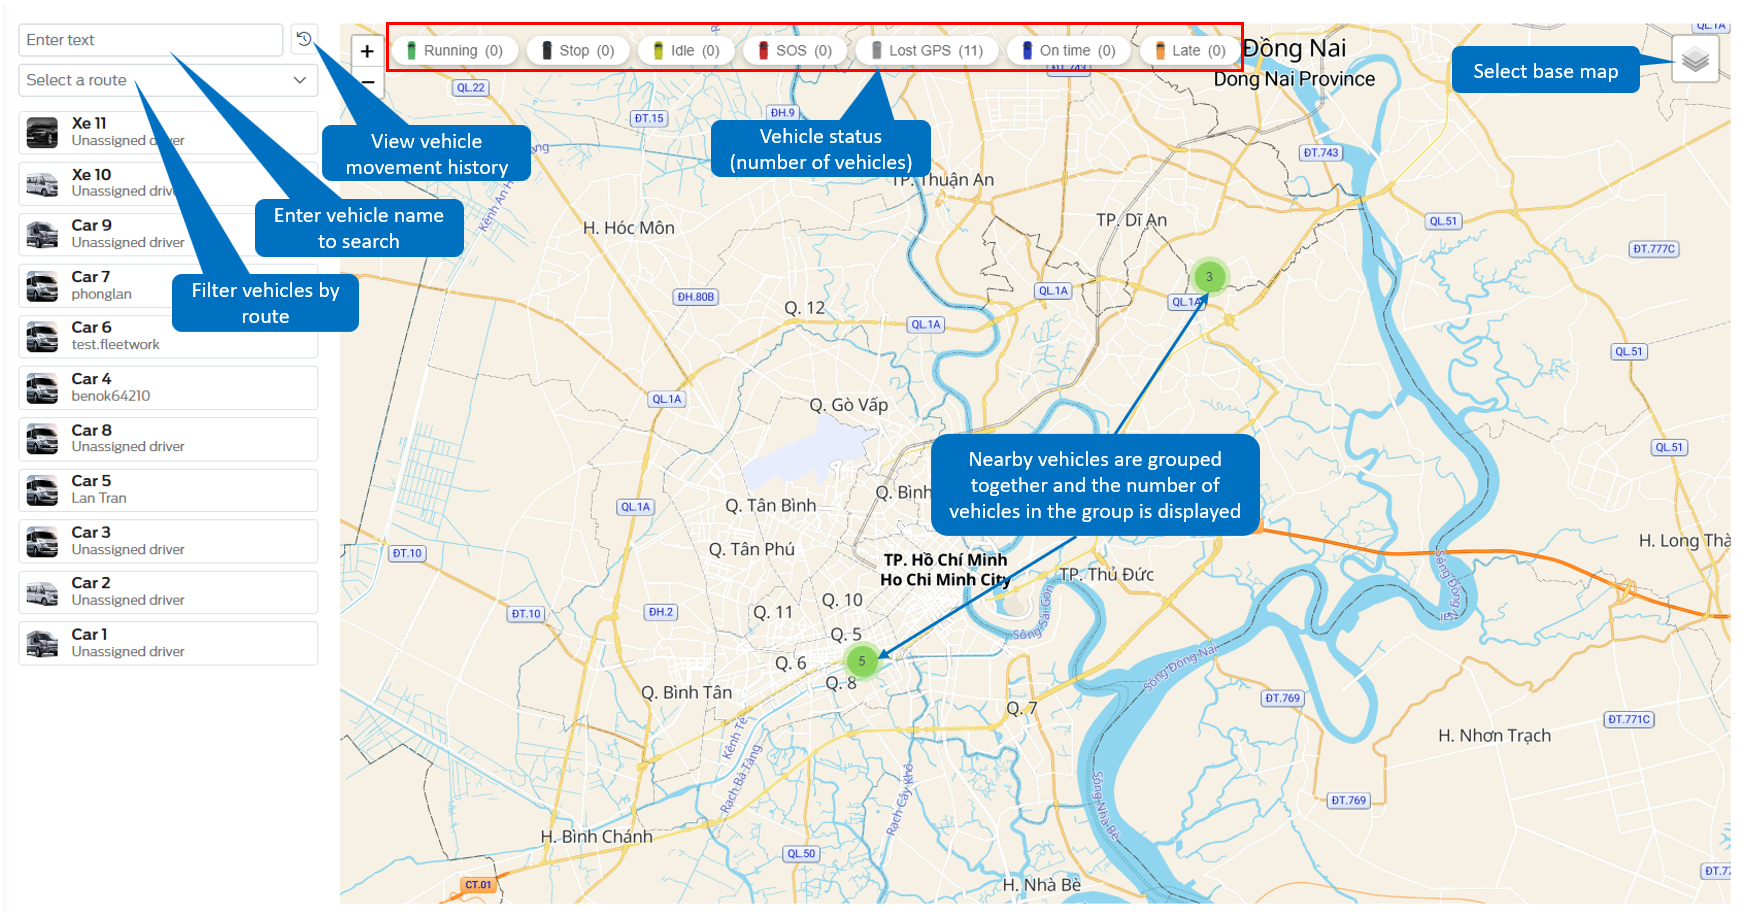
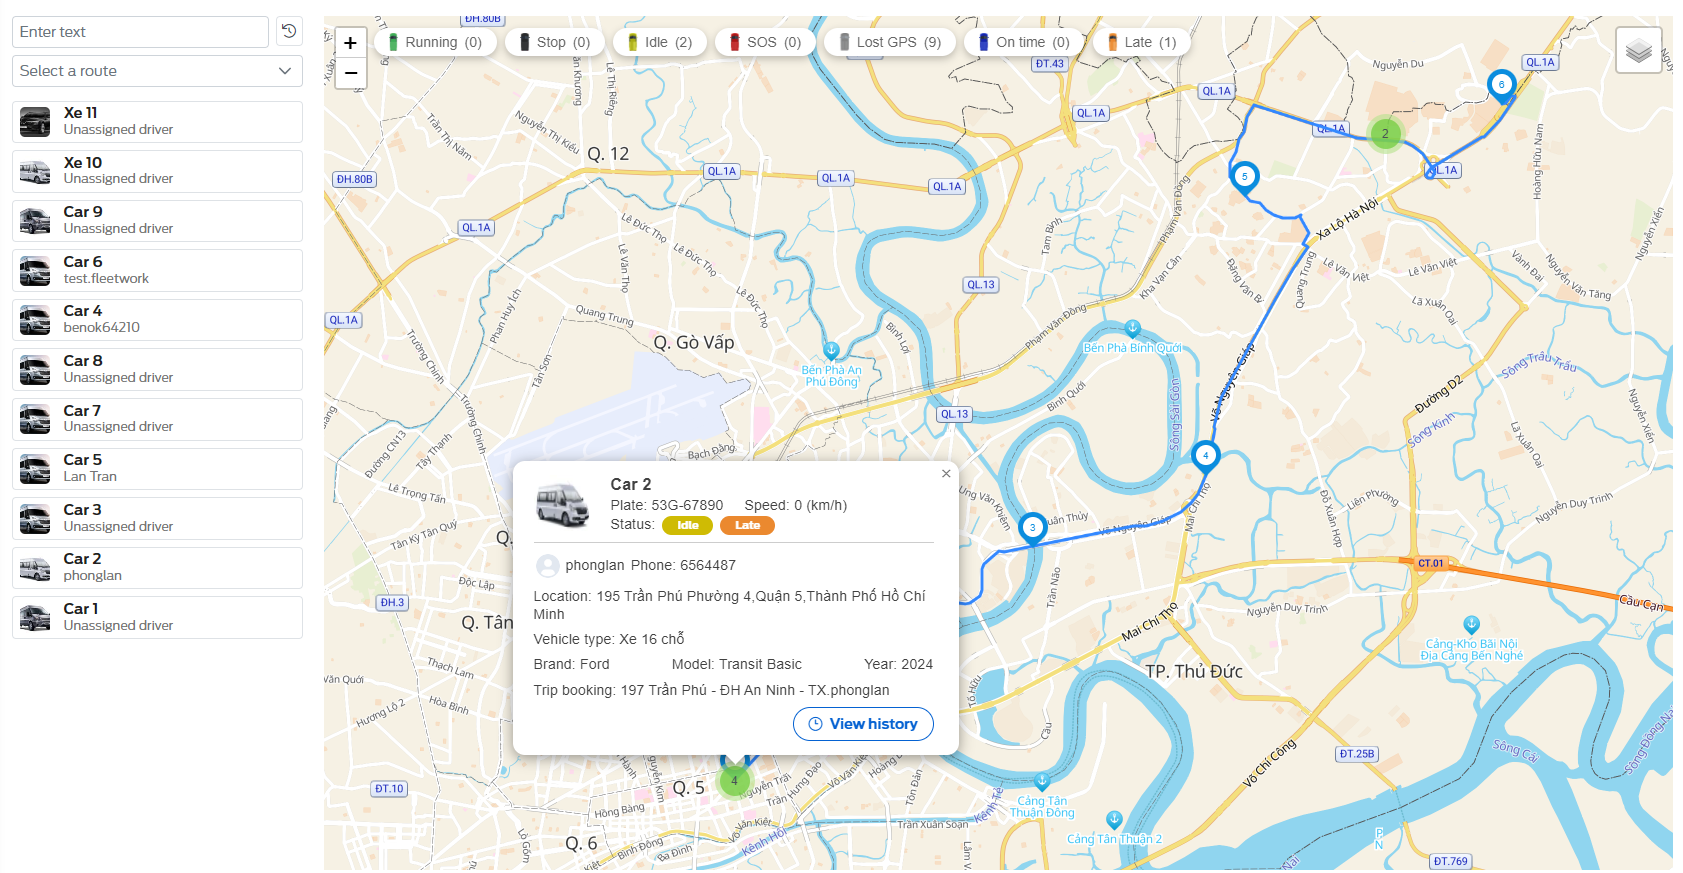
- To view the vehicle's current route during the trip: select the vehicle you want to drive, the route is displayed as shown
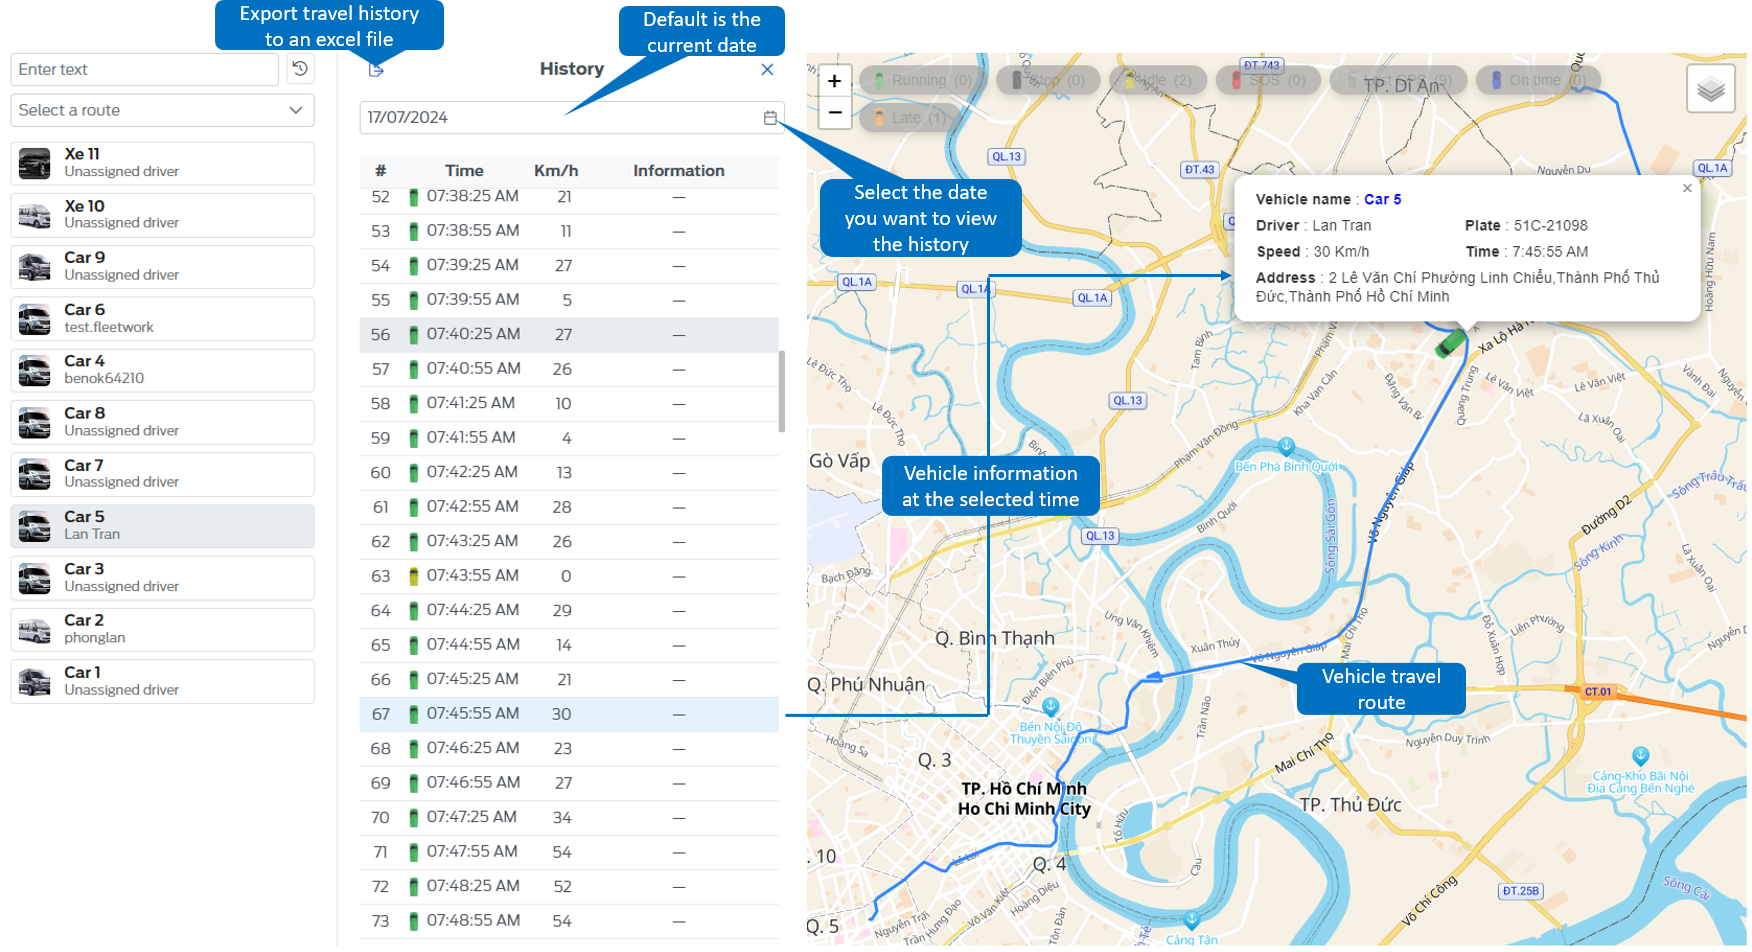
 - To review the vehicle's travel history, the user selects the vehicle and then chooses one of the following two options:
-
Click on the clock icon next to the search box.
-
Click on the "View history" button in the dialog box on the map.
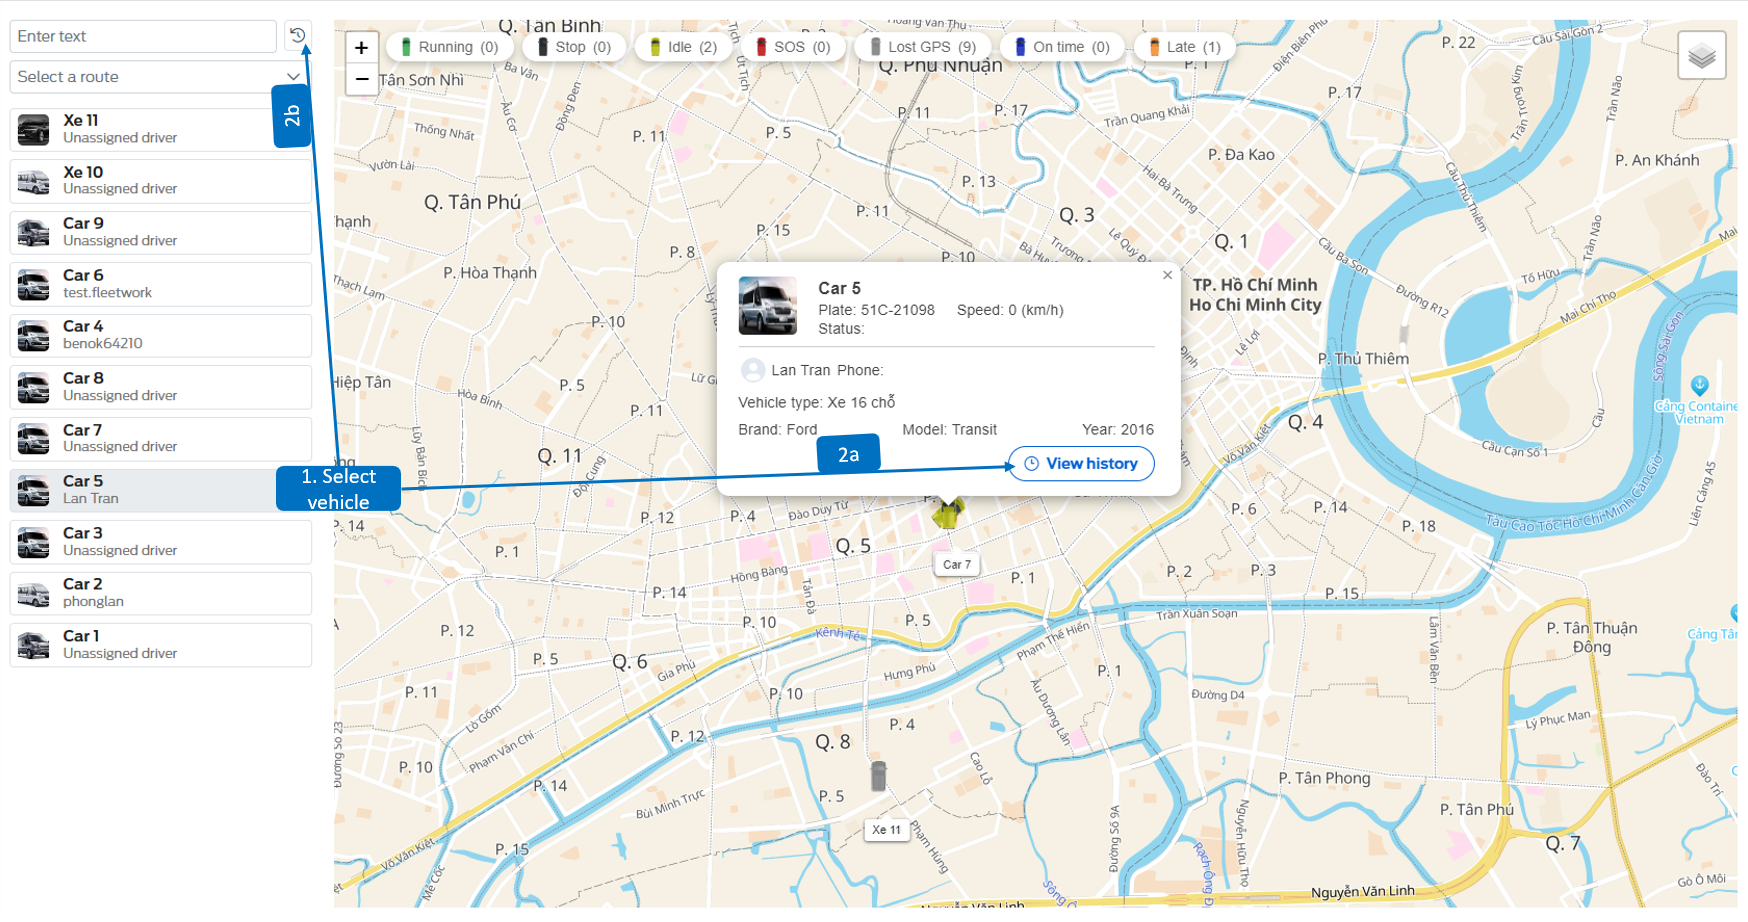
- The vehicle's movement history is displayed as shown below
11. Uptime
Only applicable to Ford Transit 2024 models (V363)
11.1 - Service Reminders
- A support center for managers/administrators to monitor vehicle status and maintenance due dates --> facilitating scheduling and appointment booking with dealerships.
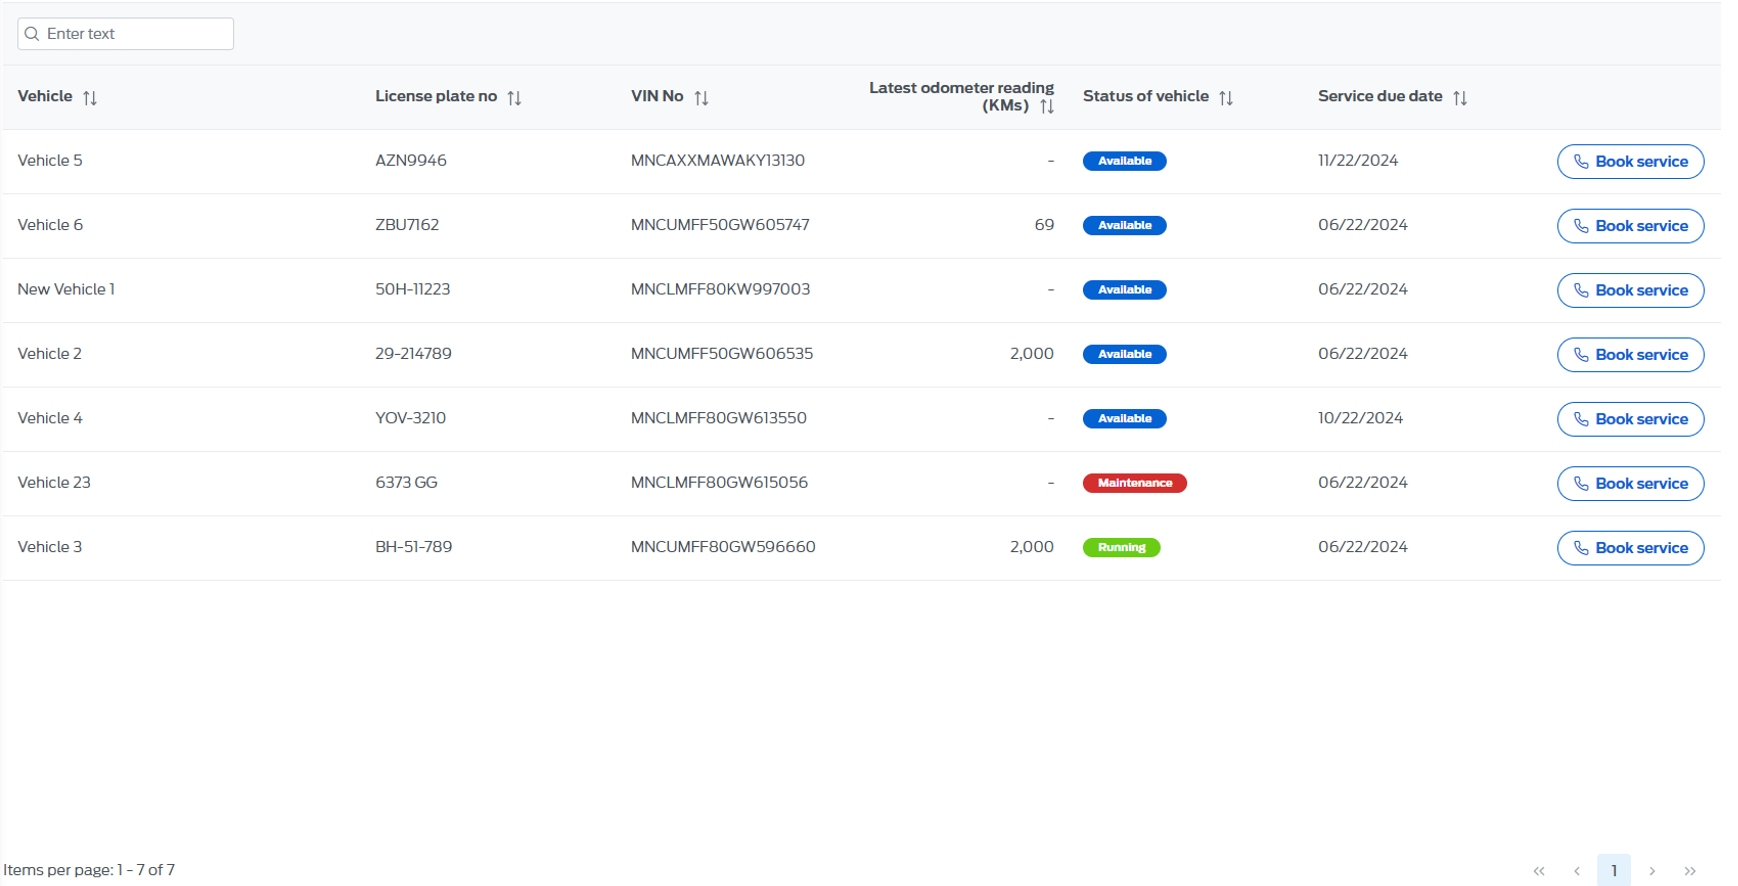 Apart from vehicle information, this page includes the following three details:
-Latest odometer reading(KMs): Odometer reading information entered by the driver on the App
-Status of vehicle:
- Available: The vehicle is operating normally
- Maintenance: The vehicle is at the dealership and undergoing maintenance
- Running: The vehicle is at the dealership with out-of-warranty damage detected; approval from higher management is required for repairs
-Service due date: Next maintenance due date
To schedule an appointment with the dealer, click on the "Book Service" button next to the vehicle information you wish to book. The system will redirect you to the Ford service page, where you can follow the usual steps to schedule your appointment. The system automatically copies the VIN for your convenience during the booking process.
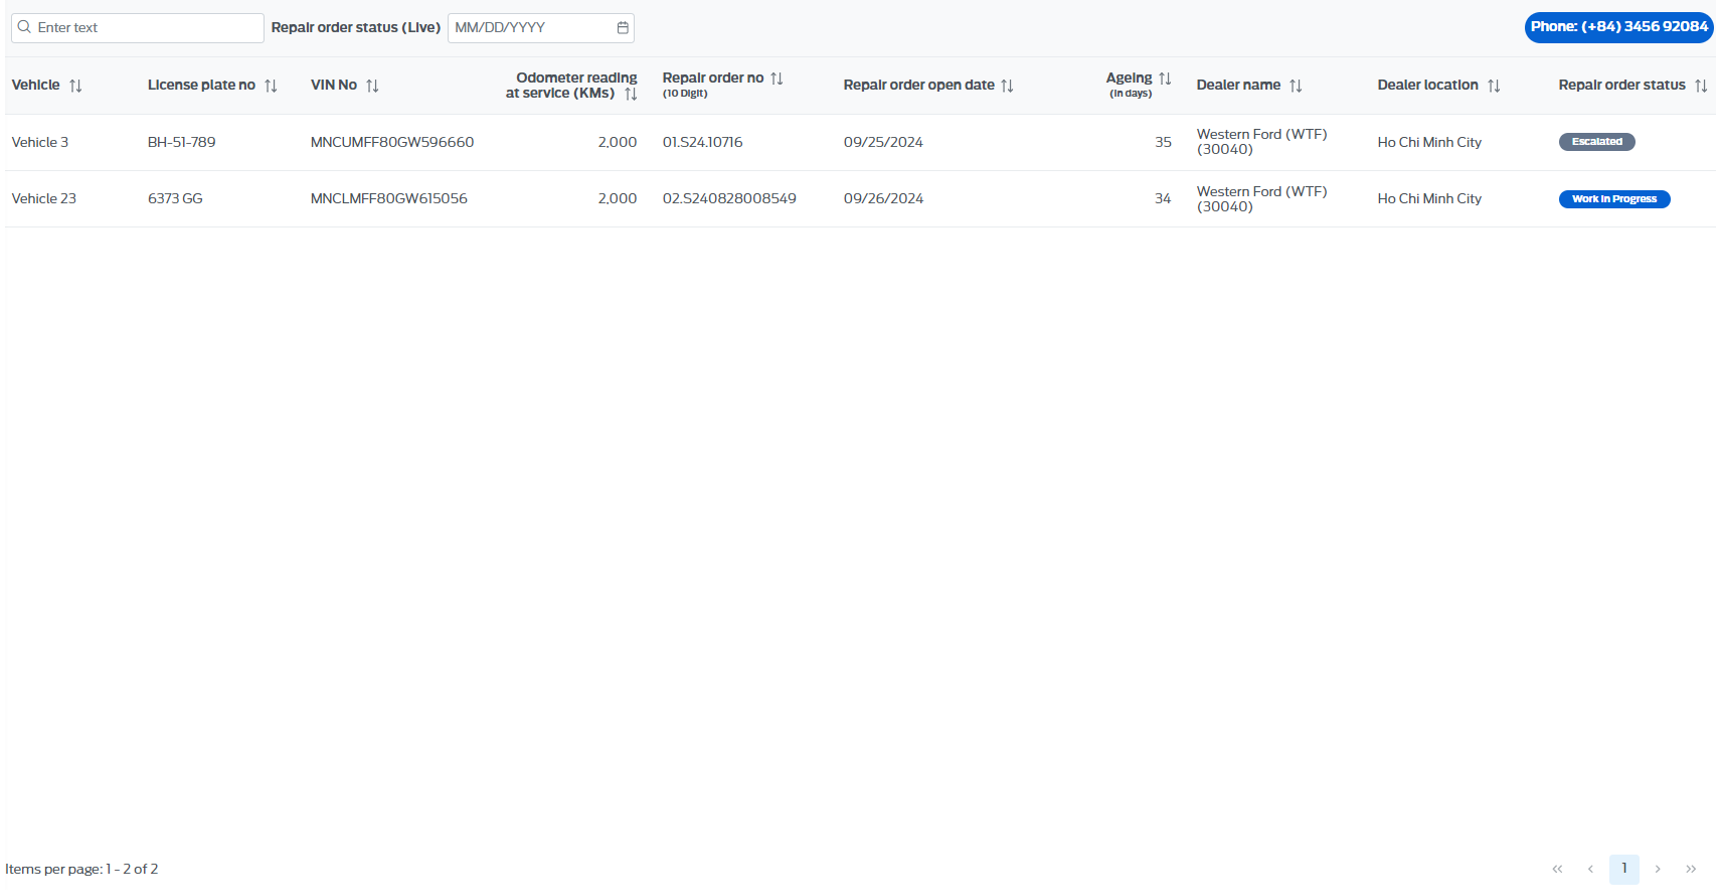
11.2 - Live repair order status
- A place that assists managers/admins in monitoring the vehicle's maintenance/repair process at the dealership.
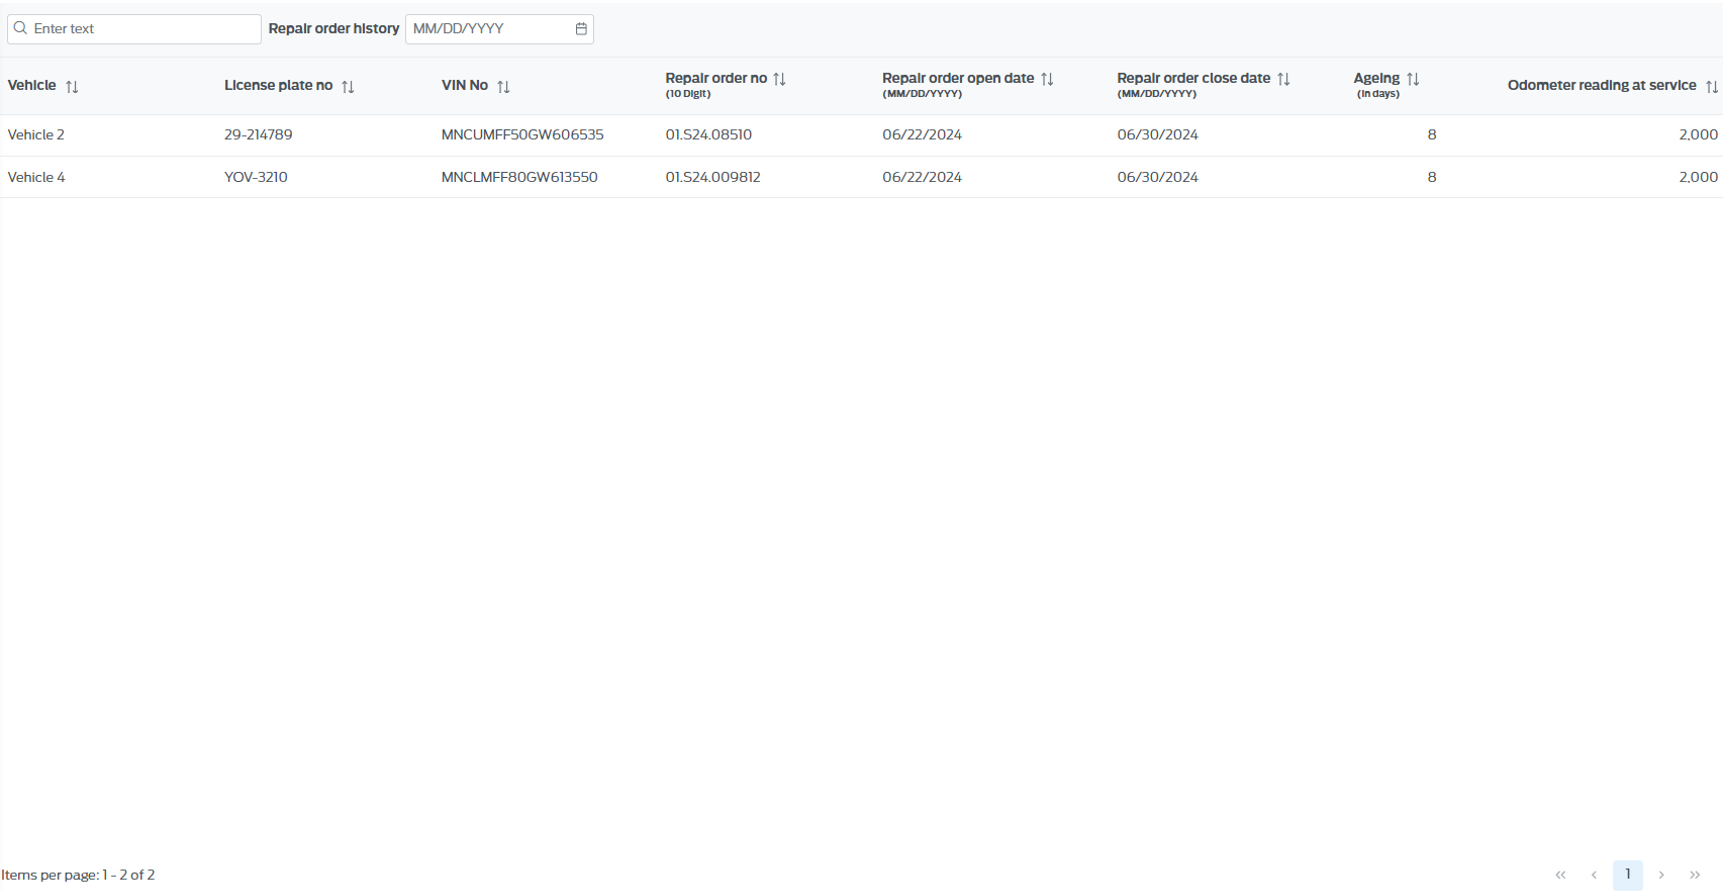
11.3 - Repair order history
- A repository that stores all completed maintenance/repair activities of the fleet.